| C6owners :: Forums :: C6 Support :: The Garage |
<< Previous thread | Next thread >>
|
Another dreaded rusty coolant pipe slowly leaking at present! |
    Please Register to enjoy additional Member Benefits |
| Author | Post | ||
321dave
 
|
|
||
  Member No: #614
Location: Dublin |
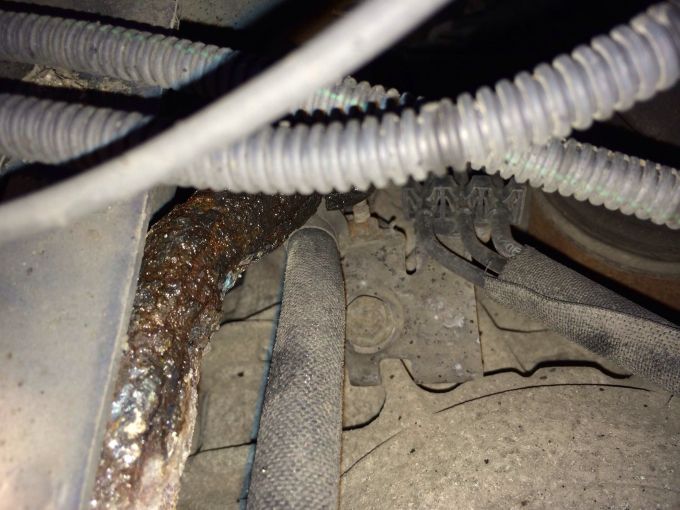
Hi all, I was saving my first post for something that might be of help to others. I really appreciate this website, as everyone else does I'm sure. I'm also another Irl registered C6 as of May this year. It's a 07 C6 in Mauritius blue with beige interior, now with 110000miles. But it's still a lovely car. It's in my hands now a few months and I've started replacing interior trim and parts that made a big difference to the car, and I knew it would need looking after mechanically. been busy doing a lot of late night reading as well and downloading technical docs in preparation for the long term care needed to keep the C6 running properly. But, just before going on holidays with the family recently I decided to have the rear pads and disks replaced and have its annual service completed at my main dealer, to give a little more piece of mind, I knew the various bushings were starting to go at the front as well, but I was very surprised to find the very rusty coolant pipe dripping blue coolant (slowly thankfully) onto the wishbone below. I have now started preparing for the upcoming NCT test after Christmas (especially after finding the pipe) myself. I have attached the rusty pipe picture for people to see below, I know it's a well understood problem from reading and keeping up with the postings here, but I'm still amazed at the main dealer for not noticing the dripping coolant pipe while working on the car, or telling me it had a slow leak. I'm still amazed. Especially since we all know what would eventually have happened!!! I am thankfully a bit technical and have a good range of tools at home. I would like to replace the coolant pipe myself and was wondering if anybody had good information on how best to remove it and achieve a good repair. I'm wondering is getting it out or putting it in the bigger issue? Many thanks if anyone has some sound advice. Very much appreciated. Sorry image loaded sideway, rusty pipe should be to the top of the image.  |
||
|
|
|||
magicands
 
|
|
||
  Member No: #1021
Location: Coventry, Warwickshire |
How did you access this pipe, and I assume its in the drivers side front wheel arch cover, or am I talking rubbish as usual? | ||
|
|
|
||
321dave
 
|
|
||
  Member No: #614
Location: Dublin |
Hi Magicands, the pipe is located on the passenger side inside the wheel arch area, and as G wrote previously on this pipe, it is between the passenger wheel area and the end of the gearbox in the engine bay. You would need to remove the wheel in order to have a good look around and my recent discovery is in very poor condition as the picture shows. Amazingly the pipe in question is totally exposed! The paint finish ( for want of a better word) doesn't last very long I can see again from other posts on here. Kind regards Dave |
||
|
|
|
||
C6Dave
 
|
|
||
    Member No: #1
Location: Northumberland |
OK, thanks to Cruiserphil, there is now a Tutorial on how to change the pipe - Click Here - | ||
|
|
|
||
gmerry
 
|
|
||
  Member No: #21
Location: Scotland |
Hi Phil, nice write-up. I see you also resorted to cutting the pipe: when the car was built this pipe would have been installed before the engine/gearbox. I would be a little nervous of the hose blowing off the end of the pipe. Hence I added a bulge to the pipe (just brazed a copper wire ring around the pipe). Regards G |
||
|
|
|
||
cruiserphil
 
|
|
||
   Member No: #38
Location: Celbridge |
Thanks G, When I was doing the repair I was mindful of your concerns on the pipe ends not being flared which you had posted about at the time. However, I'm pleased to report that I did this repair two years ago and have had no leaks or movement in the flexible pipe. Presumably an advantage is using the OEM spring clips rather than a "jubilee" clip. Like yourself I could not see a practical way of fitting the pipe in one piece. Regards, Phil C. P.S. Apologies to the forum that it took so long to complete the "tutorial." |
||
|
|
|
||
gmerry
 
|
|
||
  Member No: #21
Location: Scotland |
Hi Phil, looks like your combination of hose and spring clamps works so this would be least amount of work for anyone else repairing this particular problem. Nice write-up. Regards G |
||
|
|
|
||
magicands
 
|
|
||
  Member No: #1021
Location: Coventry, Warwickshire |
The tutorial is excellent but the job is not for the faint hearted & I doubt I have the skill or equipment to undertake such a task. |
||
|
|
|
||
cruiserphil
 
|
|
||
   Member No: #38
Location: Celbridge |
Magicands, That's a fair honest comment. For those that wouldn't tackle it I at least hope that as a result of the post they won't be talked into subframe lowering and such horrors with commensurate price tag if the pipe ever needs to be replaced. Regards, Phil C. |
||
|
|
|
||
gmerry
 
|
|
||
  Member No: #21
Location: Scotland |
Hi Phil, whilst on the subject of leaking pipes, have you had to replace any of the power steering pipes/hoses? | ||
|
|
|
||
C6Dave
 
|
|
||
    Member No: #1
Location: Northumberland |
cruiserphil wrote ... That's a fair honest comment. For those that wouldn't tackle it I at least hope that as a result of the post they won't be talked into subframe lowering and such horrors with commensurate price tag if the pipe ever needs to be replaced. Yes, for those without the skills or tools, just print off the guide and take it to a competent local garage for assessment. |
||
|
|
|
||
cruiserphil
 
|
|
||
   Member No: #38
Location: Celbridge |
G, No I haven't. They are damp in places but they don't seem to consume LDS. I know they have a tendency to fail suddenly but the dampness has been consistent and hasn't worsened on the cars since we got them, one of which we have 5 years now. Incidentally, I heard suggestion that subframe lowering may be required to replace theses hoses!!! On the subject of cooling leaks, I have a radiator to change on one of the cars which requires the front bumper assembly to be removed. There is a good Citroen document on the radiator change but I'll take photos and document the task anyway! It won't be for a few weeks as my garage entrance is being heightened to accommodate our latest vehicle! Regards, Phil C. |
||
|
|
|
||
jon_viola
 
|
|
||
 Member No: #1829
Location: Sussex |
This seems to be a safety issue to me. Imagine if it goes and your stranded in a dangerous place... Surely a safety recall needs to be enacted. |
||
|
|
|
||
dsharples
 
|
|
||
  Member No: #119
Location: Woodbridge |
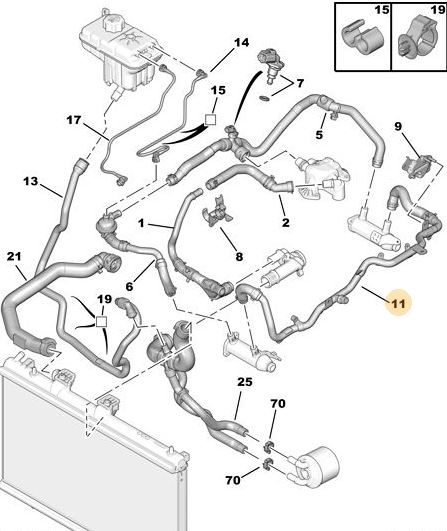
I assume the coolant pipe is Part 11 in the diagram. Part no. 1351KW? Is there any way to inspect it from the top of the car, or under the car (with the under-shield removed). Given everyone seems to have to cut the tube, could the part be completely remade using standard tubing from someone like viperperformance (other companies are available). Probably better just to cut and patch the tube I guess... |
||
|
|
|
||
gmerry
 
|
|
||
  Member No: #21
Location: Scotland |
Hi Dave, I suggest you are looking at the wrong drg. I get part number 6466PH (for a 2.7HDi). Inspection has to be from below the car. Just look at the gap between gearbox and fender. Regards G |
||
|
|
|
||
Go to page >>
|
|
 User Colour Key: User Colour Key:Head Administrator, Administrator, C6 owner, Technical Expert, C6 Premier Discount Club |
|