| C6owners :: Forums :: C6 Support :: Car Care and Maintenance Tips |
<< Previous thread | Next thread >>
|
External Temperature Sensor Replacement |
    Please Register to enjoy additional Member Benefits |
| Author | Post | ||
markp
 
|
|
||
 Member No: #1746
Location: Somerset |
I've just replaced the outside temperature sensor which is contained in the right hand door rear view mirror housing. As I couldn't find a good resource for this process, here it is: Note that the photo shows the mirror housing, with my hand holding the mirror facing down in front of it. Also note that this mirror has a parts diagram for it on this site and is labelled as the non-hdi 3.0 mirror (my car is a 3.0 petrol): - Click Here - I don't know if other cars use a different mirror. Using the electrical controls, move the mirror glass so that it is facing downwards as far as it will go and it is centred from side to side. Poke a flat bladed screwdriver in through the top (open) edge between the housing and the mirror glass. In the photo I have identified the tabs (the bottom two orange spots in the image) on the back of the mirror glass that need to be prised back ever so gently - you can only reach the top two (the bottommost two in the image). Note that the tabs have fake tabs (without the latch bit of plastic) right next to them. You may wish to try prying the two plastic ears (the topmost orange spots in the picture) away from the mirror glass back. Once you have released the mirror glass at the top, simply pulling the glass away gently will release the bottom tabs, leaving you with what you see in the photo. Now you need to release the back cowling of the mirror (the nicely curved exterior part - you can see a seam line around this where the cowl meets the main assembly which continues the nicely curved shape). The cowling has four tabs that poke through toward the mirror side of the assembly, holding the cowl in place. To release the cowl push each of the four tabs (marked with yellow spots) toward the yellow spot I have shown next to each tab, whilst pulling on the cowl from the outside. You will slightly damage the tabs doing this, but this doesn't matter. You can only move the centre of the tabs, so that they can slide back (away from you) over a latch that holds each one in. You may need to put a flat bladed screwdriver between the cowl and the part of the cowl that is part of the fixed mirror assembly to lever the cowl away as you release the tabs. To complete pulling the cowl off, you may wish to retract the mirror assemblies by locking the car - this will enable you to pull the cowl off more easily as part of the assembly next to the main hinge gets in the way of the cowl. Once the cowl is off you can pull the temperature sensor out of its slot. Cut the two wires going to the temperature sensor, quite near the sensor (say 1 or 2 cm) so that you have a reasonable amount of cable left to play with. Strip the wire ends. Strip the wire ends on the new sensor (I purchased a 6445F9 from China on ebay). Splice the two sensor wires to the two wires on the car. I put heat shrink onto the wires first so that I could slide it over the joint and shrink it. I soldered the wires once I had spliced them. Reassembly is the reverse of disassembly, just quite a bit easier and quicker! Start your C6 and discover that it is a balmy 7C, rather than the -3C that you thought it was!  If you have any corrections for the above, please post and I will edit the above as appropriate. Cheers, Mark 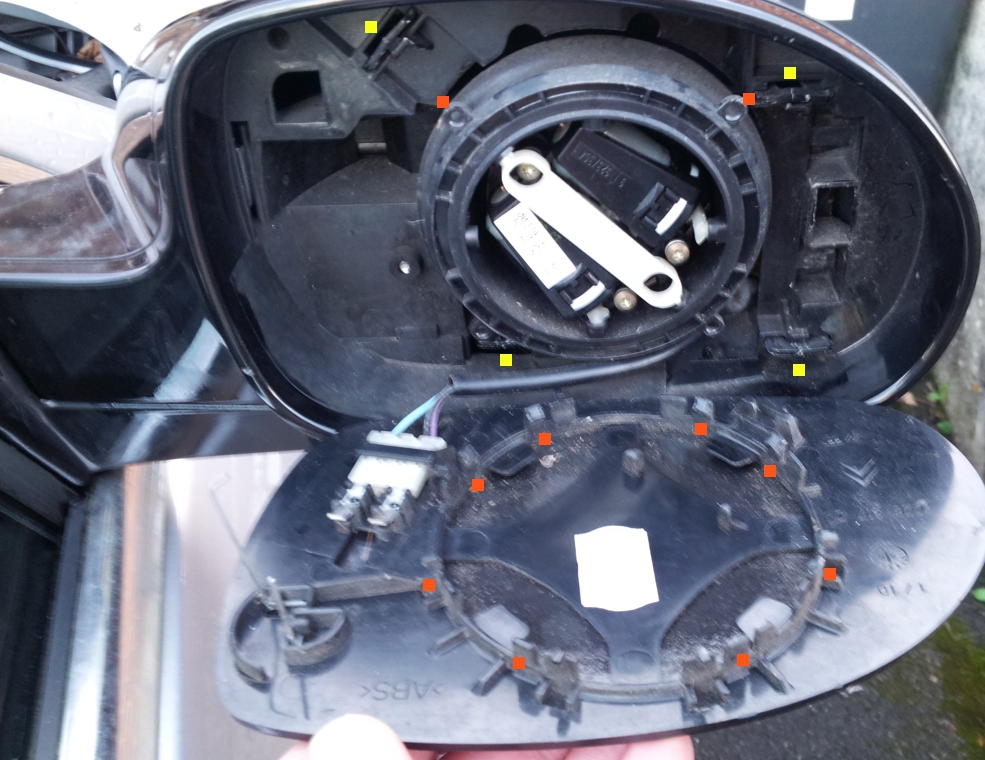 |
||
|
|
|||
|
C6Dave
|
|
||
    Member No: #1
Location: Northumberland |
markp wrote ... I don't know if other cars use a different mirror. The mirrors are all the same apart from those on the 3.0 HDi which are larger, but function in the same way
|
||
|
|
|
||
|
Sevenman
|
|
||
 Member No: #2241
Location: Herefordshire |
I should be having a go at this on Friday, having just ordered a replacement part for not many £ from ebay. Reading a similar thread for a C5 it mentioned using a hair dryer to warm some of the tabs and make them more flexible, which I will try. I will be doing this at my local garage who are French car specialists but don't want to do the dismantling themselves - I guess the risk of them damaging it, and needing replacement (I wonder how many £?) is too high. Whereas if I do the dismantling, then it is on me... |
||
|
|
|
||
|
e3steve
|
|
||
 Member No: #1163
Location: Warsash, Hants & Palma de Mallorca, Spain |
Sevenman wrote ... I seem to recall that a replacement door mirror is circa £700...I should be having a go at this on Friday, having just ordered a replacement part for not many £ from ebay. Reading a similar thread for a C5 it mentioned using a hair dryer to warm some of the tabs and make them more flexible, which I will try. I will be doing this at my local garage who are French car specialists but don't want to do the dismantling themselves - I guess the risk of them damaging it, and needing replacement (I wonder how many £?) is too high. Whereas if I do the dismantling, then it is on me... |
||
|
|
|
||
|
Sevenman
|
|
||
|
Member No: #2241
Location: Herefordshire |
e3steve wrote ... I seem to recall that a replacement door mirror is circa £700... That focuses the mind... I can handle paying £££ for major items, but that is a lot for a mirror. Any ideas on how I can reduce the risk of this operation? |
||
|
|
|
||
|
e3steve
|
|
||
|
Member No: #1163
Location: Warsash, Hants & Palma de Mallorca, Spain |
Sevenman wrote ... I've only swapped one out, complete, myself; but I'd say markp's tutorial looks to be sewn up pretty tight from his experience...Any ideas on how I can reduce the risk of this operation? Good luck! |
||
|
|
|
||
|
Sevenman
|
|
||
|
Member No: #2241
Location: Herefordshire |
Temperature sensor replacement complete, with a bit of zero-cost assistance from my local specialist. If somebody did this frequently, I think it would be a 10 minute job. In this case it took ~ 30 mins. Prying the mirror glass went ok, it seems that a good pull from the top did it without prying the clips which was proving tricky even having tilted the mirror down for access. A caution if removing the connector that supplies heat to the glass. There is an extra clip behind the white connector (flush with the plastic mirror back) that you can end up breaking, as we did. This doesn't seem to be an important connector though and I am sure the connector will stay in through friction. Getting the plastic case off the back of the mirror is tricky, especially as there isn't an easy way to pull at it - try to grip and it is hard to avoid pushing it back rather than pulling. Using a prying tool at the top we worked from the stem-end of the mirror outwards, assisted by a screwdriver to release the tabs, which are quite stiff. We did this without breaking any of them. With the case off, the sensor unclips from the bottom. We cut the wires near the old sensor, and then kept about 2 inches of the new sensor wire, it is easy to tuck a bit extra away. The wires were spliced, soldered, heat shrinked and then the sensor re-insered. Ignition on showed 30C (but we had been using hot air nearby), dropping to 20C after I fanned some air over the sensor. Fitting the case and then mirror back on only took a few seconds. Having driven the car, the temperature agrees with the weather forecast (~ 15C) rather than the -6C it was showing on the way over to the garage. The £10 6445F9 sensor off ebay seems to work, so no need to spend the £30 on a Citroen spec sensor (which is probably made in China anyway). Now that the car thinks it is above freezing outside, the air-con gets a chance to work - I had no idea if there would be gas in the system. It was re-gassed by the previous owner in July last year (2014), but if the outside sensor had failed some time ago then the air-con wouldn't have worked and gas would have escaped. Thankfully it now seems to work - blowing cold air when requested, and cold enough that, when directed towards the windscreen, I could get condensation on the outside, so the air from the vents must be well below ambient temp. Many thanks to markp for the writing guide, I wouldn't have had the confidence to do this without the detailed description and picture. Some of my own pictures below. Original sensor, removed from its holder 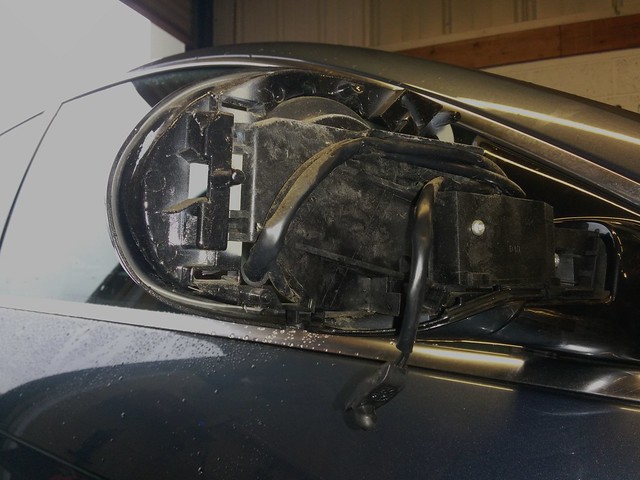 Inside the wing mirror with the back removed 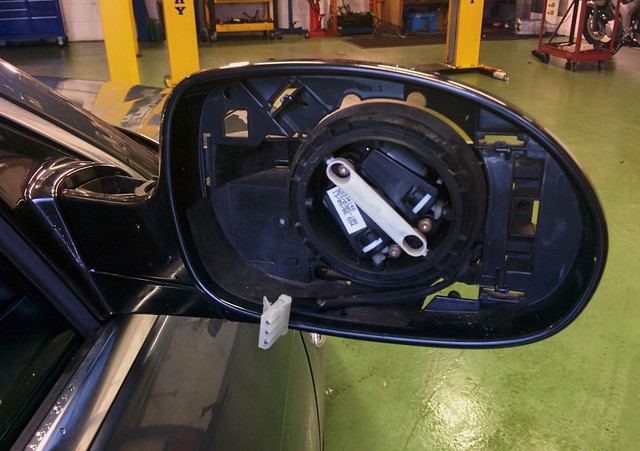 The back of the wing mirror - note the broken bit of plastic at the top left where we removed the connector without releasing it  The back case of the mirror - 4 main tabs that need releasing, plus an extra on the stem close to the car  The new sensor in place 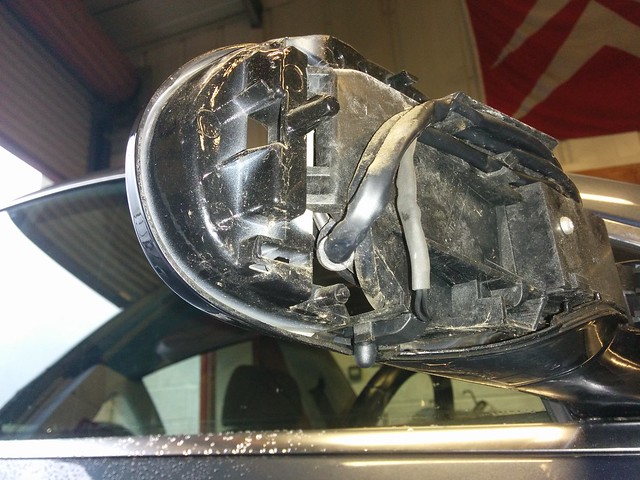
|
||
|
|
|
||
|
e3steve
|
|
||
|
Member No: #1163
Location: Warsash, Hants & Palma de Mallorca, Spain |
Sevenman wrote ... That will be the signal cable from the ECU that controls the photochromic reactions for auto-dimming....... A caution if removing the connector that supplies heat to the glass. There is an extra clip behind the white connector (flush with the plastic mirror back) that you can end up breaking, as we did. This doesn't seem to be an important connector though and I am sure the connector will stay in through friction. |
||
|
|
|
||
|
e3steve
|
|
||
|
Member No: #1163
Location: Warsash, Hants & Palma de Mallorca, Spain |
Great post(s) and tutorial! ("That's a job well done there, Billy" -- no prizes for getting the TV-film from where that quote comes...) | ||
|
|
|
||
|
Cisco
|
|
||
 Member No: #1429
Location: Glasgow |
Great info, I had thought that the temp sensor was on the windscreen! | ||
|
|
|
||
|
Sevenman
|
|
||
|
Member No: #2241
Location: Herefordshire |
e3steve wrote ... That will be the signal cable from the ECU that controls the photochromic reactions for auto-dimming... I didn't know the wing mirrors did that - the rear view mirror seems to auto-dim, which on my driving so far has worked well. I assumed the connector was a power supply for heating the glass, maybe there is a way it can do both. Also, I had meant to say it didn't look like an important clip, rather than important connector - at least I hope that is the case now I have broken it... There was plenty of friction as well as the side clips to keep it in place. |
||
|
|
|
||
|
C6Dave
|
|
||
|
Member No: #1
Location: Northumberland |
Cisco wrote ... Great info, I had thought that the temp sensor was on the windscreen! No, that is the rain sensor for the wipers....... |
||
|
|
|
||
cruiserphil

|
|
||
 Member No: #38
Location: Celbridge |
Sevenman, Thanks for recording this work for the forum. Brst regards, Phil C. |
||
|
|
|
||
 User Colour Key: User Colour Key:Head Administrator, Administrator, C6 owner, Technical Expert, C6 Premier Discount Club |
|
Privacy Policy | Cookie Policy | Site Disclaimer | Contact Details | Warranty | Sitemap | C6 Insurance | Quick Facts | Re Call Info | Downloads | Error Codes
| Site and Graphics created by: C6Dave Forum Icons by Axialis Emotes by Seb | 
|


