| C6owners :: Forums :: C6 Support :: The Garage |
<< Previous thread | Next thread >>
|
HID Bulb Replacement |
    Please Register to enjoy additional Member Benefits |
| Author | Post | ||
smihaialex
 
|
|
||
  Member No: #1031
Location: Bucharest |
Hey guys, So, I changed the bulbs myself yesterday. Yaaay! I also managed to fix the issue where the left hand side headlight would go out while turning corners with directional headlights enabled... Double yaaay!  Findings: - the operation can be done by one man, no problem (obviously) - the documentation on the Citroën Service website is not entirely accurate... To be more speciffic, on the doc detailing taking off the bumper, it lists the need to take off the deflector by unclipping the clips marked (a) which I found unnecessary, but it says nothing about the wheel arch plastic linning which needs to be taken off by unscrewing 2 T25 bolts on each side in order to be able to reach the screw marked as (1), also it lists some 12 T25 screws to be taken off from underneath, 6 on each side, when in fact there are only 4 on each side, so 8 in total, Then it lists 3 clips to be unclipped on each side of the bumper, when in fact there are only 2... Also, on the doc listing taking off the headlight it doesn't say that you need to also unclip and take off the front side lateral plastic triangular lining items, which in fact you do have to unclip and take off, if not for taking the headlight out, then surely for disconecting the electrical cable. Also, there is another piece of plastic with a widehead T25 bolt located above the frontmost bolt of each headlight, that is not featured in the doc and that you might or might not have to unscrew and take out in order to be able to then take off the headlight (I didn't)... Replacing the bulbs themselves is not that easy either... Once you open the large rubber cap in the back of the headlight, you're supposed to see the back of the socket, but the socket is made up of 2 pieces - a squarish red part and a grey round part - you're supposed to take off the red part by turning some 30 degrees anti-clockwise, then do the same with the round grey thing and then the bulb comes out effortlessly... In my case, the red part seemed to be stuck to the grey part and the bulb itself in turn stuck to them and they all came out together and it took some time to figure out how to undo them without ruining the bulb - unfortunately the bulb didn't survive this exercise...  - OEM bumbs are Osram Xenarc Original - the design of the headlamp itself is a bit of a masterpiece - there's a lot of rust going on - I broke a tubular screwdriver unscrewing the 3rd bolt of each headlight, located underneath the rearmost part of the headlight, above the wheel arch... I soaked all screws in Total LiCa grease, but I don't know if there will be any long term benefits... I hope so! But I also hope to not have to do this again anytime soon... As for the issue... How did I fix it?!? Well, what I had observed was that it acted up more when hot outside and when driving for longer... I figured heat - dilation - bad contact, right?!? So, I took a can of contact spray to all the contacts, and also mechanically adjusted the contact points inside each headlight's bulb socket... But I also think that the fact that the bulb that was stuck to the socket was the left one, i.e. the same one that was acting up, is no coincidence... Another funny thing, the whole operation was carried out with the battery disconnected, right?!? When connecting back, some initialisations had to be made, such as the sunroof's & the windows' pinch mode, but the one thing that was not functioning was the TPMS - none of the sensors were visible and the display was flashing each wheel in orange and displaying -- next to each wheel... But I knew that they were supposed to program themselves after a short drive and sure enough, the display went from -- to OK on all four wheels after some 2-3 minutes of driving at speeds of 30 mph or more All in all, a good day at the 'office'... Cheers, Sam 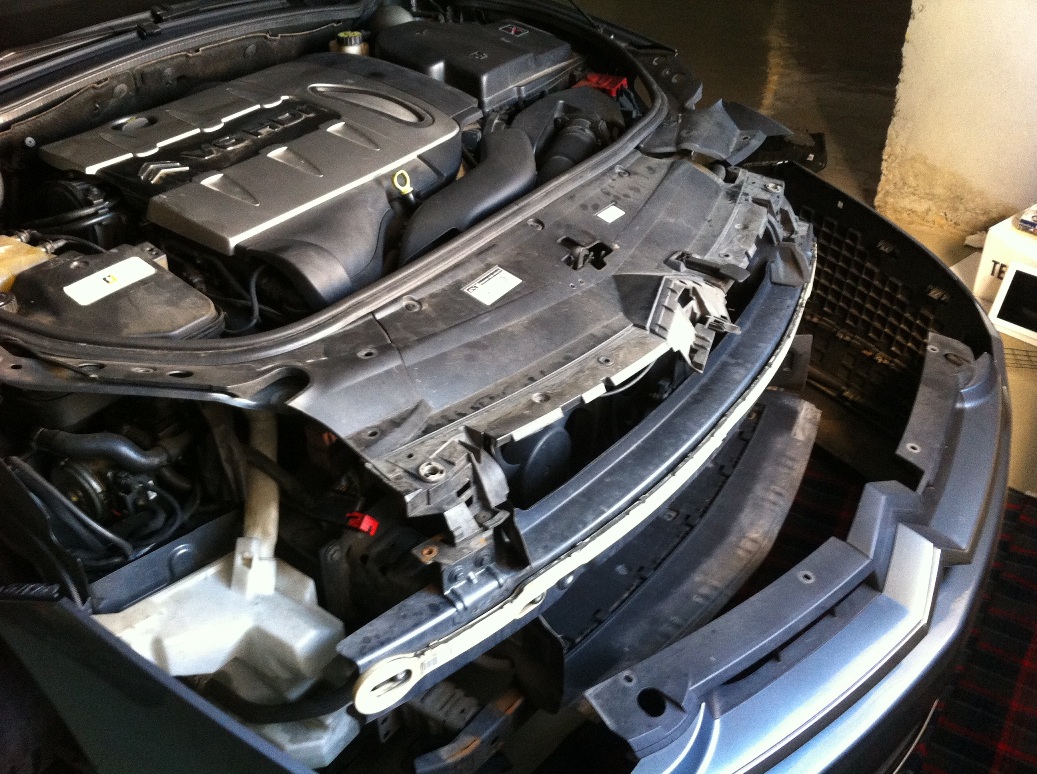 |
||
|
|
|
||
|
smihaialex
|
|
||
|
Member No: #1031
Location: Bucharest |
Hey guys, Quick update: switching the bulb igniter bases between them also fixed the left hand side bulb occasionally going out while directional headlights feature was activated. Thank you. Best, Sam |
||
|
|
|
||
|
smihaialex
|
|
||
|
Member No: #1031
Location: Bucharest |
Another quick update: the fix only lasted for a week  Will investigate further... Yours, Sam |
||
|
|
|
||
gmerry

|
|
||
   Member No: #21
Location: Scotland |
Hi Sam, I think we have covered this before but are you sure fault does not originate with connections between ignitor, headlight wiring connector and the bulb? I had a wrestle with this and I think was very lucky to assemble in the wrong order such that everything is very tight. I would recommend buying a spare grey ring first as one needs to use a little force: a hunt on the net should yield a spare out of a Mercedes S class. Regards G NB, your problems in using directional headlight function do very strongly suggest a loose connection |
||
|
|
|
||
|
smihaialex
|
|
||
|
Member No: #1031
Location: Bucharest |
Hey G, Thanks for your message, my feeling is the same. I risked a finger or two by taking off the rubber cap off the headlight that's acting up and pulling on the wires and moving stuff around and nothing, the bulb remained lit... What do you recommend that I do next? Thanks, Sam |
||
|
|
|
||
|
gmerry
|
|
||
|
Member No: #21
Location: Scotland |
My recommendation would be to refit the bulb, ignitor and connector, making sure they are very tight. Use my description as a guide. Have a spare retaining ring to hand in case of breakage. Failing that, refit with a new bulb, new ignitor, new ballast etc one at a time. Good luck OR, just use the headlights without Directional mode |
||
|
|
|
||
bencikas

|
|
||
 Member No: #2576
Location: Jonava |
Hello all, i changed xenon hid bulb without taking off bumber or doing any other hard stuff. 1) take of plastic cover from top of headlamp 2) take off back ruber cap 3) disconect wire from electric starter, then take starter, push it a bit and turn left 4)you find plastic round ring which holds bulb in the place, it should be removed the same way, turn it left and now you have this ring and xenon bulb in your hands. putting the new one in the place its the same easy. all work takes maximum 10 minutes. step by step photos:       besides in local market i bought 2 analogs for 26 euros, when we have original philips at cost 72 euros 1 pcs  at least these cheap bulbs will work for 1-2 years. at least these cheap bulbs will work for 1-2 years.
|
||
|
|
|
||
klu

|
|
||
 Member No: #2779
Location: Gliwice |
Thank you, Benas! I replaced both xenon bulbs relatively easily with your guide. The right hand side was a little pain because the LDS tank limits the space for work, but after 20 minutes of struggle the bulb and starter sit on their place and all is working fine. 
|
||
|
|
|
||
|
Jarecki
|
|
||
  Member No: #2069
Location: Poznan |
So I see it is popular reppair in the winter Both bulb replacement I did couple days ago together with my friend - 40min, obviously bumper had to be unsrewed. Easy, but time consumming. We decided to do it to avoid some mistakes doing complicated surgery with bumper on. A fev years ago, in my last C5 `06 I could replace it just using special long and thin surgeon clips without dismantling many parts - just battery out. Now the light seems to be better (4300K, Xensation TM GE. Price 40euros both incl VAT)
|
||
|
|
|
||
Bliek73

|
|
||
 Member No: #3264
Location: UTR |
One of mine was failing and I ordered from AliExpress a set of D2S and they work fine. The pair was EUR 3,99. So maybe they last only short but I thought it was worth a try. Upon arrival one was cracked So I got half the money back. So I now replaced the right one (the most difficult on) That's now nice 4300K. The left one is Pinkish. I am waiting for the next batch to be delivered and will then also replace the left one. I might post you a pic! | ||
|
|
|
||
Go to page <<
|
|
 User Colour Key: User Colour Key:Head Administrator, Administrator, C6 owner, Technical Expert, C6 Premier Discount Club |
|
Privacy Policy | Cookie Policy | Site Disclaimer | Contact Details | Warranty | Sitemap | C6 Insurance | Quick Facts | Re Call Info | Downloads | Error Codes
| Site and Graphics created by: C6Dave Forum Icons by Axialis Emotes by Seb |  |

