| C6owners :: Forums :: C6 Support :: Super Sticky |
<< Previous thread | Next thread >>
|
Diesel Additive for DPF Filter not Required for C6 |
    Please Register to enjoy additional Member Benefits |
| Author | Post | ||
321dave
 
|
|
||
  Member No: #614
Location: Dublin |
Many thanks for the link Steve to your excellent tutorial, that's very helpful indeed, should I potentially purchase any particular item that might break along with the two tanks. I'm thinking the items marked in red as brittle are the pipes or unions that broke on you that time? I was thinking today that a 2007 C6 must of had some previous work to these areas of the coolant circuit. I wouldn't think it possible not to have had a problem yet? I wonder had these tanks been replaced before now? How could you tell if the outlet or inlet tanks had been replaced already? Any kind of give away signs. I guess some tool markings on the items and surrounding area might be one way of checking. |
||
|
|
|
||
e3steve

|
|
||
 Member No: #1163
Location: Warsash, Hants & Palma de Mallorca, Spain |
321dave wrote ... Each coloured piece of text refers its respective arrow(s). Red doesn't particularly denote anything, regarding brittleness; just assume that any plastic part will break from merely being given a stern look...Many thanks for the link Steve to your excellent tutorial, that's very helpful indeed, should I potentially purchase any particular item that might break along with the two tanks. I'm thinking the items marked in red as brittle are the pipes or unions that broke on you that time? I was thinking today that a 2007 C6 must of had some previous work to these areas of the coolant circuit. I wouldn't think it possible not to have had a problem yet? I wonder had these tanks been replaced before now? How could you tell if the outlet or inlet tanks had been replaced already? Any kind of give away signs. I guess some tool markings on the items and surrounding area might be one way of checking. The tiny plastic swirl-valve pipes will probably break off inside the rubber couplers, but they can be re-used as long as the broken bits are removed from said couplers. If you follow my advice regarding a right-angled pick and soap solution to unstick the rubber from the plastic then you may succeed in not snapping off the ends of the pipes. Don't bend any plastic piping; it will snap! The little swirl pipes should be pulled out straight from the couplers -- not twisted or orbited. Possibly the only exception regarding any slight bending of pipework is the diesel supply and return lines which are parted via the push button couplings above the throttle butterfly housing (air metering unit); these pipes -- the pair from/to the fuel tank -- appear to be polypropylene and, thus, are more flexible. The couplings are parted by pressing the two buttons together. The same type of coupling is used thoughout the fuel system. You need to decouple some of these, around the coolant outlet tank and in order to remove it, from the fuel heat exchanger, found in the middle of the vee and to the right of the coolant tank (looking from where you'll be working from at the front of the car). These pipes, once decoupled, can be lifted clear of the working area, still attached at the fuel filter end of the engine, as they pivot on their unions to the filter itself. The bigger issue is to be very aware of the fuel return junction at the fuel temp sensor, nesting in the cleavage of the Y-split! If you're anything other than very gentle with that junction then the likelihood of snapping those three pipes is extreme! It's not a desperately expensive assembly but is a right hassle to change!! The rear bank is by feel alone. The return pipe hops from the rearmost injectors of each bank to their neighbours and they meet at the fuel temp sensor. Be very gentle with this assembly when moving it around in order to allow the removal and refitting of the coolant tank... |
||
|
|
|
||
|
321dave
|
|
||
|
Member No: #614
Location: Dublin |
That's great Steve, that's a very good tutorial I've read through it about 5 times now, and I can really see the pipe work is complicated, and as you say brittle from 100000mls plus of heat at this stage. I think I'll buy a few extra bits just in case, I'm slow and careful enough, but things have broken on me before even when I was applying very little force. Better to have ordered some back than up parts than be stuck with the car of the road waiting something small. | ||
|
|
|
||
|
C6Dave
|
|
||
  Member No: #1
Location: Northumberland |
321dave wrote ... Better to have ordered some back than up parts than be stuck with the car of the road waiting something small. 'Murphy's Law' still applies though 
|
||
|
|
|
||
|
e3steve
|
|
||
|
Member No: #1163
Location: Warsash, Hants & Palma de Mallorca, Spain |
Admin Dave wrote ... You're not wrong, Admin Dave!321dave wrote ... Better to have ordered some back than up parts than be stuck with the car of the road waiting something small. 'Murphy's Law' still applies though 321dave: if you find you need to replace the fuel return pipe ass'y, be sure to also get yourself some retaining clips which hold the unions to the injectors. They have a nasty habit of pinging off somewhere into the ether! |
||
|
|
|
||
|
321dave
|
|
||
|
Member No: #614
Location: Dublin |
e3steve wrote ... Admin Dave wrote ... You're not wrong, Admin Dave!321dave wrote ... Better to have ordered some back than up parts than be stuck with the car of the road waiting something small. 'Murphy's Law' still applies though 321dave: if you find you need to replace the fuel return pipe ass'y, be sure to also get yourself some retaining clips which hold the unions to the injectors. They have a nasty habit of pinging off somewhere into the ether! Hi Steve, You mention retaining clips? I'll have another look for them in the tutorial. Funny thing I'm going to replace the coolant tank and get the new cap as well, but I came across the posting for the level senior again. Never new it ever was fitted to a C6! |
||
|
|
|
||
|
e3steve
|
|
||
|
Member No: #1163
Location: Warsash, Hants & Palma de Mallorca, Spain |
321dave wrote ... I've never alluded to these clips, Dave. I only did that job the once, when I changed out the coolant tank in April '13. It was my own fault as I wasn't aware of how delicate that fuel return assembly would be. Had I known then I'd have been more careful.Hi Steve, You mention retaining clips? I'll have another look for them in the tutorial. Funny thing I'm going to replace the coolant tank and get the new cap as well, but I came across the posting for the level senior again. Never new it ever was fitted to a C6! I'm sharing the experience and hoping that you'll all learn from my mistakes... |
||
|
|
|
||
|
321dave
|
|
||
|
Member No: #614
Location: Dublin |
e3steve wrote ... 321dave wrote ... I've never alluded to these clips, Dave. I only did that job the once, when I changed out the coolant tank in April '13. It was my own fault as I wasn't aware of how delicate that fuel return assembly would be. Had I known then I'd have been more careful.Hi Steve, You mention retaining clips? I'll have another look for them in the tutorial. Funny thing I'm going to replace the coolant tank and get the new cap as well, but I came across the posting for the level senior again. Never new it ever was fitted to a C6! I'm sharing the experience and hoping that you'll all learn from my mistakes... Many thanks Steve, every little bit of advice really helps. I'm still waiting for the belts kit and I'll have the new outlet and inlet coolant tanks by this Tuesday. Hope to get gooing as soon as all the parts finally arrive, but still putting the parts & tools together. |
||
|
|
|
||
|
321dave
|
|
||
|
Member No: #614
Location: Dublin |
321dave wrote ... e3steve wrote ... 321dave wrote ... I've never alluded to these clips, Dave. I only did that job the once, when I changed out the coolant tank in April '13. It was my own fault as I wasn't aware of how delicate that fuel return assembly would be. Had I known then I'd have been more careful.Hi Steve, You mention retaining clips? I'll have another look for them in the tutorial. Funny thing I'm going to replace the coolant tank and get the new cap as well, but I came across the posting for the level senior again. Never new it ever was fitted to a C6! I'm sharing the experience and hoping that you'll all learn from my mistakes... Many thanks Steve, every little bit of advice really helps. I'm still waiting for the belts kit and I'll have the new outlet and inlet coolant tanks by this Tuesday. Hope to get gooing as soon as all the parts finally arrive, but still putting the parts & tools together. 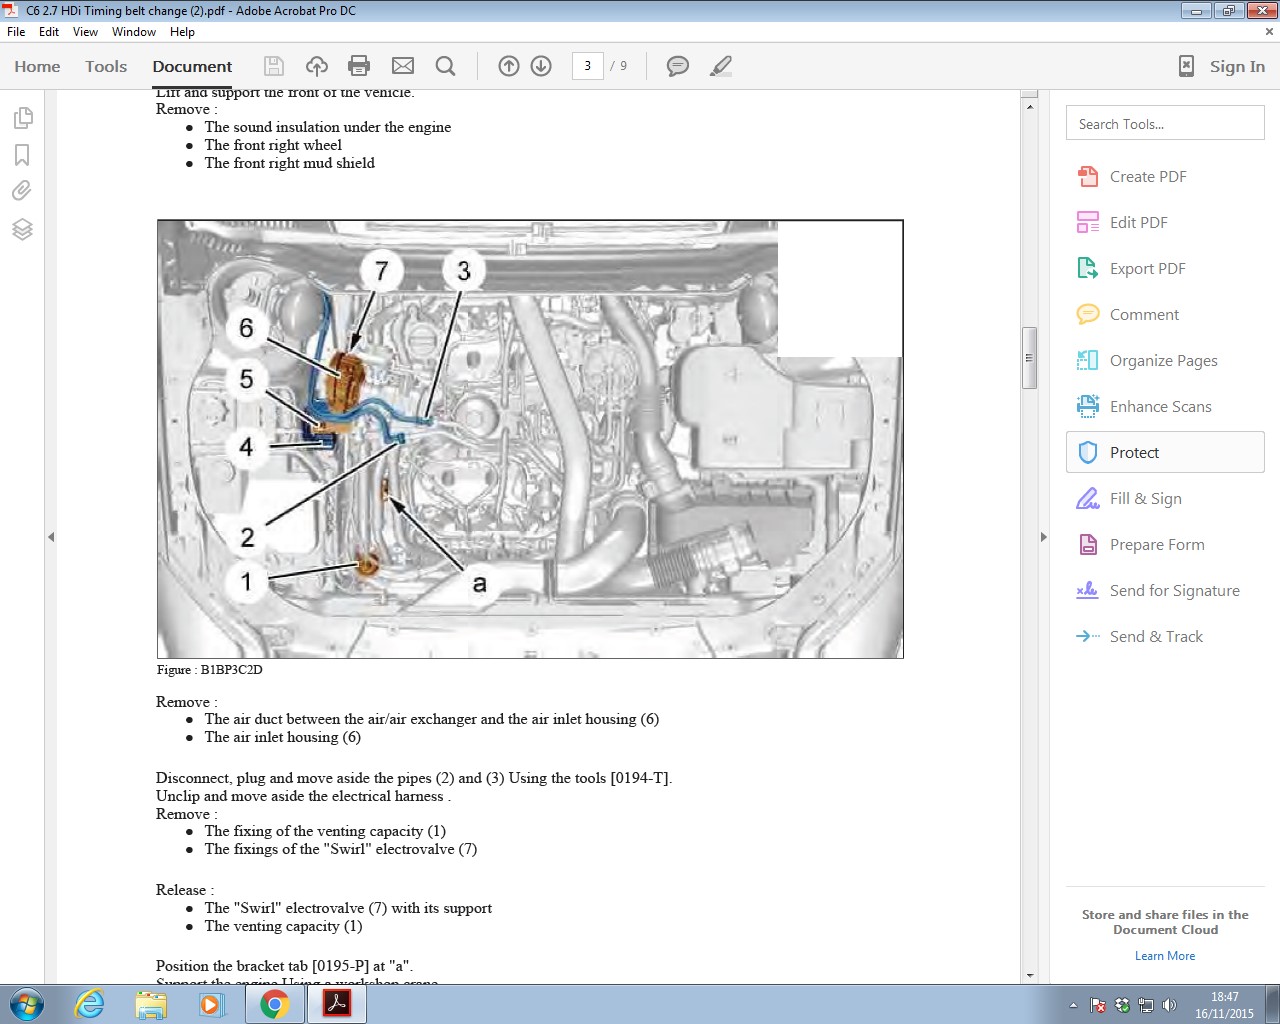 Hello again Steve, well I've finally got a window of time to start the timing belt job this Saturday! I was just wondered are the blue fuel pipes above mentioned in the timing belt PDF download the pipes that you had trouble with/broke when you were replaced your timing belt recently? Thanks again for the help Steve |
||
|
|
|
||
|
e3steve
|
|
||
|
Member No: #1163
Location: Warsash, Hants & Palma de Mallorca, Spain |
321dave wrote ... I was just wondered are the blue fuel pipes above mentioned in the timing belt PDF download the pipes that you had trouble with/broke when you were replaced your timing belt recently? No Dave, those are the fuel feed and return pipes; they're pretty flexible and they really don't seem to mind being manhandled. However, the very small-bore tubes for the swirl valve systems are delicate and brittle where indicated (!), and the fuel return pipework from the two banks' injectors is very brittle indeed, particularly where indicated (!!) where the pipes meet the fuel temp sensor (red connector in the image below): 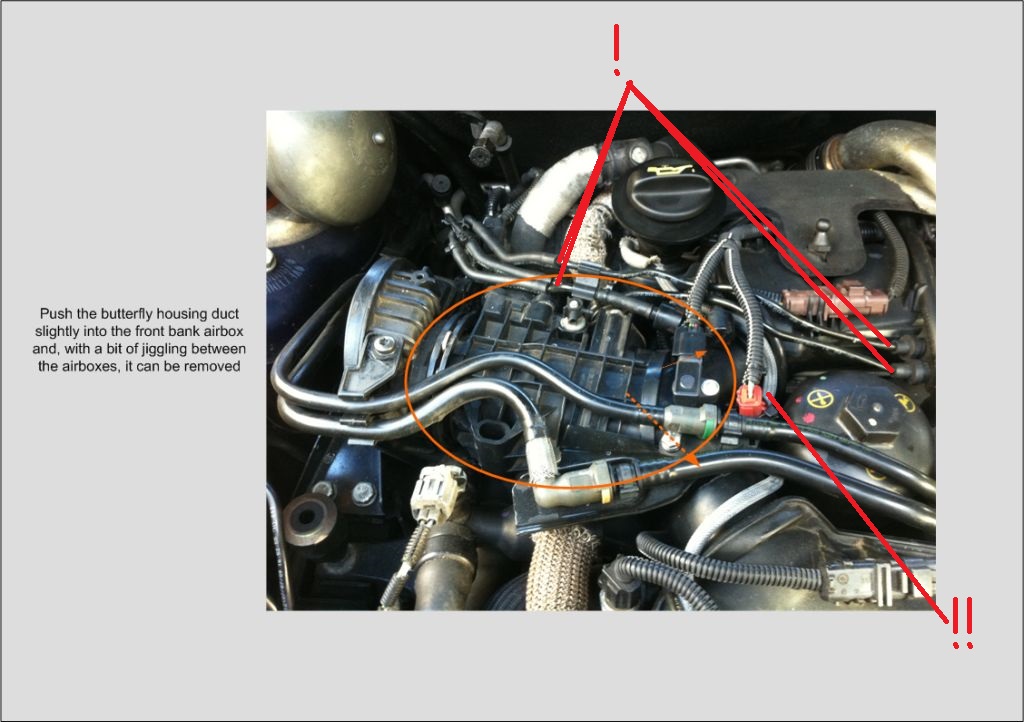 |
||
|
|
|
||
|
321dave
|
|
||
|
Member No: #614
Location: Dublin |
That's great! Thanks for that reply Steve. I'll see about getting those as backup replacements in case the worst happens. Have a new coolant tank to go in as well as a new inlet and outlet tank. Can you think of any other component that should be replaced while doing the timing belt and water pump work? It will be a busy Saturday! Incidentally, on startup these cold mornings, a cyclical squeaking sound is heard until the car warms up a bit, when the engine revs the sound follows the revs up as well. Just wondering was it the old water pump bearings? Or something else? Many thanks Steve |
||
|
|
|
||
|
e3steve
|
|
||
|
Member No: #1163
Location: Warsash, Hants & Palma de Mallorca, Spain |
321dave wrote ... Could possibly be either the accessory belt's idler (common) or its tensioner (less common). Before disabling the engine completely, remove the accessory belt and see if the squeak is still apparent... Bear in mind that it could also be the Litens-type overrun clutch (the alternator pulley) or the a/c electromagnetic clutch pulley..... on startup these cold mornings, a cyclical squeaking sound is heard until the car warms up a bit, when the engine revs the sound follows the revs up as well. Just wondering was it the old water pump bearings? Or something else? Don't rush anything; take your time. Putting yourself under pressure to complete the job in one day could end in tears before bedtime! |
||
|
|
|
||
|
321dave
|
|
||
|
Member No: #614
Location: Dublin |
e3steve wrote ... 321dave wrote ... Could possibly be either the accessory belt's idler (common) or its tensioner (less common). Before disabling the engine completely, remove the accessory belt and see if the squeak is still apparent... Bear in mind that it could also be the Litens-type overrun clutch (the alternator pulley) or the a/c electromagnetic clutch pulley..... on startup these cold mornings, a cyclical squeaking sound is heard until the car warms up a bit, when the engine revs the sound follows the revs up as well. Just wondering was it the old water pump bearings? Or something else? Don't rush anything; take your time. Putting yourself under pressure to complete the job in one day could end in tears before bedtime! Thanks for the advice Steve, I've been busy buying parts for the C6 on/off all year. When my battery was acting up last year (all fine now) i thought the worst and bought the Litens alternator pulley and the idler(but it was just a tired old battery that was replaced in the end). I think the squeak is still audible when the air-con is switched off! But your most likely correct, its idir the alternator pulley or the idler or maybe the tensioner(hopefully not)starting to act up at this late stage. Must say I'm looking forward to having a go on Saturday, and have arranged to have the car of the road if needs be for the week, so I'll be taking ages as I normally tend to. But I think i enjoy it a bit to much maybe. But I know things can break and go wrong fast!! hopefully all will work out ok. Need to also change both Xenon bulbs and a few other front bulbs (now that the evenings are closing in earlier) but is the Xenon bulb in front of the drivers side Headlight possible to refit without moving the LDS tank. Would it be easier remove the bumper in your view? Thanks again Steve. |
||
|
|
|
||
|
e3steve
|
|
||
|
Member No: #1163
Location: Warsash, Hants & Palma de Mallorca, Spain |
If the squeak turns out to be the idler or the tensioner, they're both do-able after the surgery. The idler bearing is definitely replaceable, with a small amount of skill. I got the bearing for mine from SimplyBearings.co.uk. For headlamps' surgery, bumper off is the best route, IMHO... |
||
|
|
|
||
|
321dave
|
|
||
|
Member No: #614
Location: Dublin |
e3steve wrote ... If the squeak turns out to be the idler or the tensioner, they're both do-able after the surgery. The idler bearing is definitely replaceable, with a small amount of skill. I got the bearing for mine from SimplyBearings.co.uk. For headlamps' surgery, bumper off is the best route, IMHO... Hi Steve, I was thinking that. Might as well remove the front bumper while I'm at things. I've had it nearly of so many times before. I'll get ready to stick up some images of the belts condition on the forum afterwards. |
||
|
|
|
||
 User Colour Key: User Colour Key:Head Administrator, Administrator, C6 owner, Technical Expert, C6 Premier Discount Club |
|
Privacy Policy | Cookie Policy | Site Disclaimer | Contact Details | Warranty | Sitemap | C6 Insurance | Quick Facts | Re Call Info | Downloads | Error Codes
| Site and Graphics created by: C6Dave Forum Icons by Axialis Emotes by Seb |  |


