| C6owners :: Forums :: C6 Support :: Ice / USB Box / Telephone problems |
<< Previous thread | Next thread >>
|
How to make your own USB cable to use in Navidrive RT4/5 |
    Please Register to enjoy additional Member Benefits |
| Author | Post | ||
m3mpower
 
|
|
||
  Member No: #662
Location: Alicante |
This is a guide on how to make your own USB cable for RT4 / 5 It is fairly easy to do and takes less than an hour You can then use this cable to do: * Software upgrades * Maps updates * Play MP3 files through USB * Copy MP3 files from USB stick to jukebox And of course, use Mirascripts to do all sorts of mods such as disable video speed limit, change boot screen...etc First, you need to buy a USB cable, i got mine from eBay ( 3 for £1.99 ) or you can buy one for about £1 Then you need to get the black connector that connects to the back of your headunit, you find these in your local scrapyard, in PSA cars, they are everywhere in the wiring loom Cut the USB cable through, you will see 4 wires, red, black, green and white The black connector should also have 4 wires, these connectors have 6 pins and we only need 4, make sure the wires are in Pins 3, 4, 5, and 6 You don't need pins 1 and 2 To put the wires in the correct pins, open up the connector, disconnect the wires from the wrong pins and connect to the correct ones... Join the 4 wires from USB cable to the 4 wires from black connector this way: USB red cable to Pin 3 of black connector USB black cable to Pin 4 of black connector USB white cable to Pin 5 USB green cable to Pin 6 There are different ways of joining the wires together, you can use a soldering iron, i simply use shrink wraps, join the wires together then heat up the shrink wrap, this will hold well together.. ADMIN EDIT: due to a photobucket issue original images have been lost. If you want a hard copy with images you can still download the .pdf version here: - Click Here - |
||
|
|||
frenchie

|
|
||
 Member No: #41
Location: Orust |
Hi all! Without knowing for sure if this is a problem or not (haven't executed the fix myself yet), I suspect that your iPhone does not enter charge mode with this fix. However, with 4 resistors this is done in a jiffy; On MintyBoost's webpage The mysteries of Apple device charging (check at the bottom of page) you'll have all the tech-spec you need to make the iPhone charge properly. It is a matter of adding one Voltage Divider per data-line dividing out 2.0V to the D+ and 2.8V to the D- and in that way set the charge current to 1.0A into your iPhone. If the D- also is fed with 2.0V the charge current is set to 500mA. I'll probably build a cable of my own in my C6 in a short while and then I can report back if the RT3/4/5 can manage 1A charge current. Bare in mind, if this pose any problem you should build a separate charger anyway. No problem letting the D+/D- on to the RT-unit as long as a separate charger share the same earth potential. I have built one of those chargers in a VW Passat once, worked really well. But that was for pure charging purpose using a simple voltage stabilizer (1.5A LM317 in an TO220 package). Please note that you can use other values of your resistors, but try to keep the sum of the two R-values around 10kΩ-100kΩ limiting the small current tapped off through the divider to less than 0.5mA. |
||
|
|
|
||
C6Dave

|
|
||
    Member No: #1
Location: Northumberland |
4 years on and the original cable is available still from a Citroen or Peugeot Dealer, part number is CIT 6574 JH or Pug 96 864919 80 OR UK cost as of November 2017 is/was £22.97 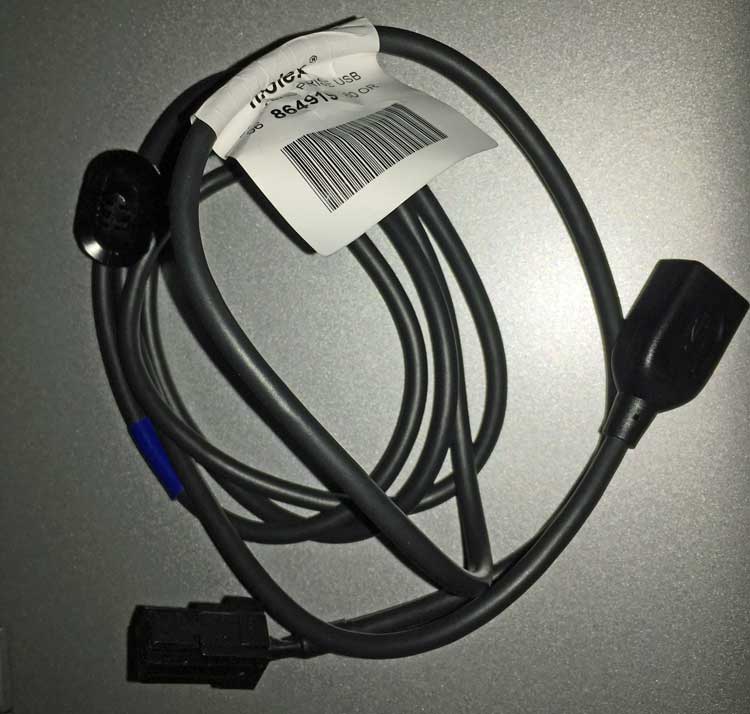 |
||
|
|
|
||
 User Colour Key: User Colour Key:Head Administrator, Administrator, C6 owner, Technical Expert, C6 Premier Discount Club |
|
Privacy Policy | Cookie Policy | Site Disclaimer | Contact Details | Warranty | Sitemap | C6 Insurance | Quick Facts | Re Call Info | Downloads | Error Codes
| Site and Graphics created by: C6Dave Forum Icons by Axialis Emotes by Seb |  |


