| C6owners :: Forums :: C6 Support :: The Garage |
<< Previous thread | Next thread >>
|
2.7HDI Starter motor removal and refit procedure |
    Please Register to enjoy additional Member Benefits |
| Author | Post | ||
olmala
 
|
|
||
 Member No: #1919
Location: Ylivieska |
Here's a guide on how to remove and replace starter motor for 2.7HDI PSA engine. My car is Citroen C5 but procedure is the same with C6 and Peugeot cars with this engine. English is not my native language so I hope this guide isn't too terrible to read.  I had a weird problem and found out that starter motor was faulty. When starting, engine turned like the battery was near flat. It had been like that from last winter. I bought new battery and same thing so I knew it wasn't the battery. After that, checked all the wiring - nothing wrong. Searched online and somewhere from the web found out that worn starter motor can do this and after ordering replacement and changing it, car starts perfectly.  THE PROCEDURE: First you obviously disconnect battery and I trust that you know how to do that. After that we'll start stripping the engine bay down to make room for the starter to come off. Official way is to remove the fuel filter also but really there's no need. It's just one difficult task to do and smelly hand and not really help at all. 1. This is where you start. I already removed AIR INDUCTS and next to remove is the AIR FILTER COVER and engine FUSE BOX COVER. 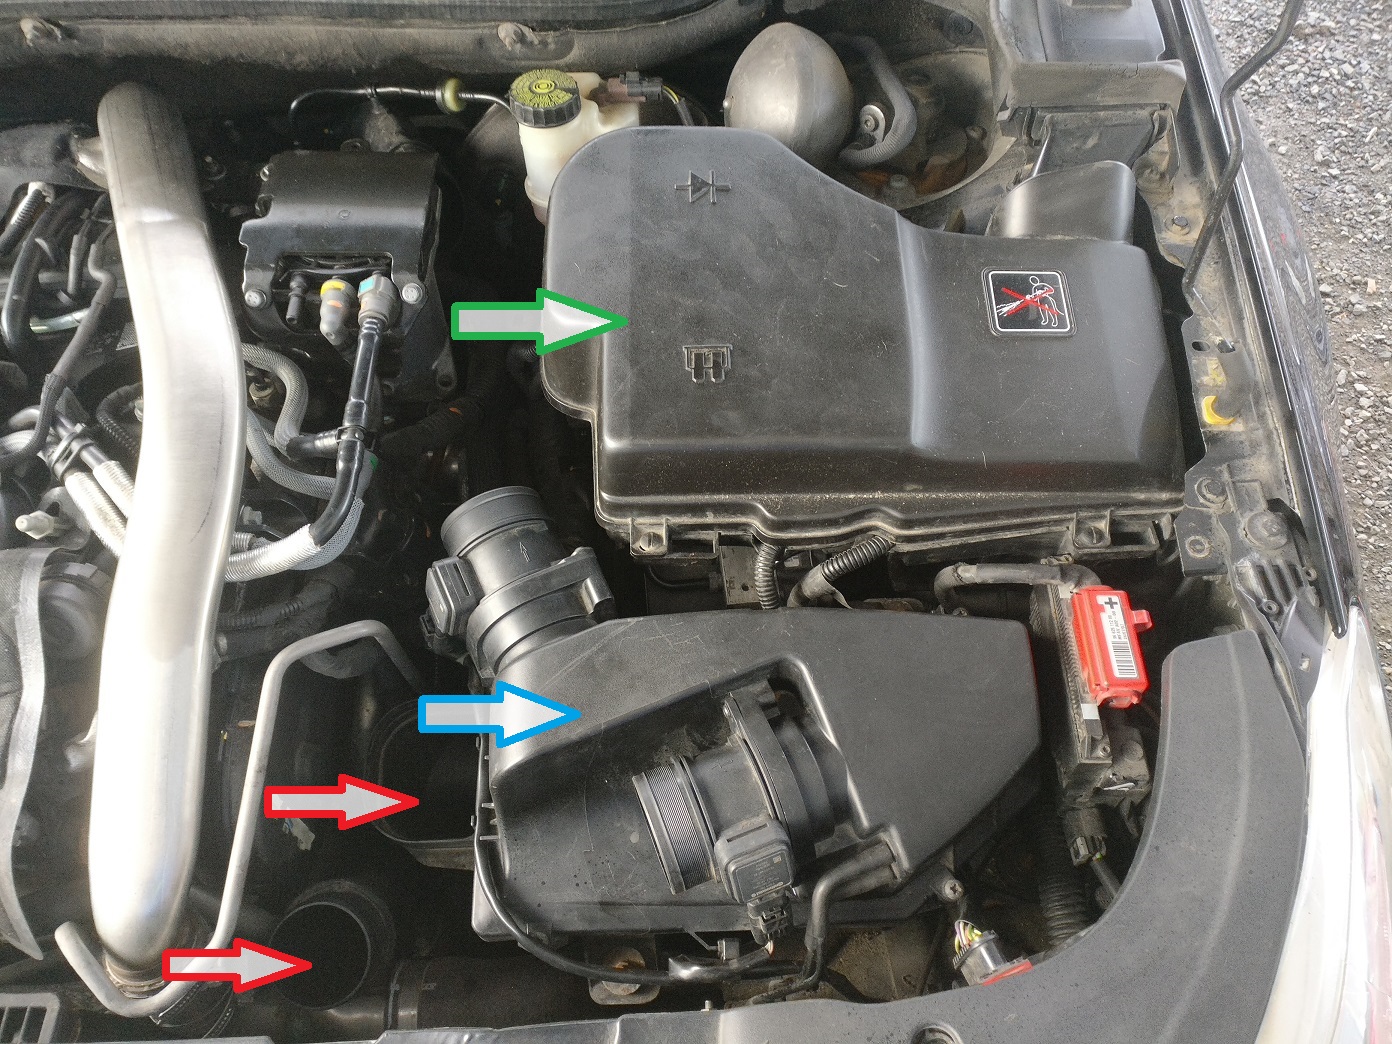 2. Under the fuse box cover you’ll find two ECUs and quite a few electric connectors. 12 if I remember correctly and almost all of them you’ll be disconnecting. Take a good note and mark the orientation and locations of the connectors. These are color coded but never can be too sure. Here you can see the top ECU which is fastened with THREE TORX SCREWS, which you’ll remove. 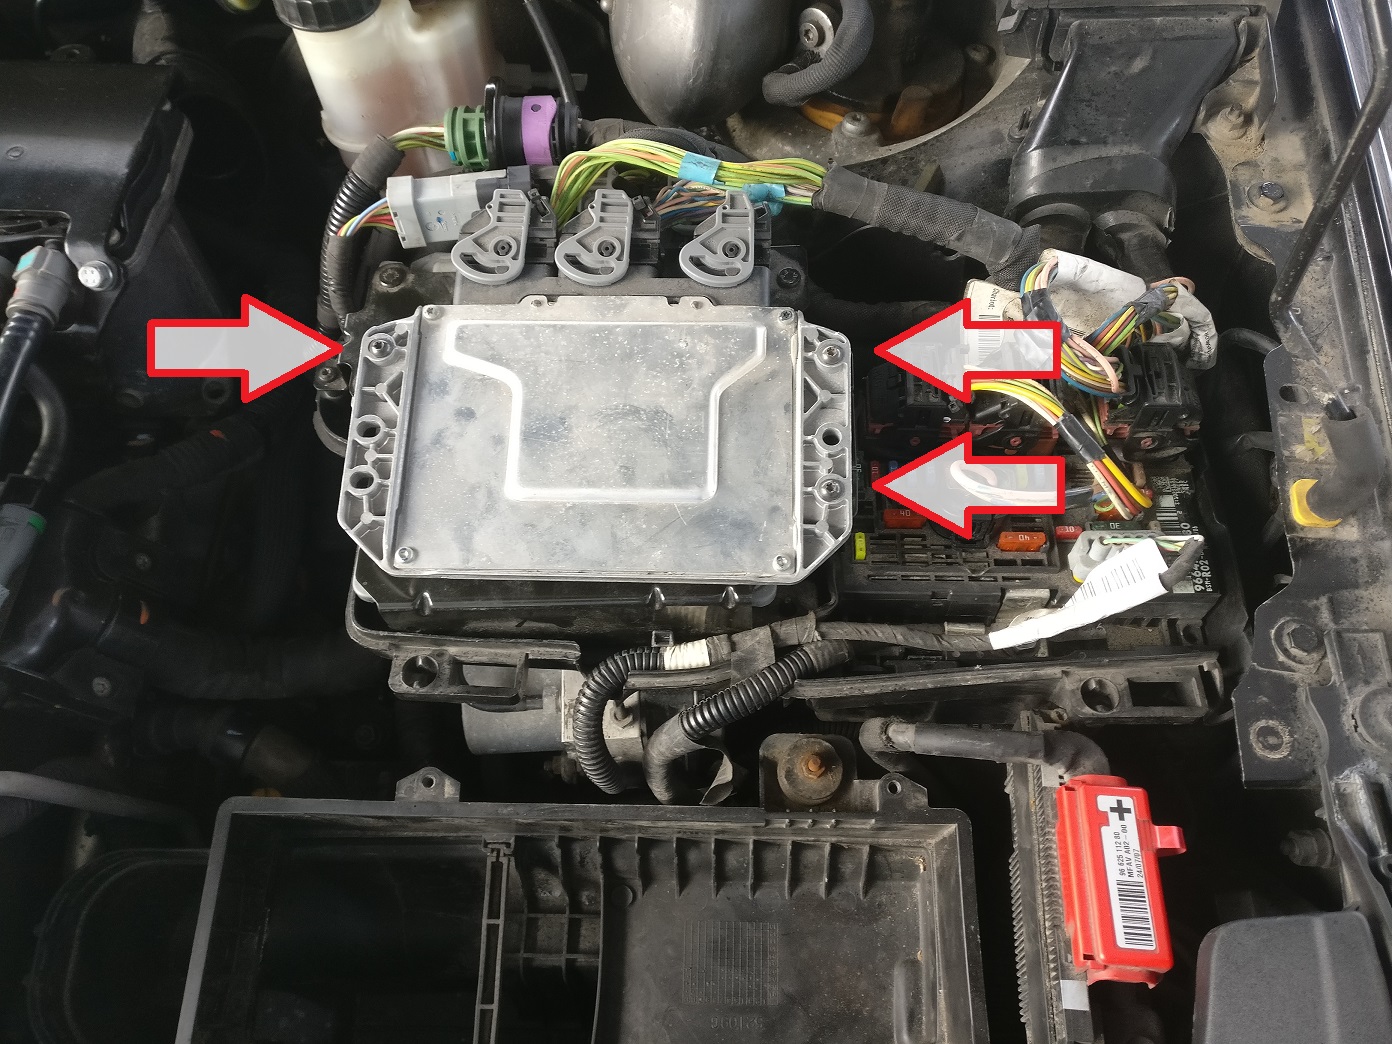 3. After removing top ECU, I just lifted it out of the way without disconnecting it. Next to remove are TWO ELECTRIC CONNECTORS on top and after that you’ll want to undo TWO TORX SCREWS holding lower ECU in place and disconnect THREE CONNECTORS connecting the ECU. 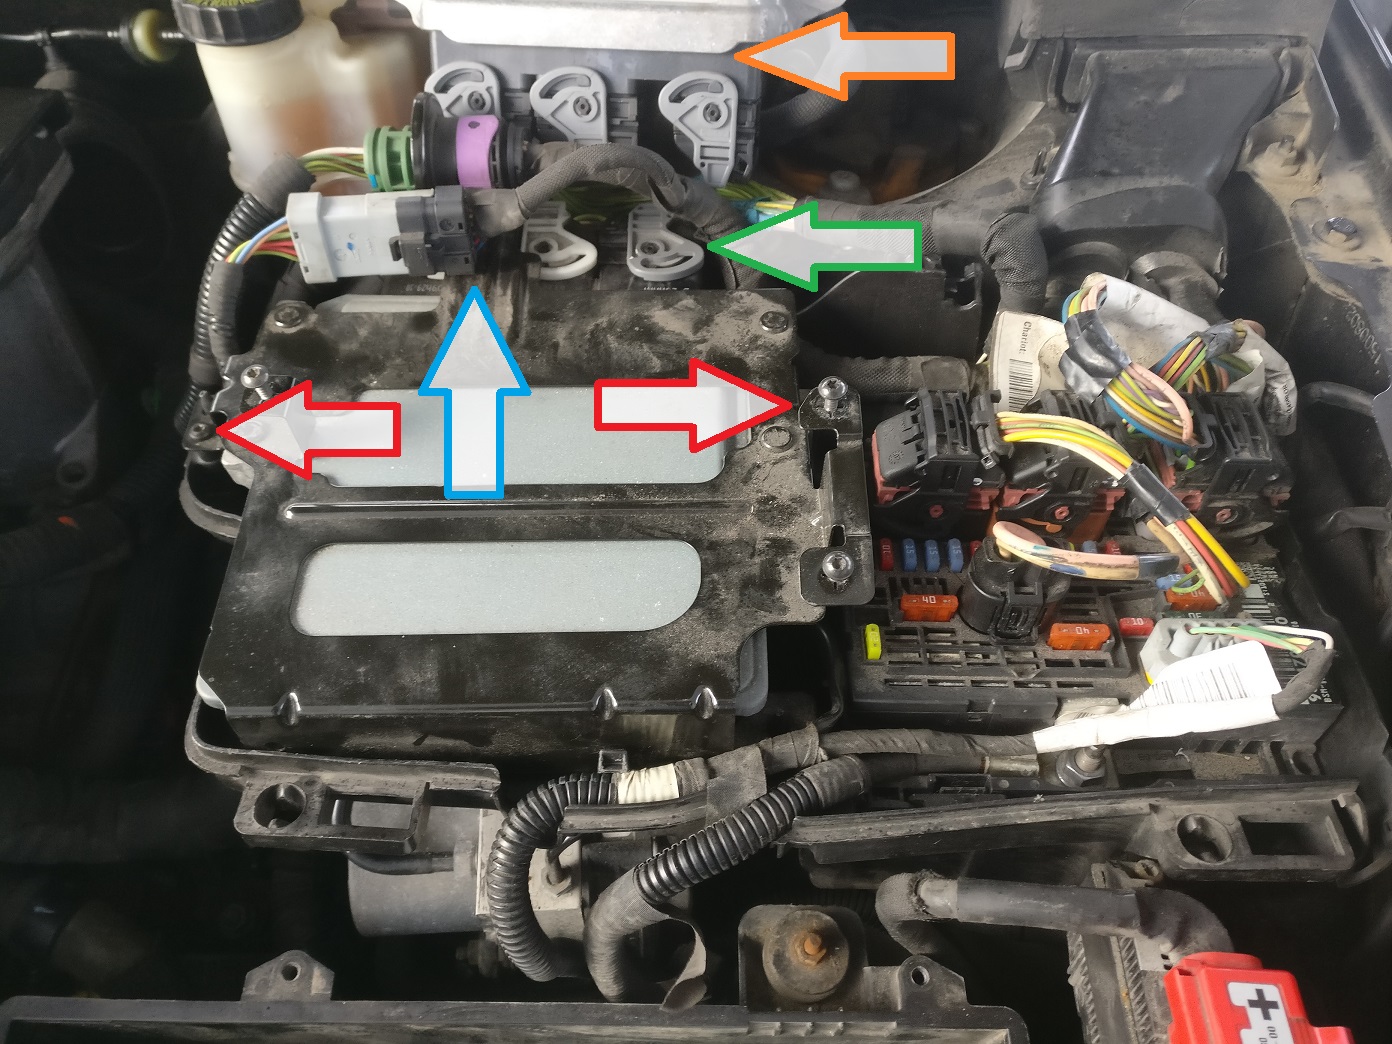 4. Small guide on how to remove green connector. Lift PLASTIC LOCKING RING up and disconnect the connector. To detach the green part of the connector from the ECU bracket, push these TWO TINY CLIPS towards the backand out of the way so you can lift and move green connector up a little bit and pull out of the bracket. 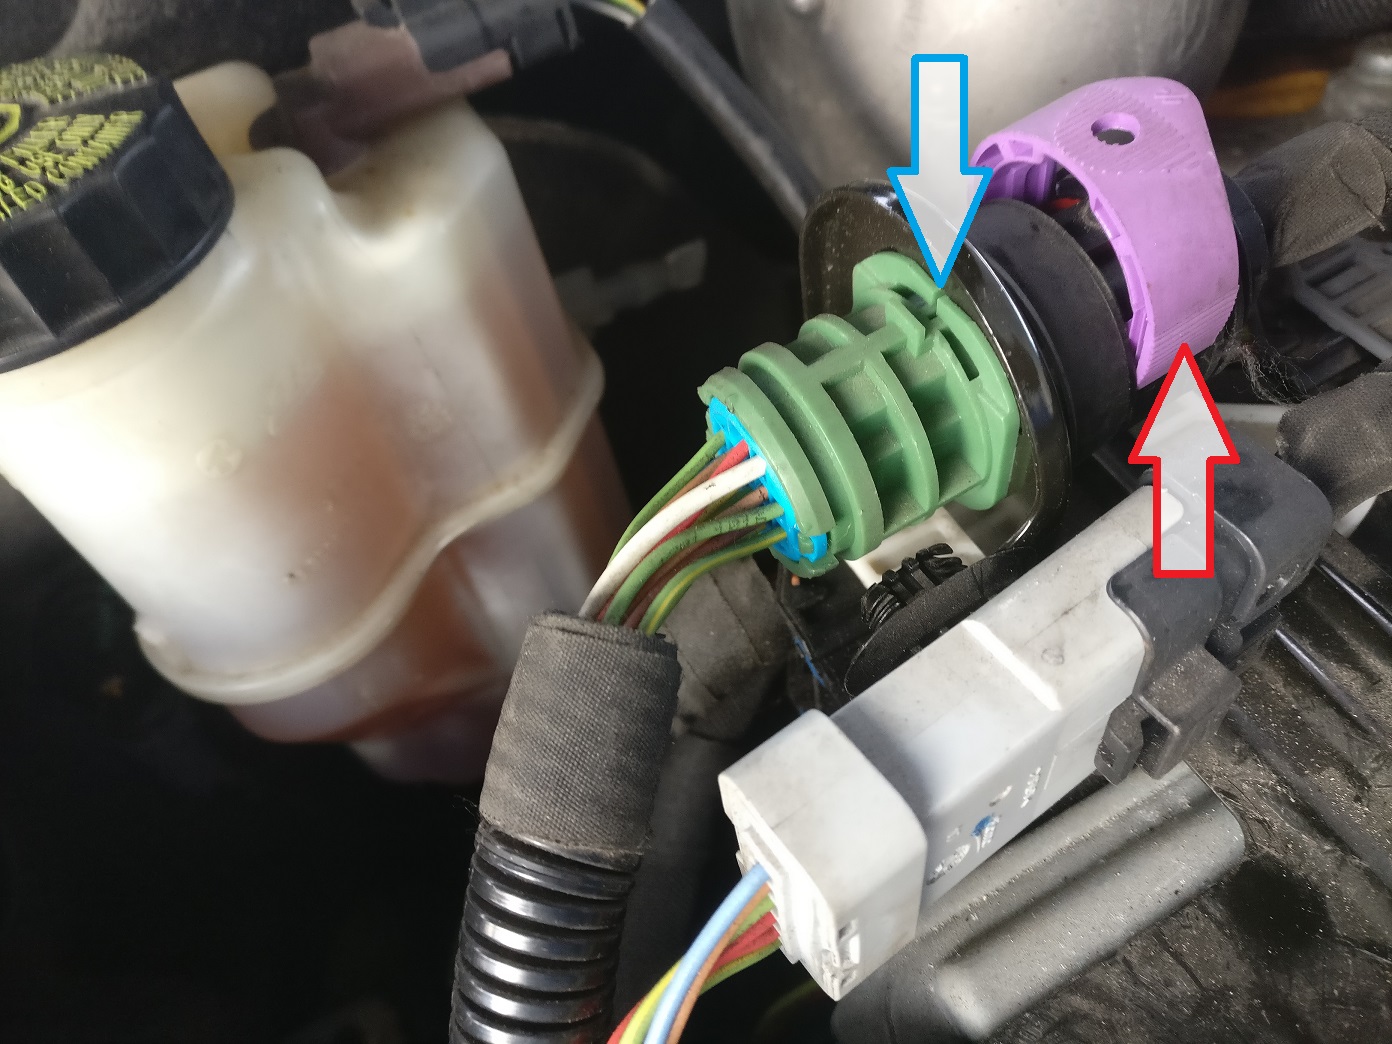 5. After removing both ECUs, this is what’s beneath it. Undo TWO TORX SCREWS, one is holding the wiring down and another is holding control unit. Disconnect TWO CONNECTORS from the CU, no need to remove the one with the nut on. 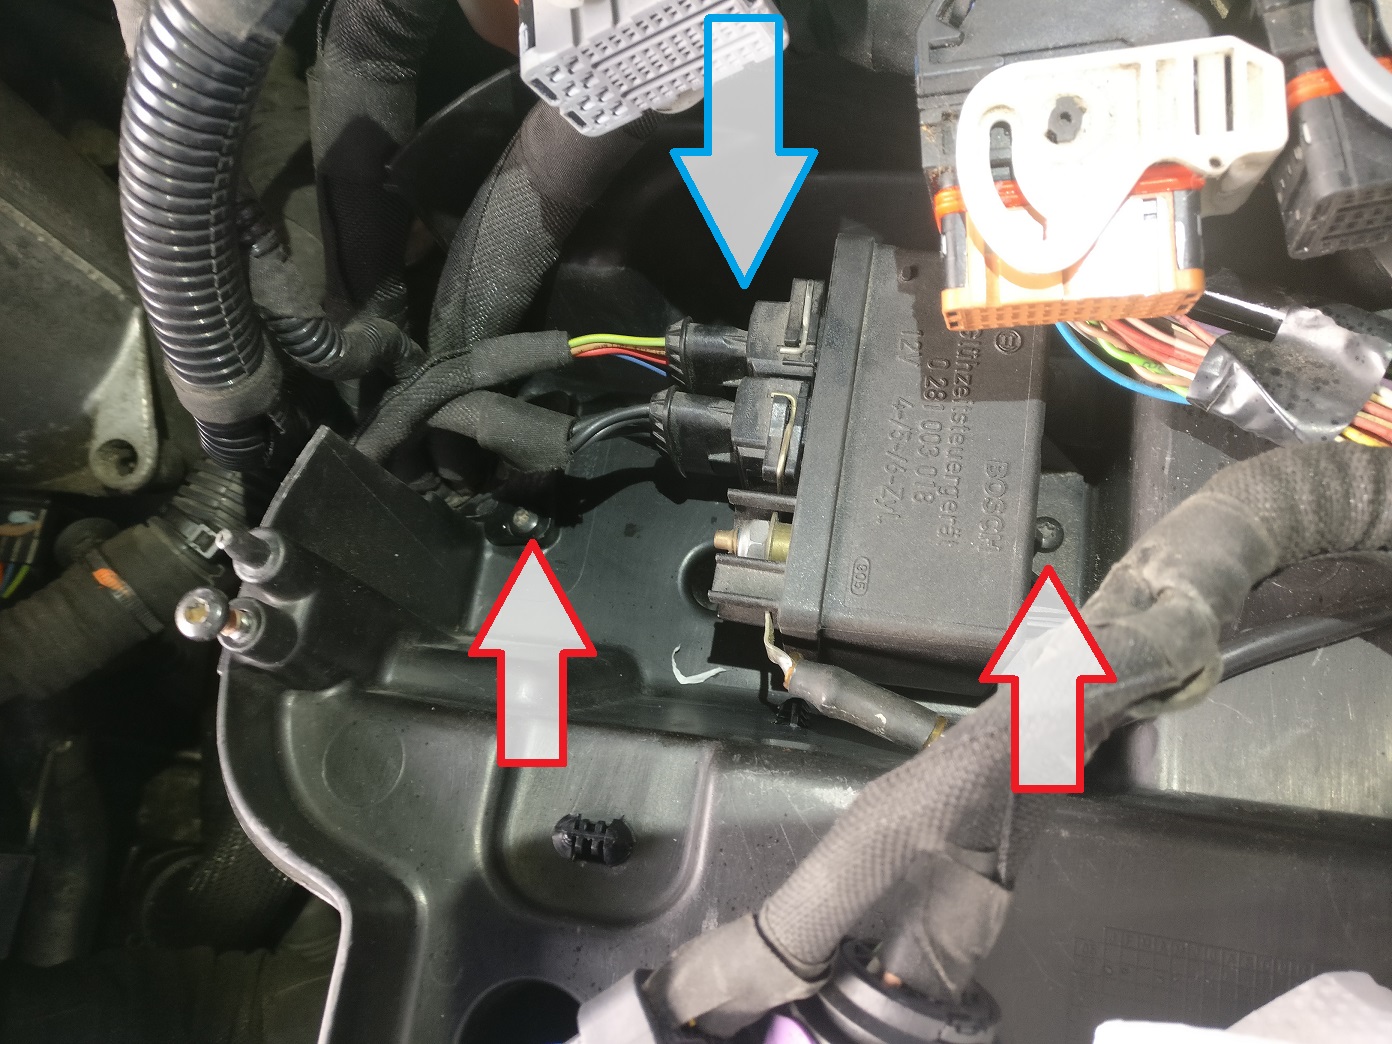 6. Now you can lift part of the wiring harness out of the way. Next thing to do is to disconnect all the electric connectors from top of the FUSE BOX, and after that remove the fuse box from its housing. Fuse box is hold on place with TWO CLIPS. Under the fuse box you’ll see that housing is fastened with two 10mm screws. Remove those and remove the housing. Also remove the air filter housing which is hold on place with three nuts. 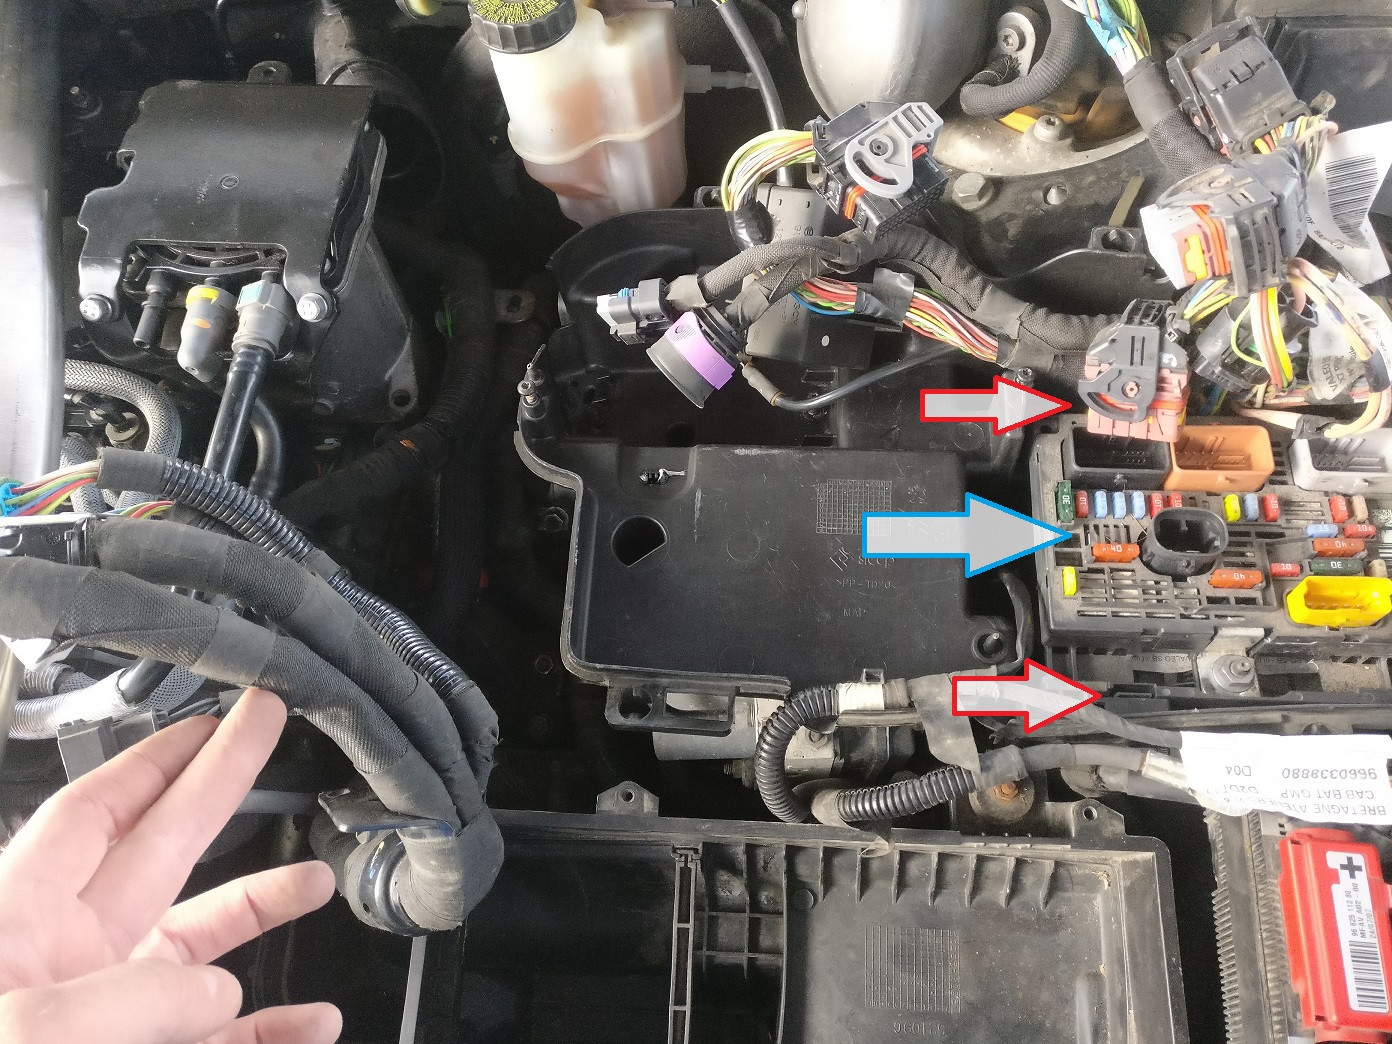 7. Now you can see the STARTER MOTOR. Disconnect WIRING from the fuel filter and remove the MOUNT for the electric harness, fastened with two Torx screws. There are few clips holding down the harness, you’ll find them when you try to lift the wiring out of the way. Unclip those.  8. Next to remove is the ball joint for the transmission cable. Press THESE TWO CLIPS inwards with your fingers and lift the ball joint up to disconnect it. DON’T USE ANY TOOLS FOR THIS!!! You can also see the BRACKETS for transmission cable and wiring harness which you’ll remove next. 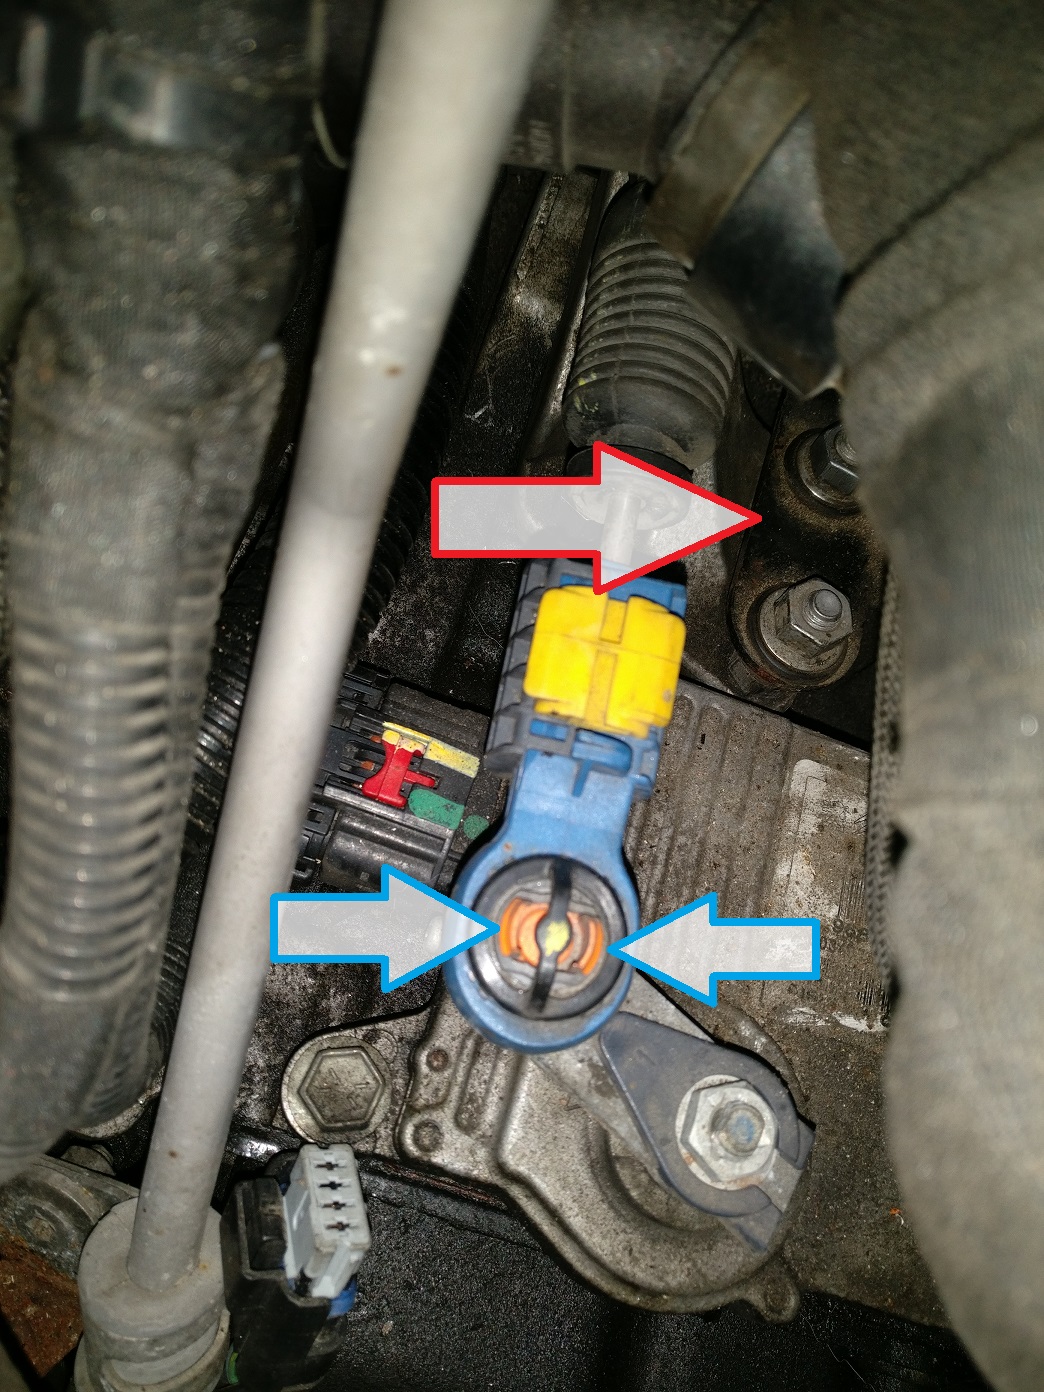 9. First remove two nuts to unmount WIRING BRACKET and next remove three two sided bolts to remove the BRACKET for the transmission cable. Here you can also see TWO OF THE THREE 13mm bolts holding the starter motor in place. You can unscrew these at this point also. 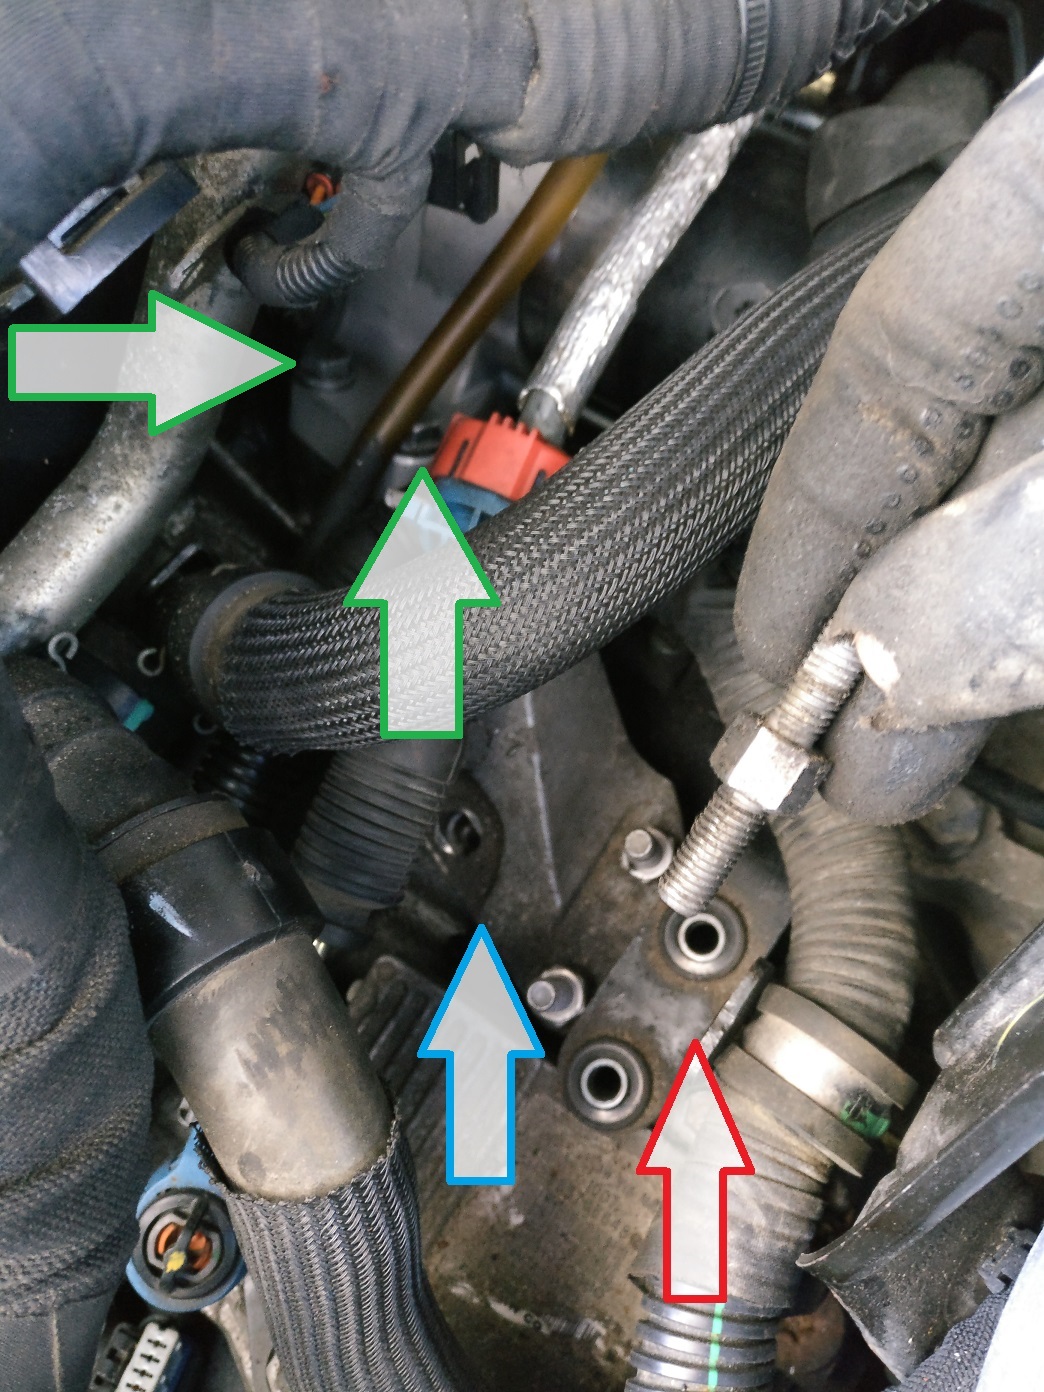 10. Next to remove is the plastic shield from top of the starter motor solenoid, which hides the wiring for the starter motor behind it. You basically just lift it up to unclip it. 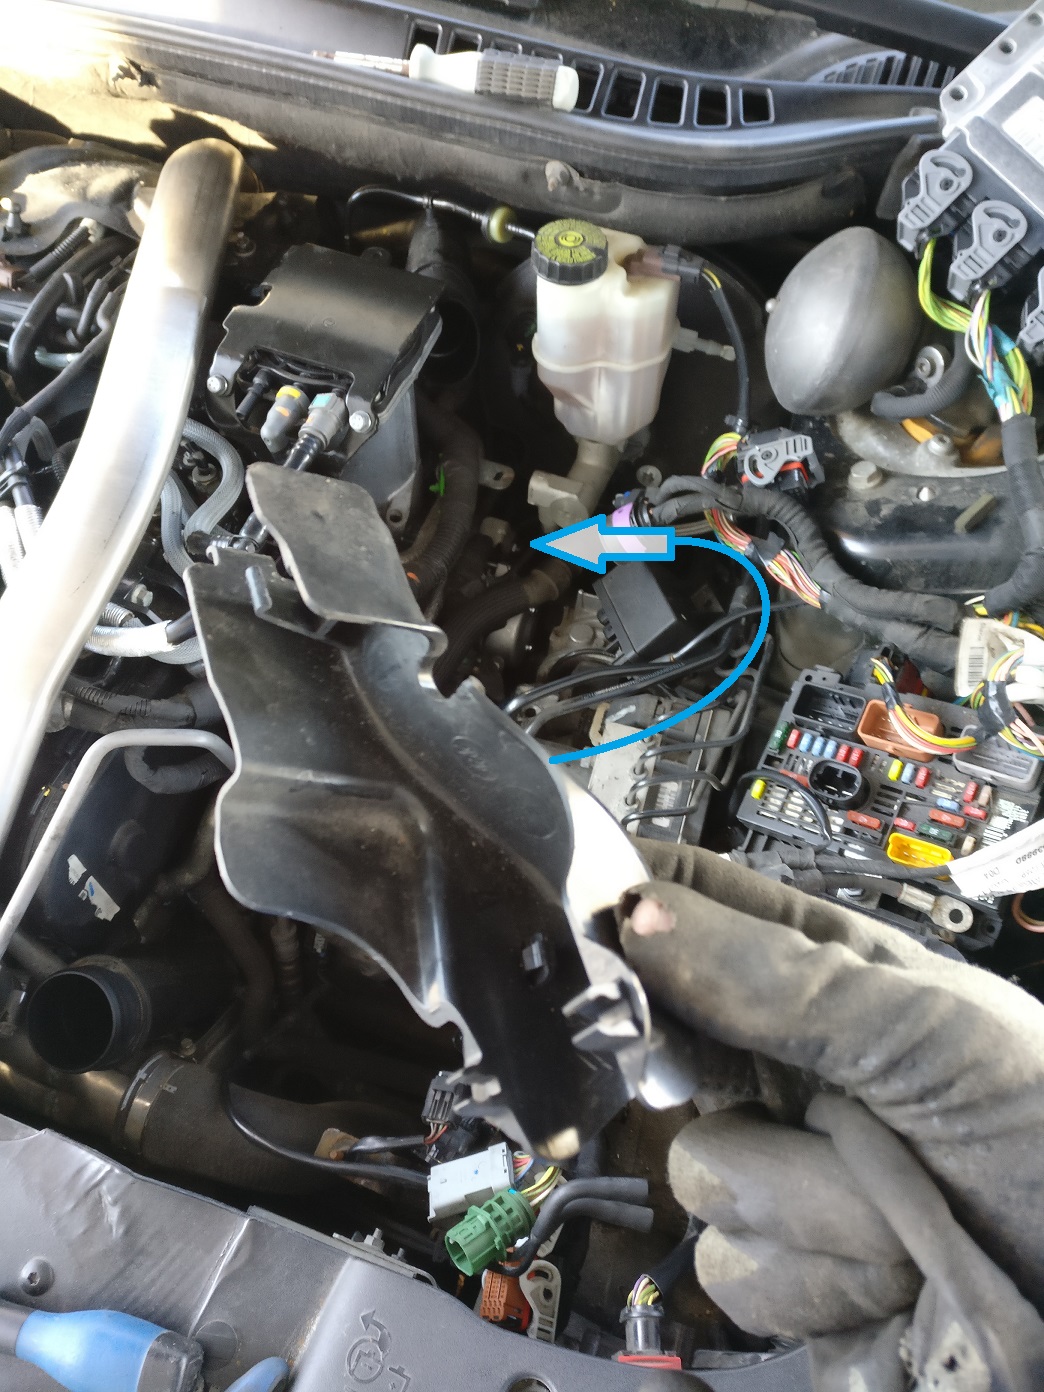 11. You’ll want to disconnect wiring from the starting motor next. This is how it looks and TWO NUTS to be removed, ONE 12mm and ONE 8mm. You don’t need to undo the third nut you see on the photo. These are a bit difficult to undo, I used ¼ ratchet with one long extension peace. 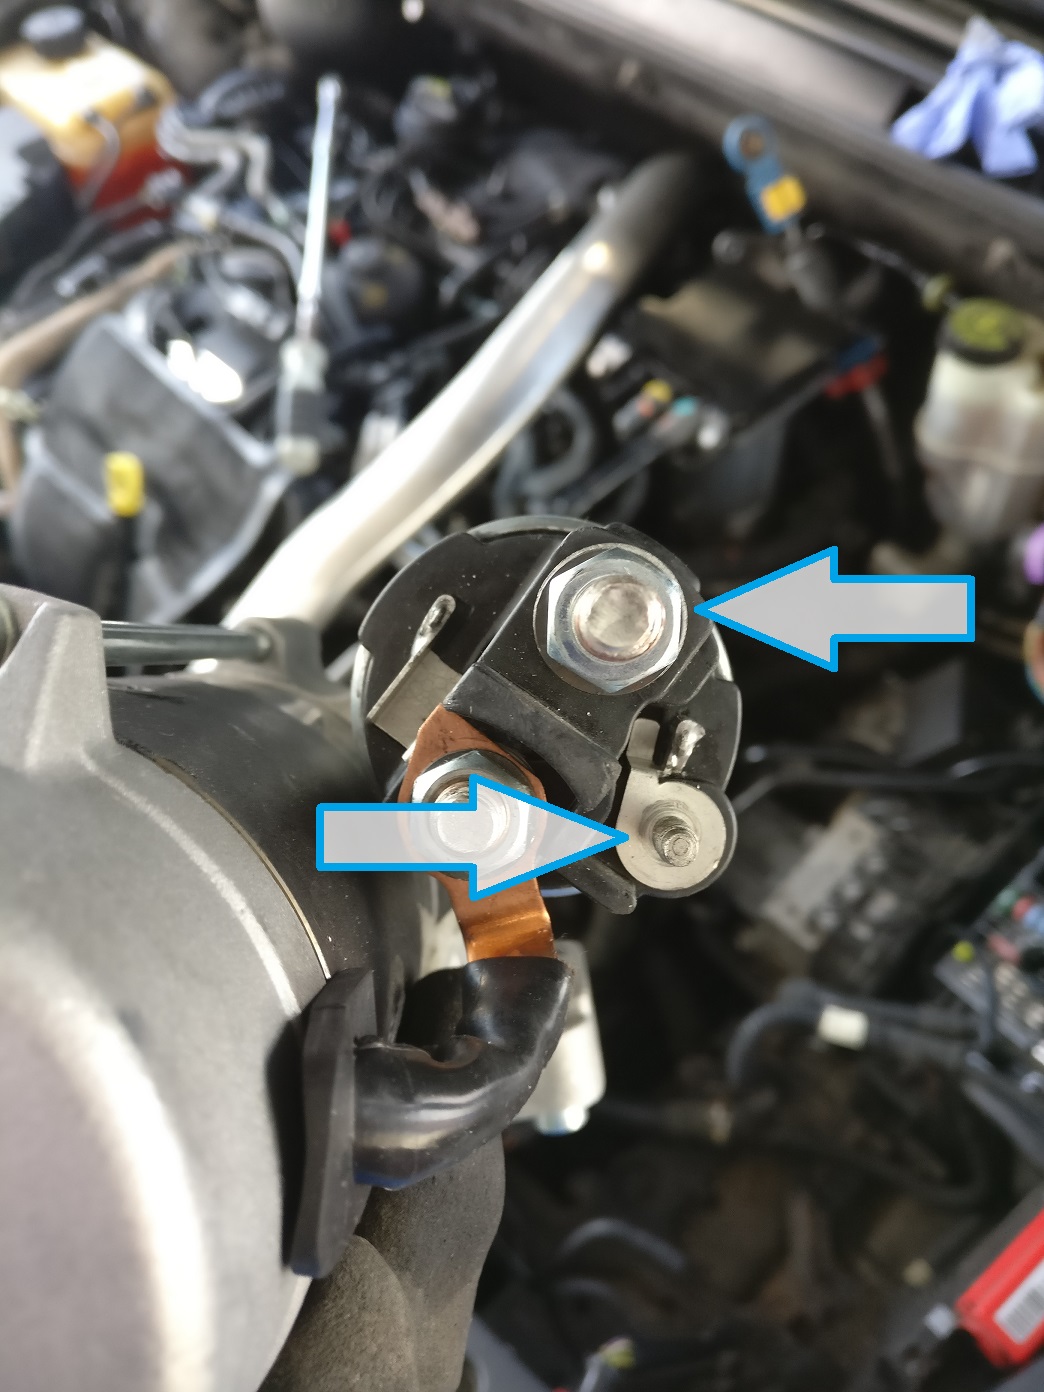 12. The view after you remove the plastic shield (10). 12mm NUT to remove and OTHER NUT that you don’t need to remove. One 8mm nut is located behind the starter motor and orientated as seen on previous photo and THIS IS THE WIRE that it holds on place. Lift the wiring out of the way. 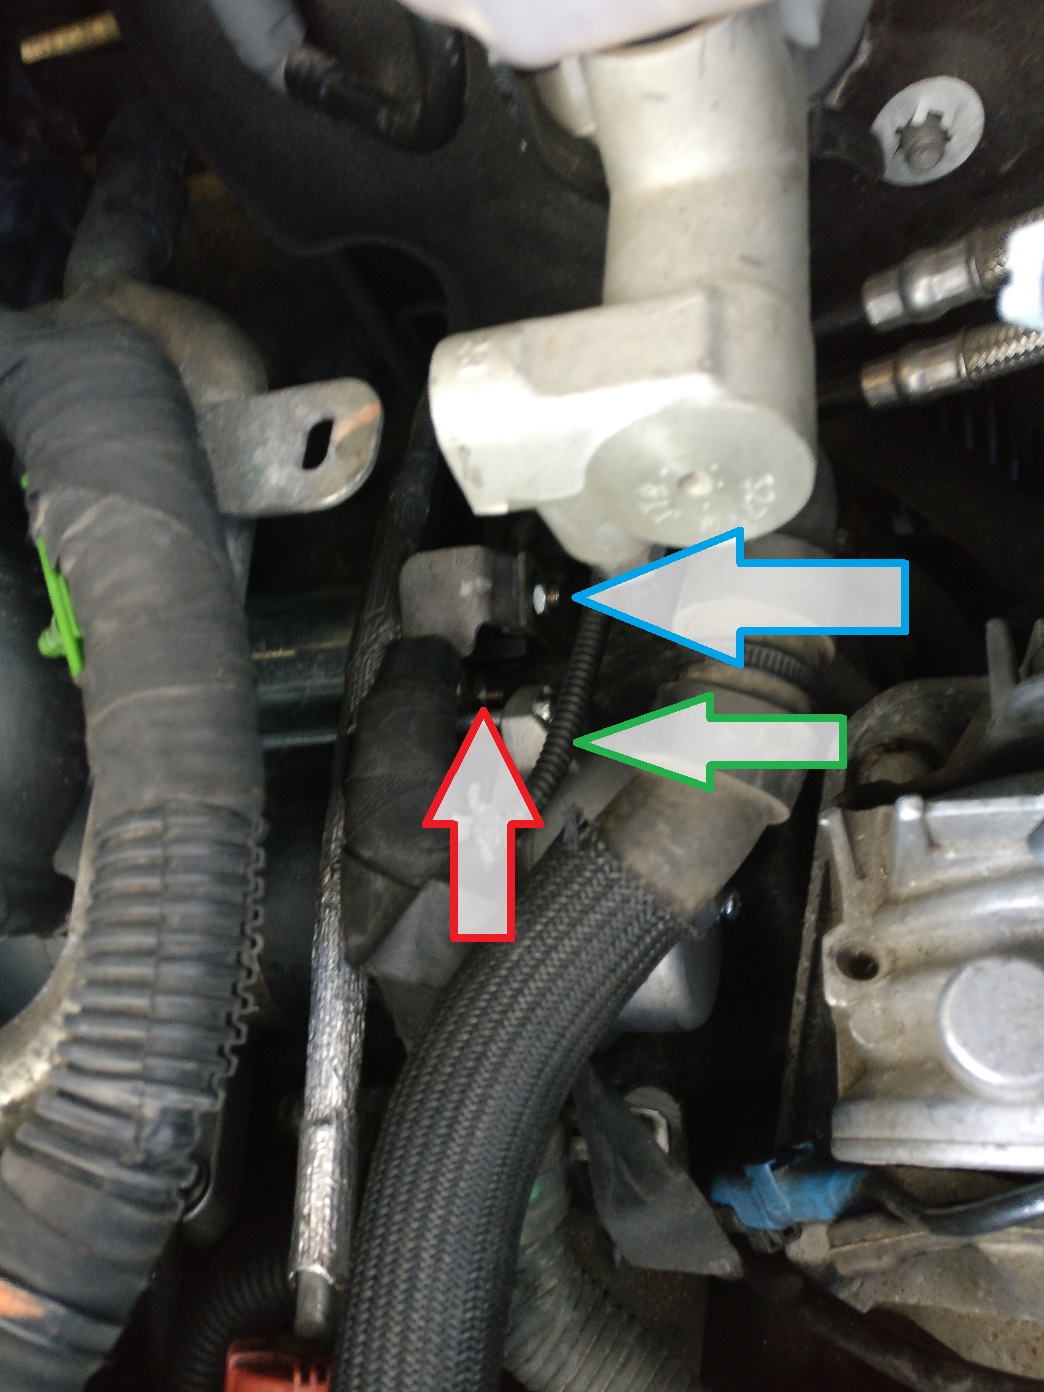 13. Now it’s time to remove the THIRD BOLT holding the starter motor on place. You can see it behind the FUEL FILTER. In the left photo I have already removed the bolt and EMPTY HOLE can be seen. You can access this bolt behind the fuel filter with ¼ ratchet with one long extension and one universal joint, as seen on right side photo.  14. Next off goes the starter motor. Lift the all the wiring and also TRANSMISSION CABLE out of the way and move the engine COOLANT PIPE to the right after unclipping it from the BRACKET to make room for the starter motor to come off. As you can see, you have to turn the starter motor counter clockwise to remove it from its place. You then pull it out pinion end first. 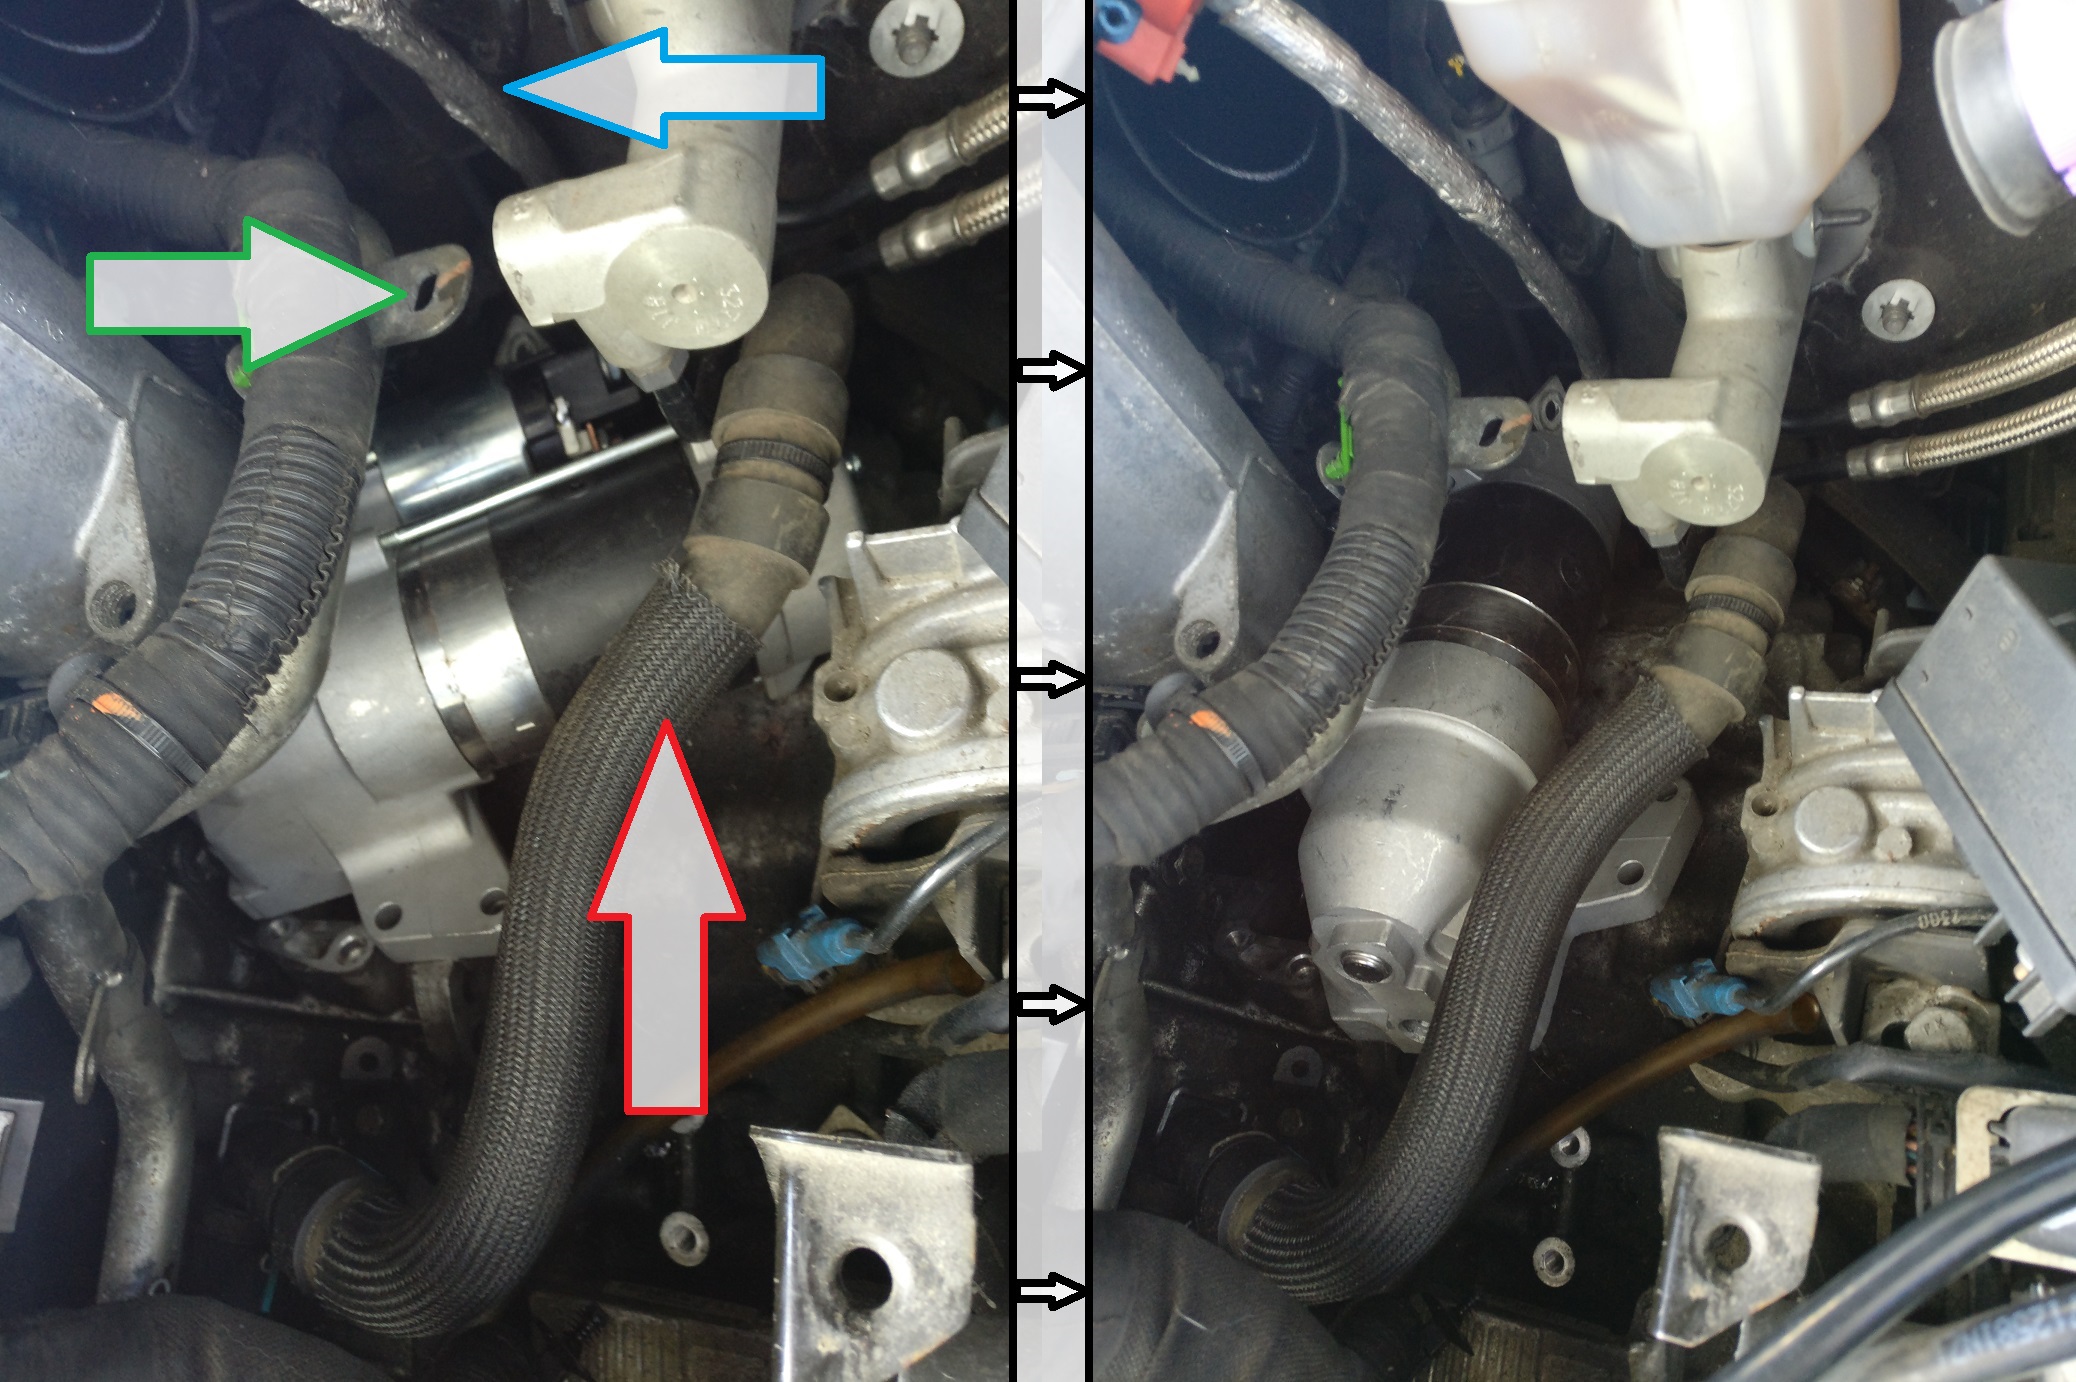 15. And ta’daa, there you have it. Here you can see few of the things moved beside to make room for starter motor to come off. ECU WIRING, WIRING for the starter motor, engine COOLANT PIPE and TRANSMISSION CABLE. Refitting is obviously done in reverse order. 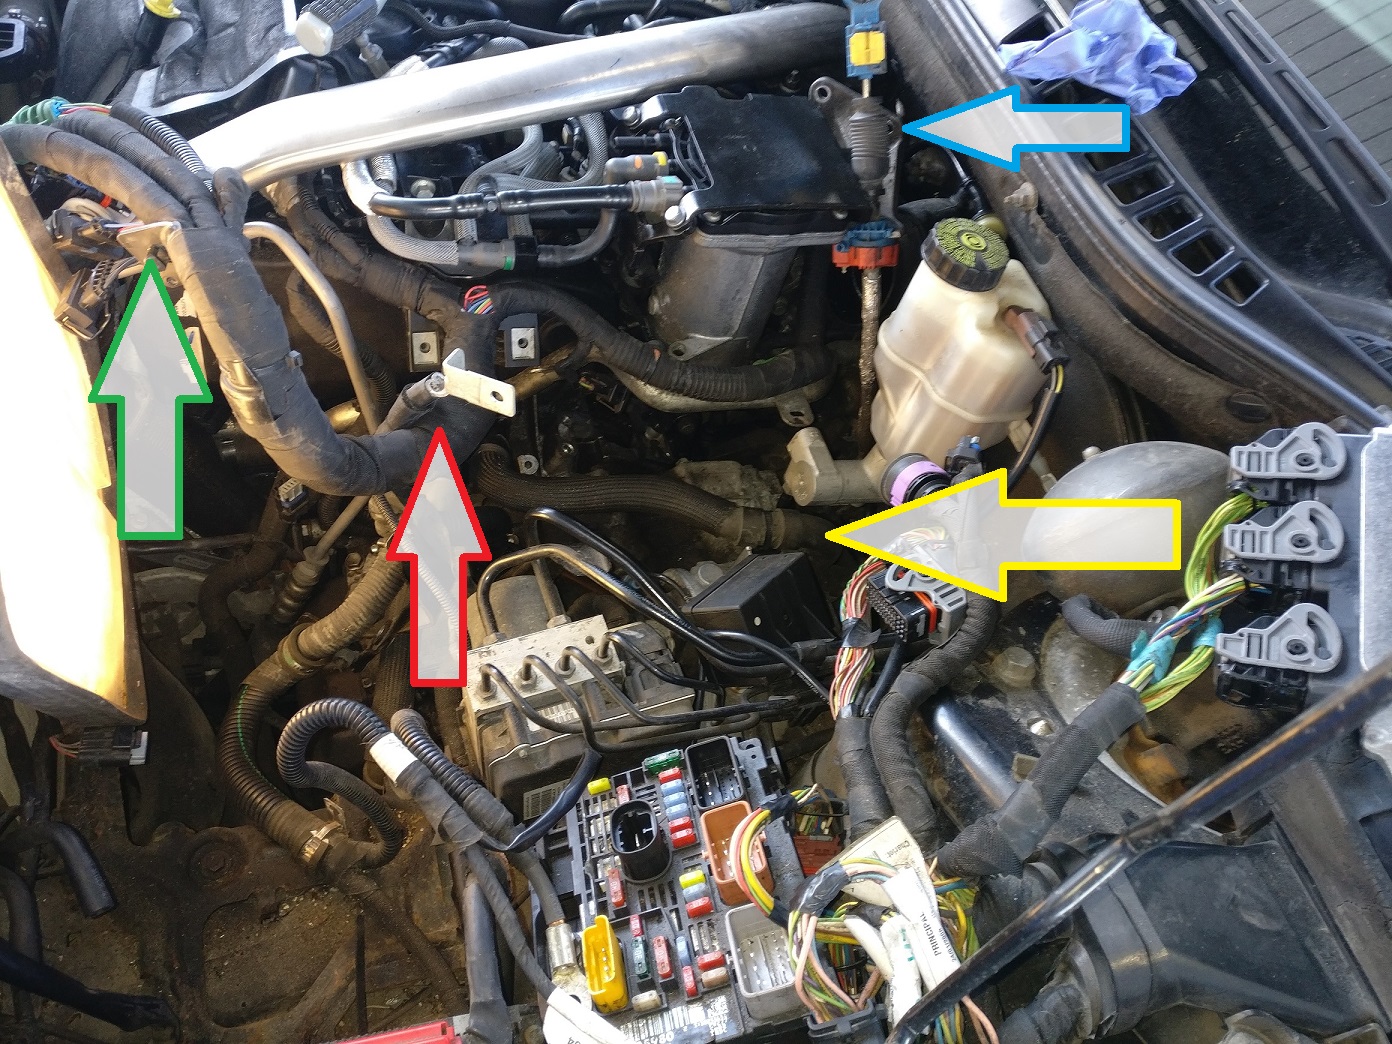 16. One nice tip when you start to put all back together – SUPER GLUE! Glue those hard to access bolts or nuts to the bit with extension when screwing them back on. You know the bit has always little play to the nut, right? So, when you twist the bolt or nut counter clockwise while gluing it, it will snap right off when you tighten it in place. No need to use awful lot of glue here so you don’t lose your bit. First photo you can see the bolt that connects back of the starter, glued on to the bit with super glue. This way you can easily slide it on its place with the ratchet and extension. Second photo is the 8mm nut and washer that connects back of the solenoid. I glued washer to the nut and nut to the bit with extension to be able to easily screw it on. 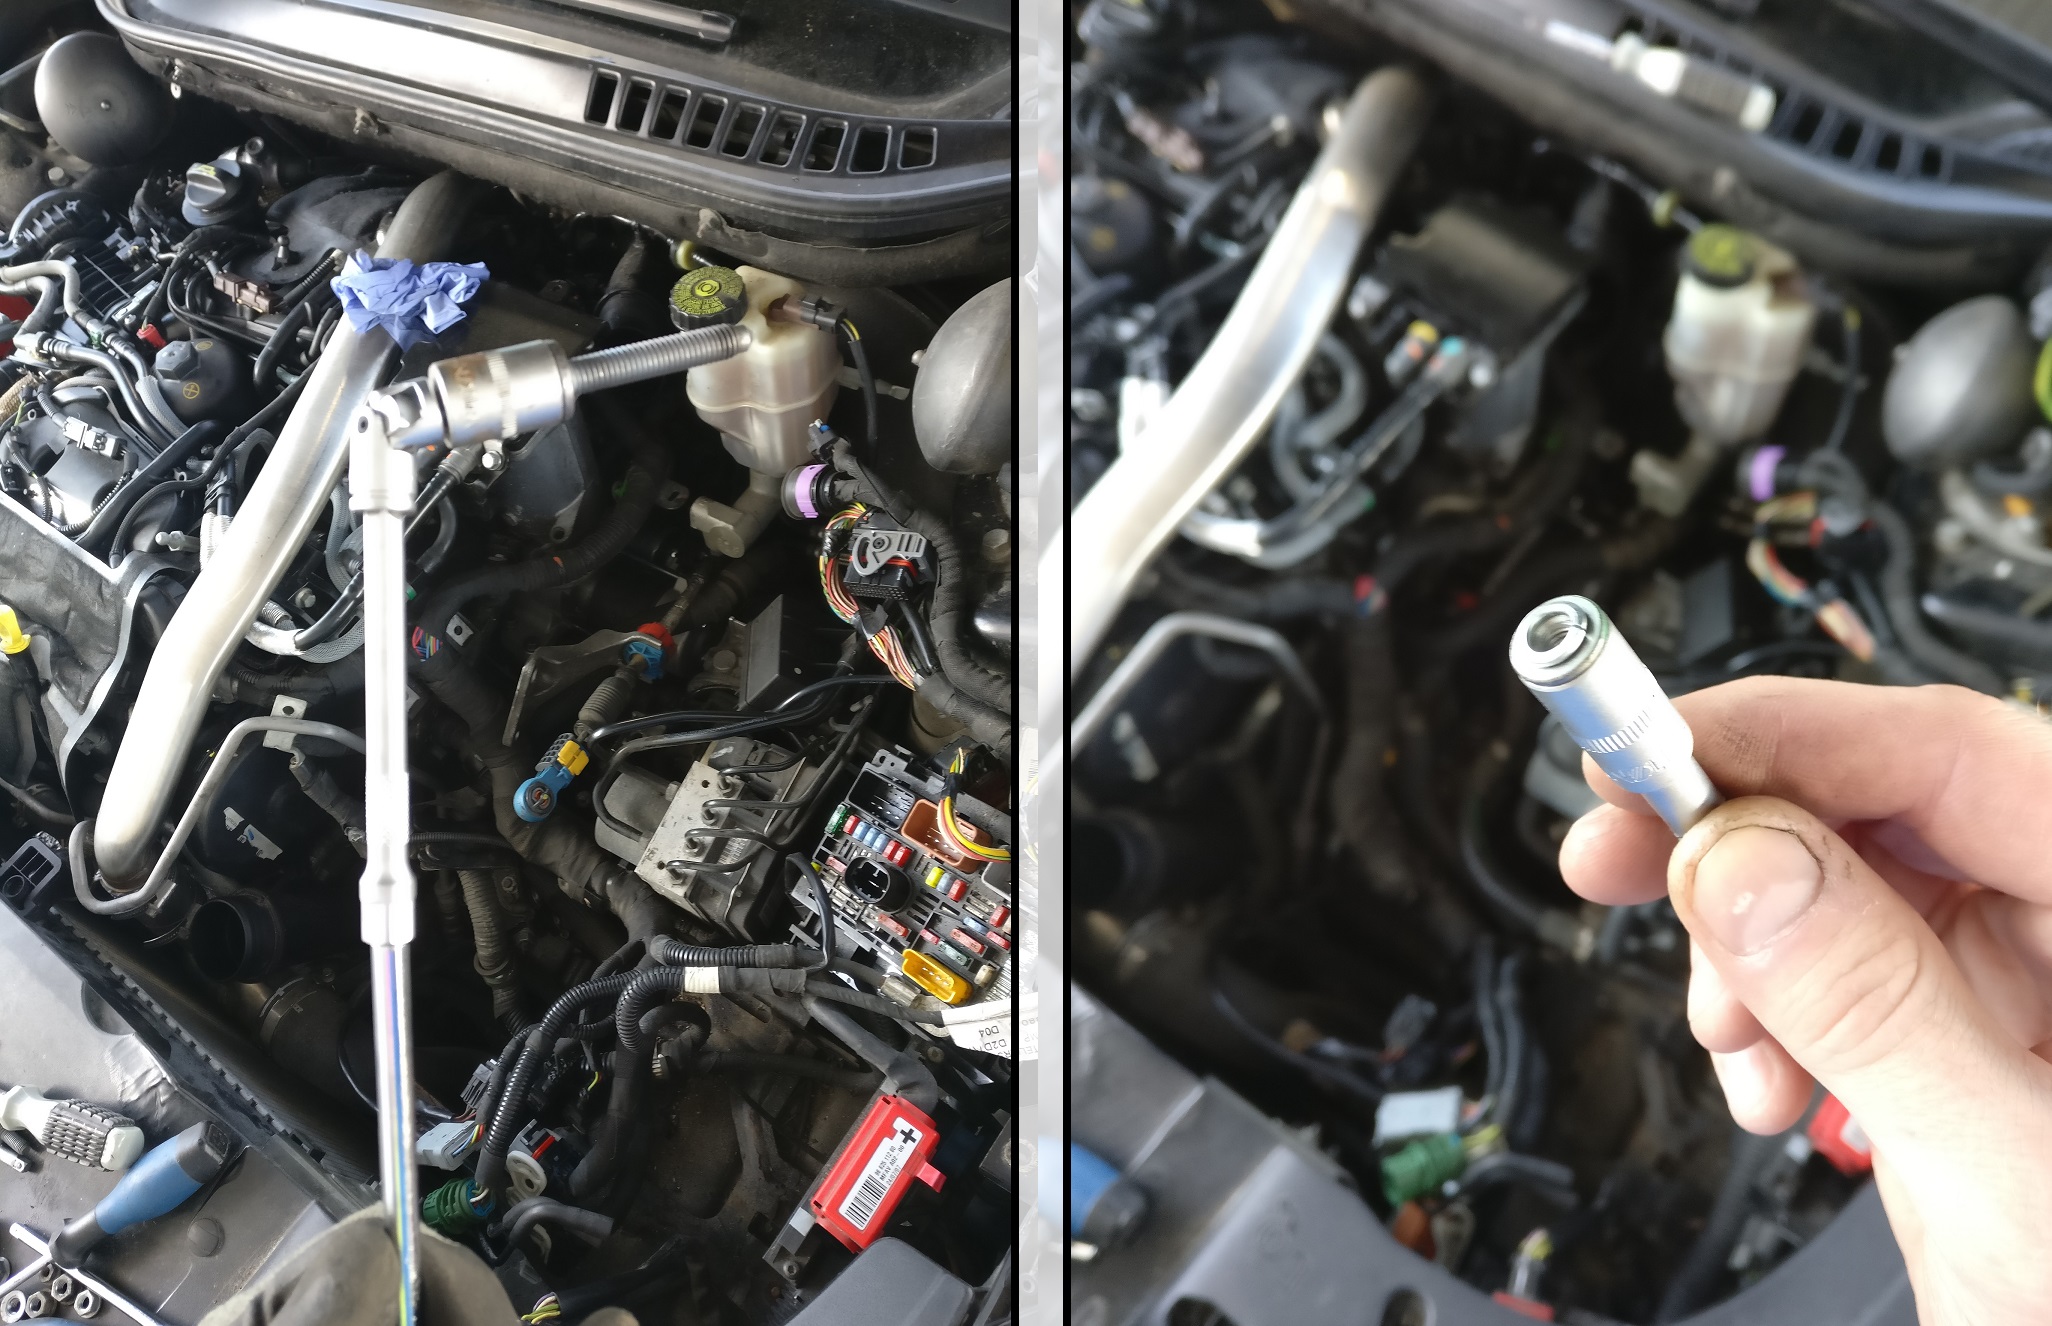 Takes around three hours and not a difficult task to do, although I was a bit nervous when doing this, because I did it outside with -10 degrees Celsius and with all of those plastic clips and connectors, I was worried that I brake them all. But at the end, nothing broke and car starts as new!
|
||
|
|
|||
Cisco

|
|
||
  Member No: #1429
Location: Glasgow |
Hi Olmala, That's a tremendous tutorial, well done and thanks ATB Frank |
||
|
|
|
||
cruiserphil

|
|
||
   Member No: #38
Location: Celbridge |
Great job. Many thanks for going to to the ground of recording it. Best regards, Phil C. |
||
|
|
|
||
|
olmala
|
|
||
|
Member No: #1919
Location: Ylivieska |
You're all welcome. Info in this site and all of your help has helped me so tremendously that had to give something back.
|
||
|
|
|
||
gmerry

|
|
||
 Member No: #21
Location: Scotland |
Olmala, great record of the job (way better than a Haynes if there was one). Thanks again to E3steve, I think he was the first to do a starter motor change via fusebox disassemble. regards |
||
|
|
|
||
|
robingc33
|
|
||
 Member No: #2303
Location: NW Essex |
Great tutorial thanks Olmala - very clear - I like the colour coding. It almost makes me want to try it Robin |
||
|
|
|
||
vaho

|
|
||
  Member No: #2228
Location: Tallinn |
Thank You Olmala. I got some useful tips, especially about the removal of the starter motor. The Citroen guide is somewhat unclear, how to rotate and which end first you have to remove the motor. Some things that I did differently: first I found it easier to only remove the fuel filter housing, that way you can get straight down access to two of the bolts. For third one you have to use the movable joint of course but you can see and retrieve the bolt easier I think. I also found easier to unscrew the little 8 mm nut from the electrical connection after the starter bolts were removed and the motor was turned clockwise so the end was facing the front of the car. 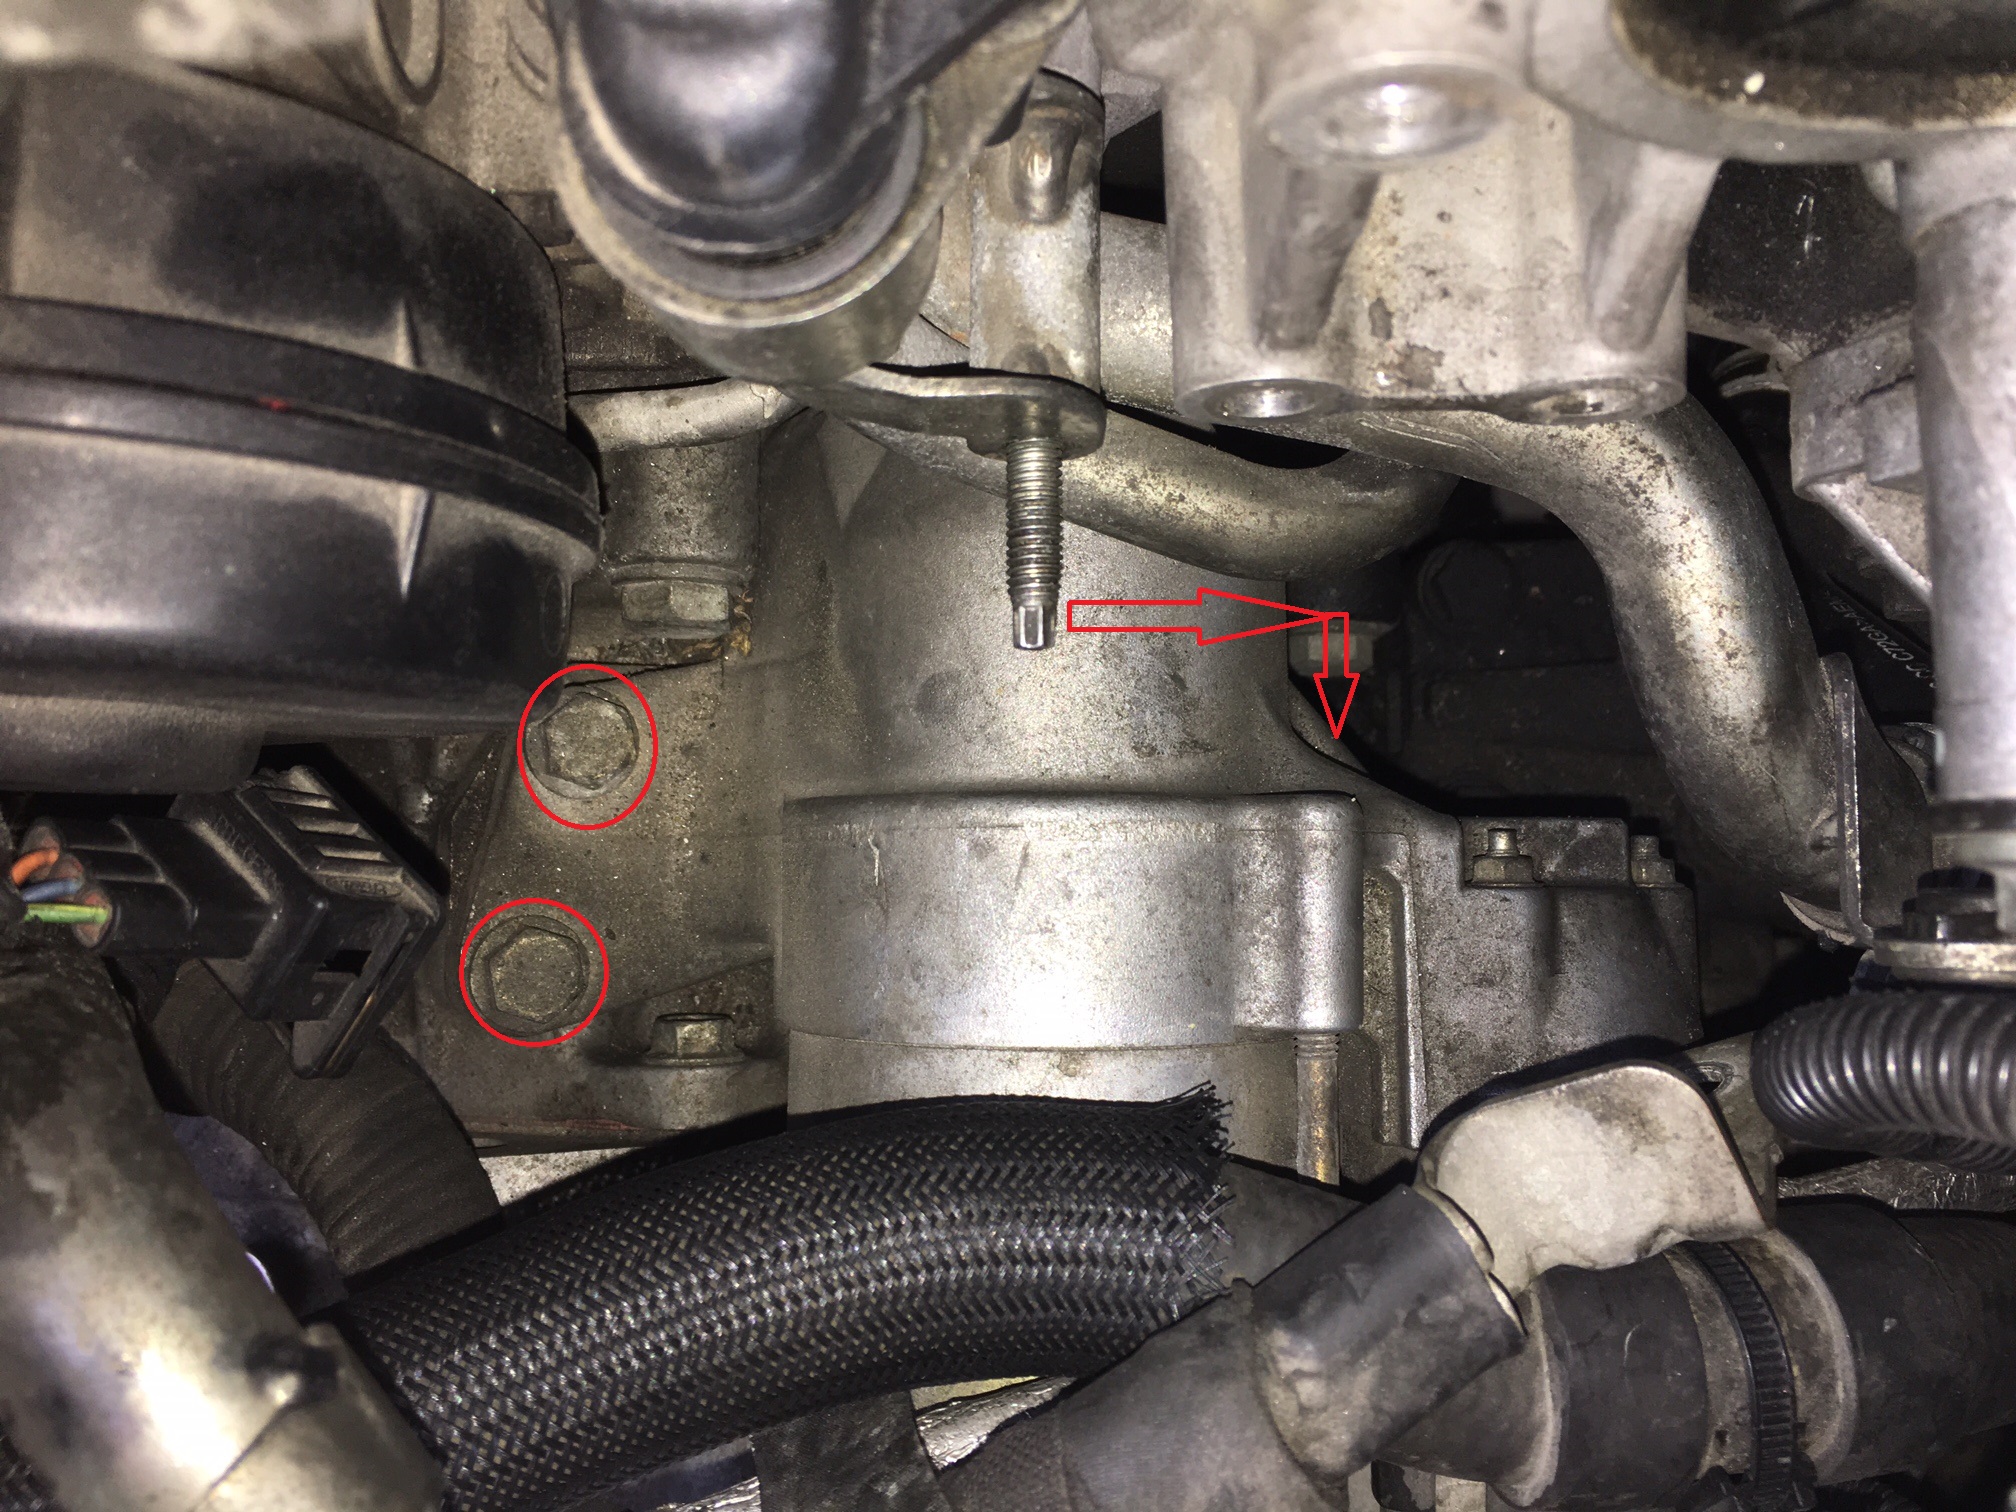 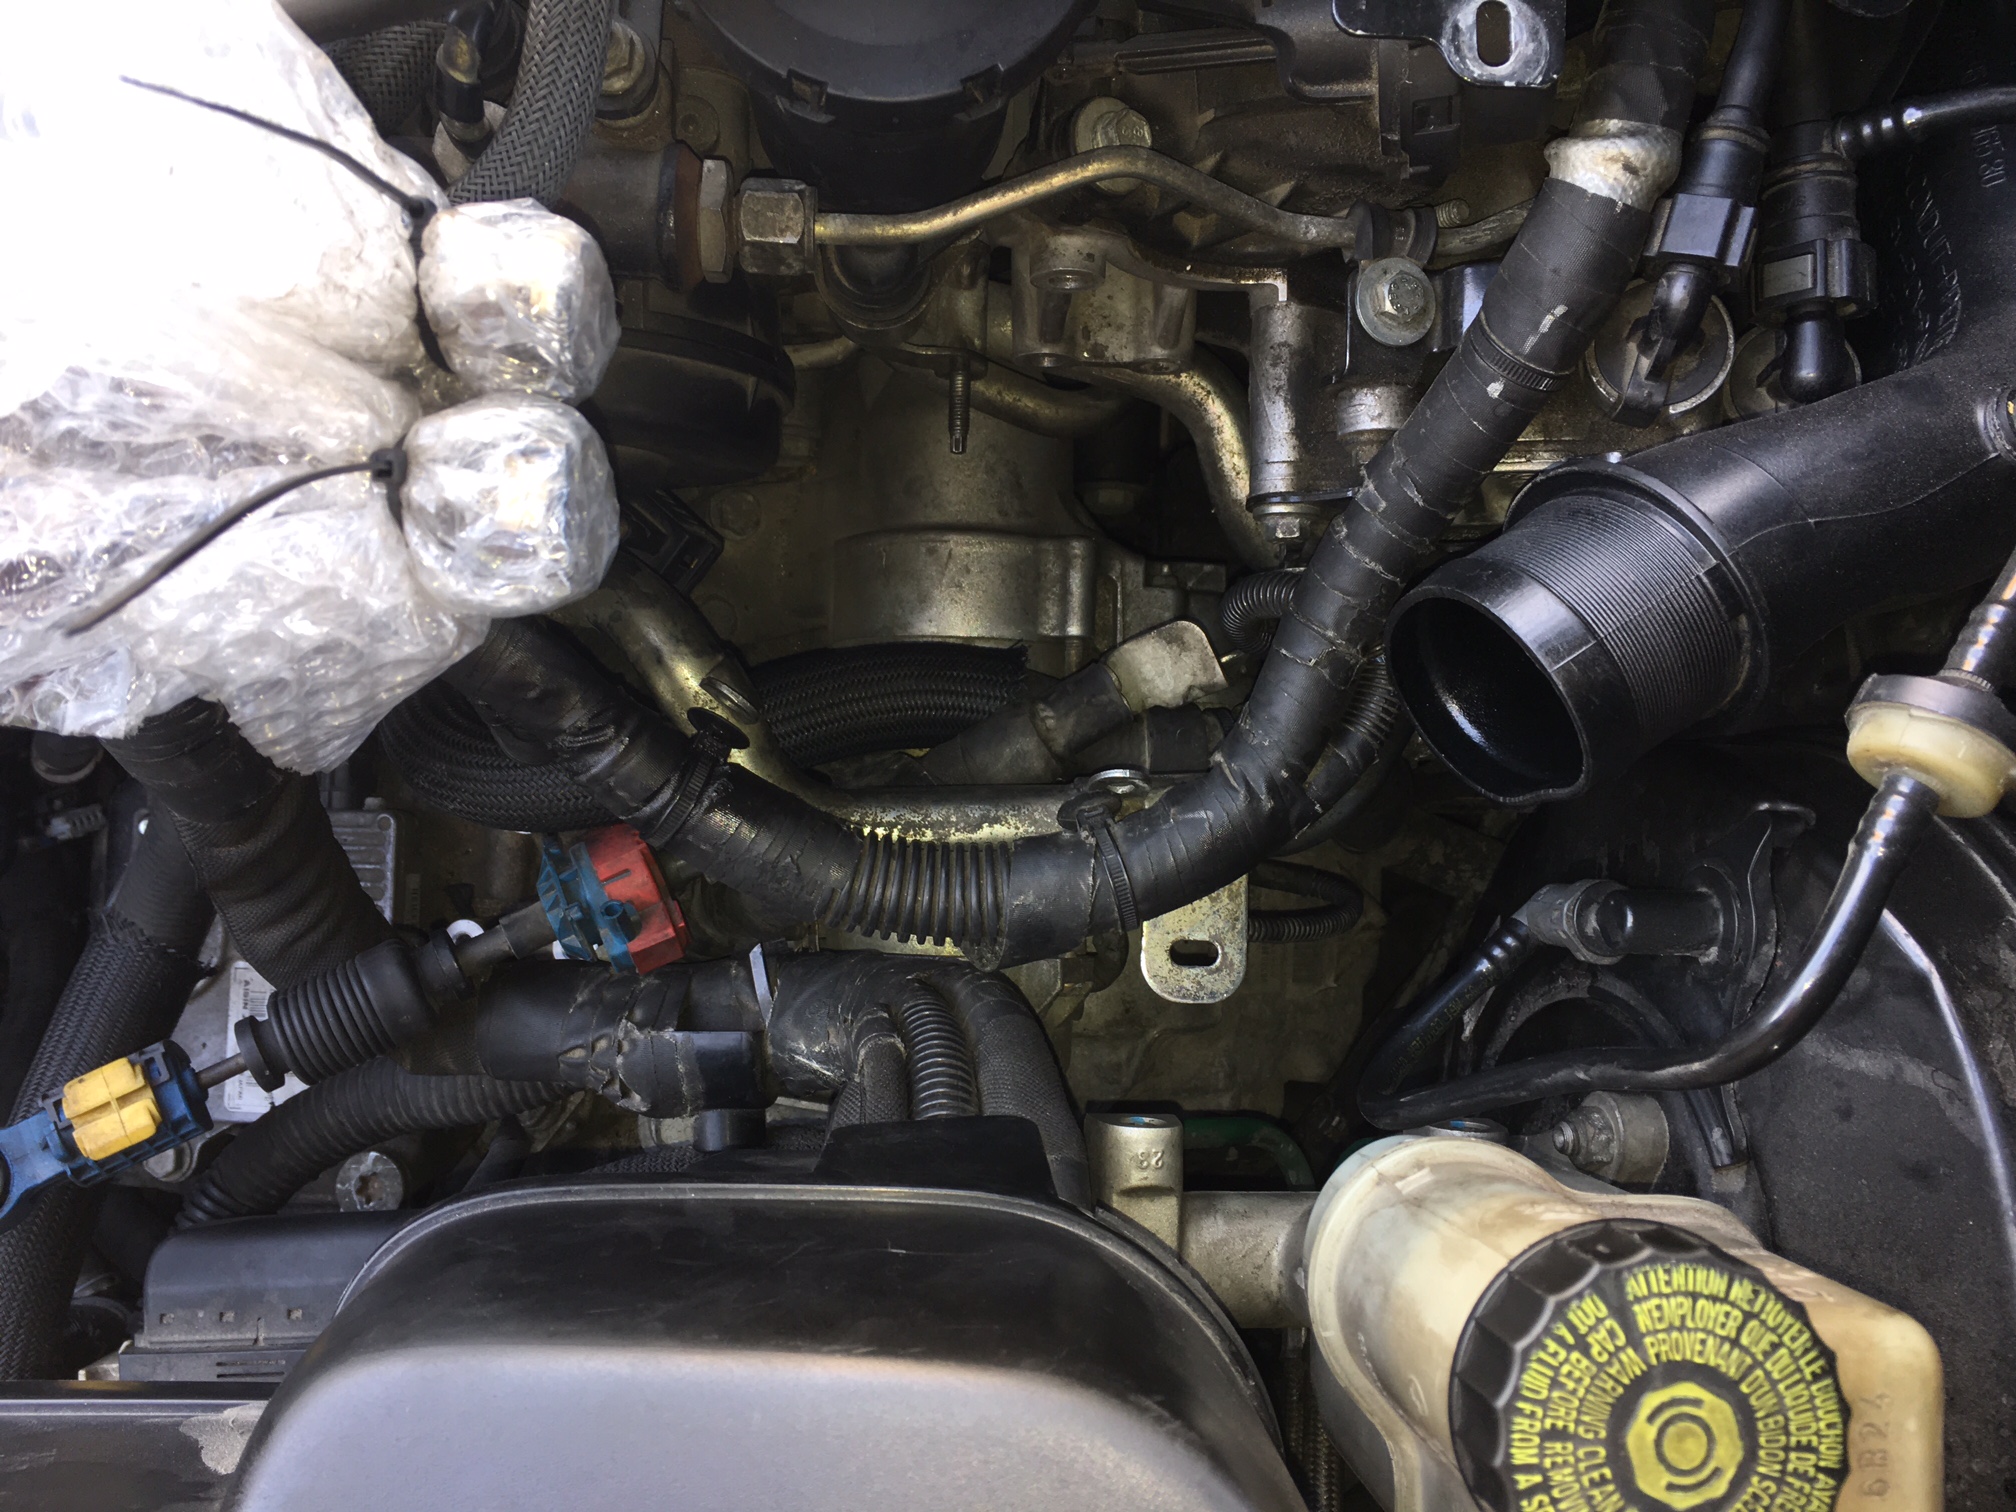 And finally I can´t believe what a difference the new starter motor makes, it is so much improved and healthy sounding starting. The car starts instantly now as opposed to the relatively slow cranking speeds before and sometimes a few to many seconds before startup. |
||
|
|
|
||
|
joopajaa
|
|
||
|
Member No: #3261
Location: Byroslavia, FIN |
Thanks for good information ja guide! I did not remove ecu but I did remove the fuel-filter housing. Job done and now starts like new! | ||
|
|
|
||
 User Colour Key: User Colour Key:Head Administrator, Administrator, C6 owner, Technical Expert, C6 Premier Discount Club |
|
Privacy Policy | Cookie Policy | Site Disclaimer | Contact Details | Warranty | Sitemap | C6 Insurance | Quick Facts | Re Call Info | Downloads | Error Codes
| Site and Graphics created by: C6Dave Forum Icons by Axialis Emotes by Seb |  |

