| C6owners :: Forums :: C6 Support :: The Garage |
<< Previous thread | Next thread >>
|
Front hub support lower bearing problem |
    Please Register to enjoy additional Member Benefits |
| Author | Post | ||
travlician
 
|
|
||
   Member No: #350
Location: Paradera |
This weekend I decided to check why the car gives so much noise over uneven terrain. Two months ago both the front lower support arms and the left FRIP joint have been replaced (the usual wear). However I noticed lately that the left front suspension sounded just like before the work had been done an suspected something got loose. I found that there where the lower support arm is connected to the hub support, there is some kind of bearing (metal cylinder with a hole to pass the bolt and some rubber between the hub support and this cylinder) with a lot of play, I could move the wheel a few centimeters (horizontal and vertical) with some force. I checked the parts list and the repair manual but this does not seem to be a replaceable part and suspect the complete hub support needs to be replaced to do a proper repair. For the moment I filled the space between the cylinder and the hub support with PFTE shims I happened to have laying around (which made the noise disappear) but I wonder if any of my fellow C6 owners have had the same problem and if so, how that was solved. Any others ideas always welcome! | ||
|
|
|||
gmerry

|
|
||
 Member No: #21
Location: Scotland |
Hi Travlician, to avoid any misinterpretation, could you show offending item on a marked-up sketch, or better still the exploded parts drawing. thanks G |
||
|
|
|
||
cruiserphil

|
|
||
  Member No: #38
Location: Celbridge |
Trav, If I'm correct it's the bushing in the hub support that the forked end of the wishbones fits around? I replaced one recently. You're correct, the part is not available from Citroen, but it is available as a spare part on eBay and is the correct fit. See here - Click Here - Best regards, Phil C. |
||
|
|
|
||
e3steve

|
|
||
 Member No: #1163
Location: Warsash, Hants & Palma de Mallorca, Spain |
Yep. Mine was that bush flopping about too! | ||
|
|
|
||
|
travlician
|
|
||
|
Member No: #350
Location: Paradera |
Gmerry, here's the image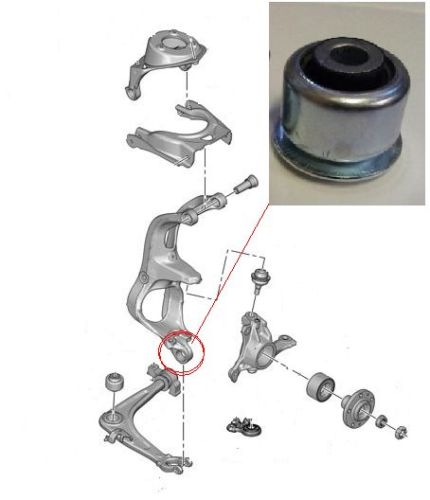
|
||
|
|
|
||
|
gmerry
|
|
||
|
Member No: #21
Location: Scotland |
Hi Travlician, Neat Car Parts seem to have them on ebay. probably best to go with Phil's recommended supplier. Just checking that its the rubber that has gone in this bush and that the metal press fitting is still good regards G |
||
|
|
|
||
|
cruiserphil
|
|
||
|
Member No: #38
Location: Celbridge |
G, I can't actually remember who I got it from, but it may have been Neat Car Parts. I just used the link as an example of what's available! Best regards, Phil C. |
||
|
|
|
||
|
travlician
|
|
||
|
Member No: #350
Location: Paradera |
Thanks all guys for the valuable info. I ordered from Lithuania as from the UK postal service to Aruba is even worse and the price is right. It's just the rubber that has gone, just hope I can get the old ones out (need a press or can it be done with a bolt and proper supports to press where it needs to be pressed out/in?). | ||
|
|
|
||
|
cruiserphil
|
|
||
|
Member No: #38
Location: Celbridge |
Trav, You don't need a press, you're second option will work. The receiver to accept the pressed out bush will need to be thin walled as the amount of land around the bush to support it is very thin. I used a short piece of exhaust pipe that I shaped into an oval. With the bolt method you don't need to take the carrier out or release the driveshaft. Just remove the bolt from the assembly and push the wishbone down far enough to keep it out of the way. Best regards, Phil C. |
||
|
|
|
||
|
Jodyone
|
|
||
 Member No: #1240
Location: Cornwall |
I did this job the other day. I used a combination of large sockets and a three-arm puller to remove and replace the bushing. A 30mm socket was perfect for pushing the old one out, and a 38mm bearing against the casting for installation. I used a spacer plate from a brake pad wind-back tool to clear the inner bush and push instead on the outside face, to avoid distorting the rubber section. Doubtless, there are any number of other ways to achieve it. I practised on a spare front pivot (from when I had the dealer do the other side, very expensively) to refine my technique. Pics below!   
|
||
|
|
|
||
|
cruiserphil
|
|
||
|
Member No: #38
Location: Celbridge |
Jodyone, Great post and clever way of doing it. I'll be doing it this way next time!! Best regards, Phil C. |
||
|
|
|
||
 User Colour Key: User Colour Key:Head Administrator, Administrator, C6 owner, Technical Expert, C6 Premier Discount Club |
|
Privacy Policy | Cookie Policy | Site Disclaimer | Contact Details | Warranty | Sitemap | C6 Insurance | Quick Facts | Re Call Info | Downloads | Error Codes
| Site and Graphics created by: C6Dave Forum Icons by Axialis Emotes by Seb |  |

