| C6owners :: Forums :: C6 Support :: The Garage |
<< Previous thread | Next thread >>
|
Replacement DLR's from England |
    Please Register to enjoy additional Member Benefits |
| Author | Post | ||
speedfix
 
|
|
||
 Member No: #1043
Location: south west |
Ok back from Portugal, what a car for me the six speed manual 2.2 hdi is the one, eats the miles etc. Drat road fund increased £5.00 to £200.00 have to tax next. Back to the LEDs, with the light bulb holders dismantled look at the three metal strips, one long one this is earth - to indicator and daylight bulb, the two short ones are +,one is the feed for the indicator the other is for the + LED or was 15w bulb. Look for the + red lead on the LED and fit acordingly. If the pic is uploaded ok will put some more up. 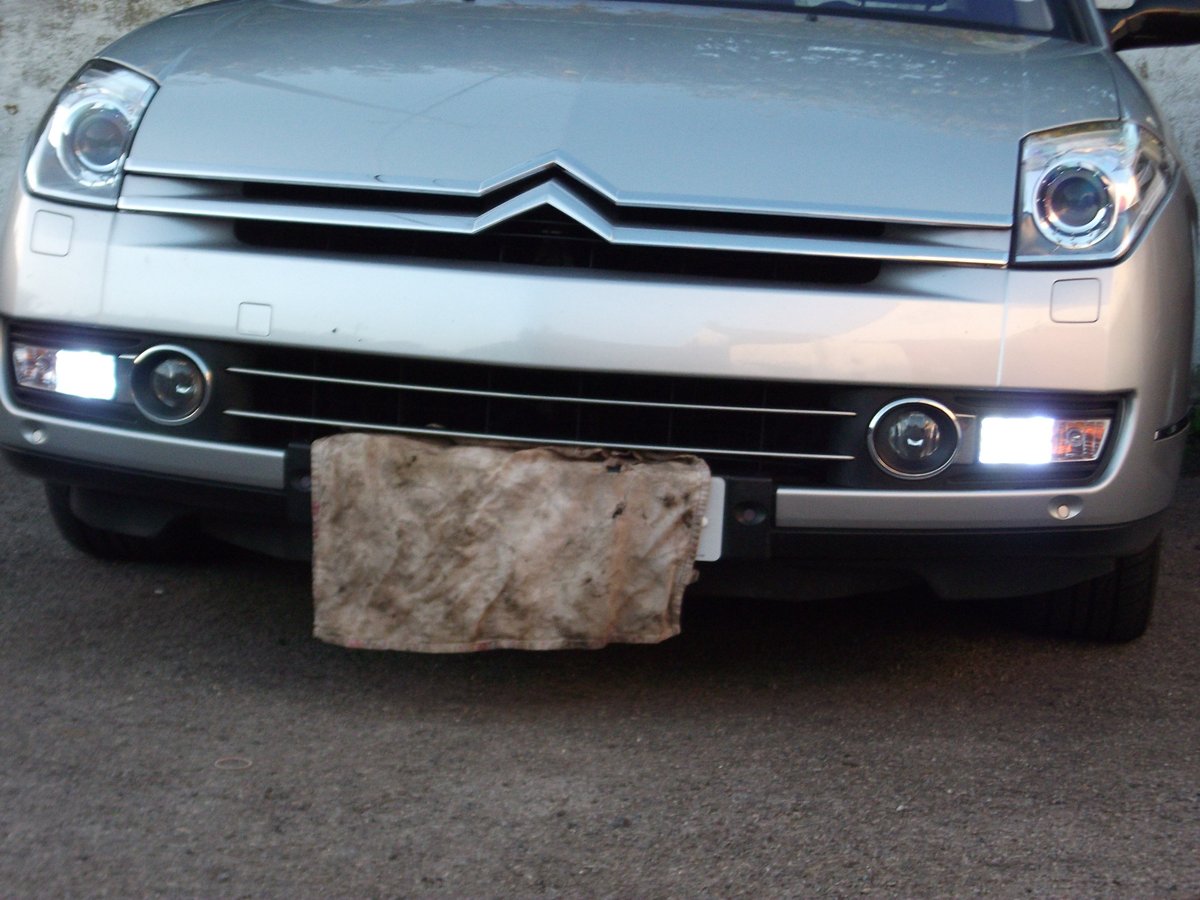 |
||
|
|
|
||
|
speedfix
|
|
||
|
Member No: #1043
Location: south west |
Dave FYI red wire is positive live and yes contary to your quote " no other earth is required." Earth - is a must. Three wires to light unit and one has to be -. 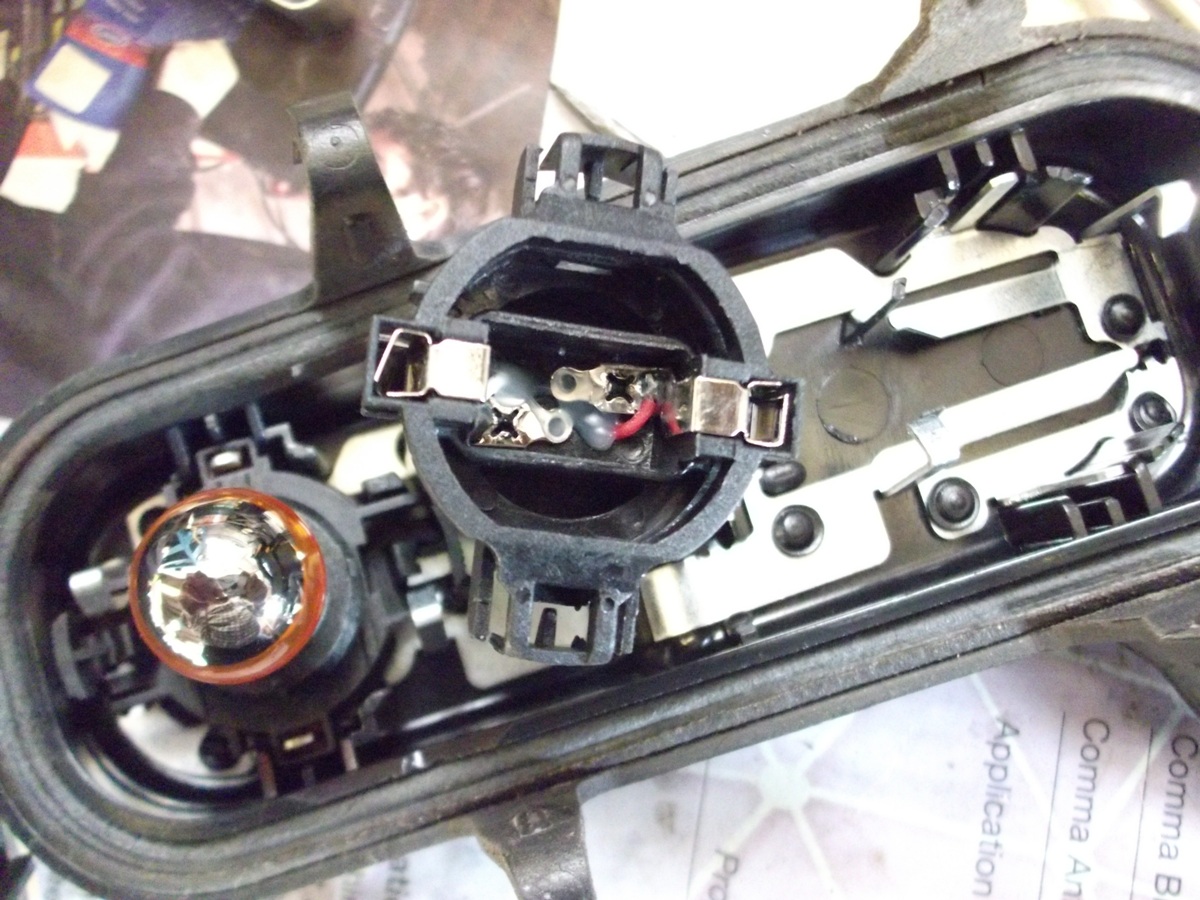 |
||
|
|
|
||
|
magicands
|
|
||
   Member No: #1021
Location: Coventry, Warwickshire |
Hi Speedfix & thanks for the information. Just to clarify then I have added a photo, perhaps you would agree that these are the correct terminals as per your statement above? Thanks, Gary 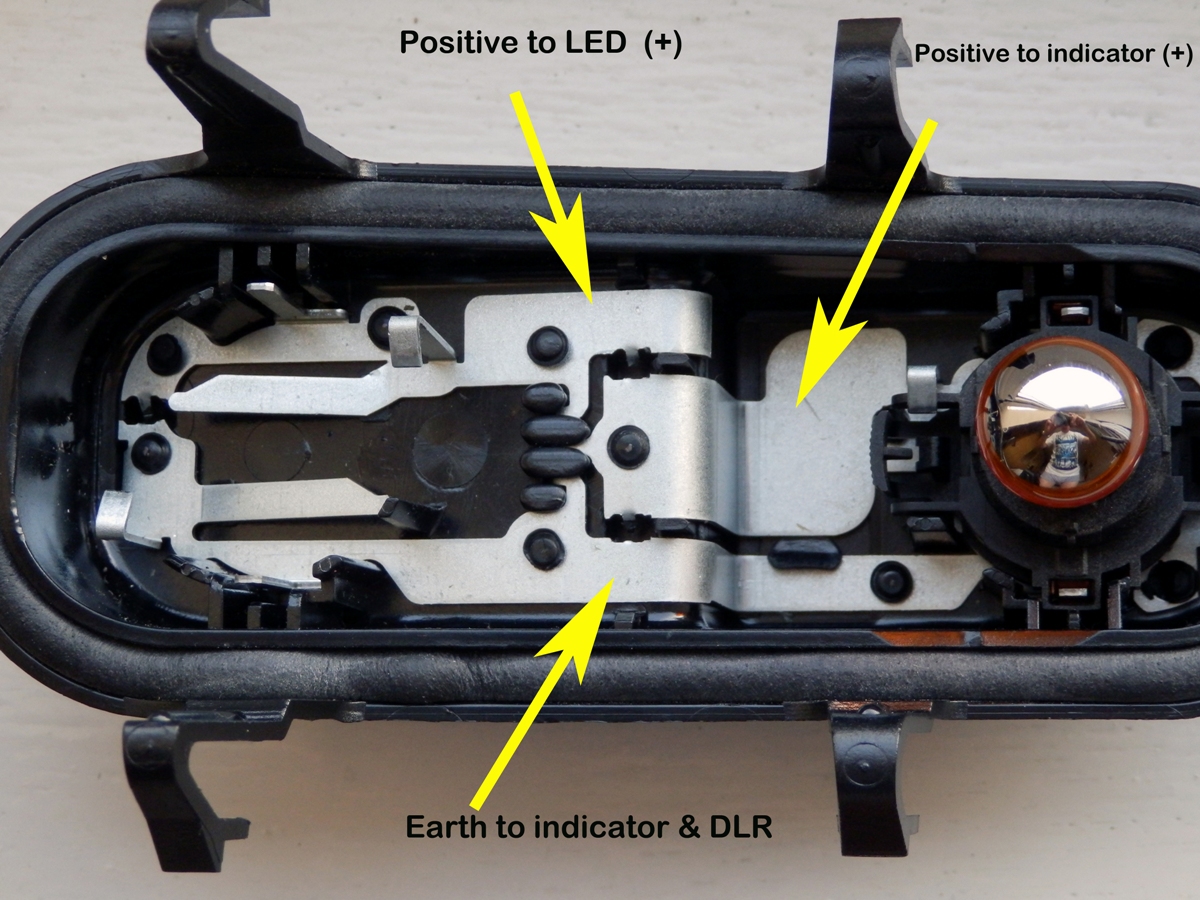 |
||
|
|
|
||
|
speedfix
|
|
||
|
Member No: #1043
Location: south west |
Gary that is correct, do check the soldered connections on the LEDS as one of mine had a fault also close the female connections carefully to aid a good contact with the LED holders to the metal supply tangs last use a connection cleaning fluid as the current to connetions is low. Also use a heat gun for the light assembley plastic locating clips before disassembly and assembly as the plastic can be brittle this time of the year . 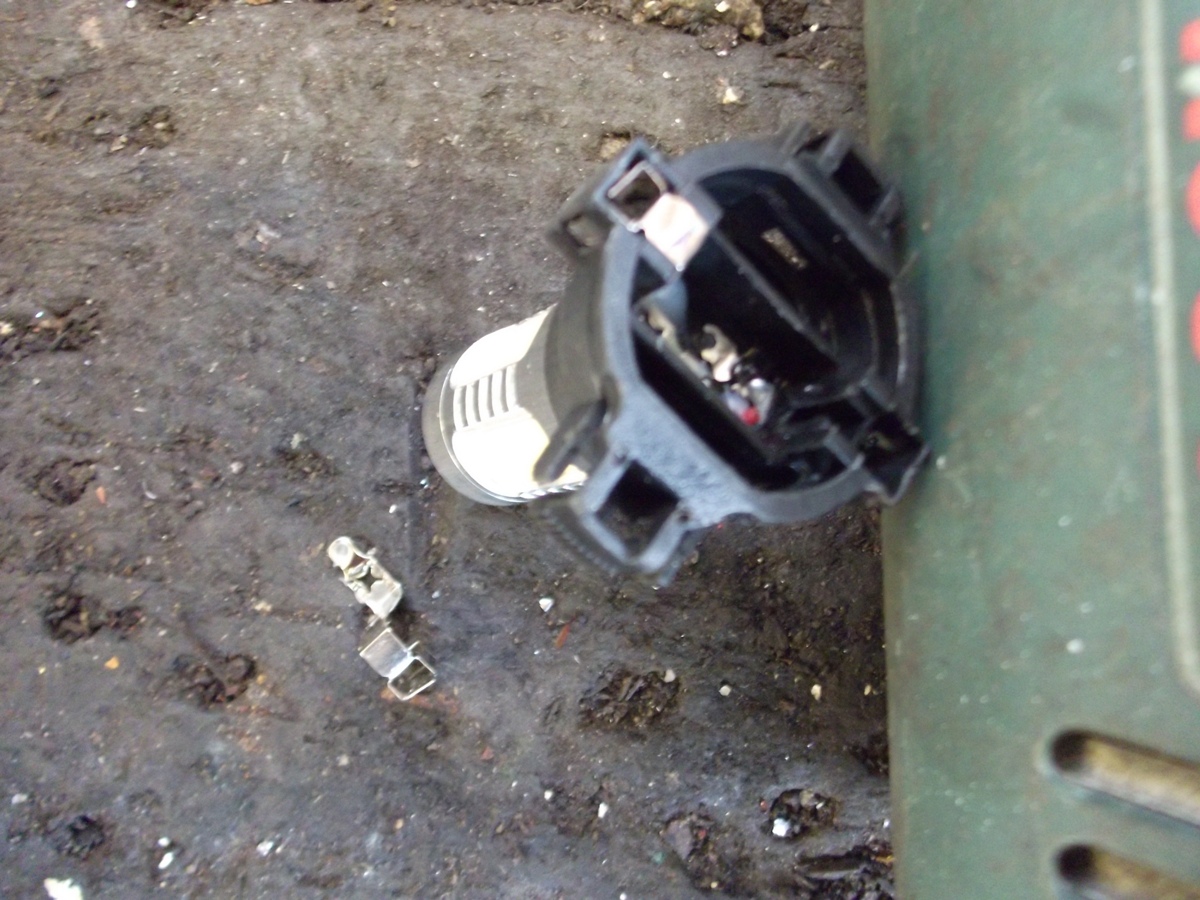 |
||
|
|
|
||
|
magicands
|
|
||
|
Member No: #1021
Location: Coventry, Warwickshire |
Thanks again for the heads up speedfix, will let you know how I get on. Gary |
||
|
|
|
||
|
C6Dave
|
|
||
   Member No: #1
Location: Northumberland |
speedfix wrote ... Dave FYI red wire is positive live and yes contary to your quote " no other earth is required." Earth - is a must. You miss read the post, when the unit is plugged in by itself before assembly no additional earth is required. The bulbs should illuminate OK with it hanging down. It's a way of checking before the holder is snapped back into the reflector housing and saves taking it apart again if there is an issue...... |
||
|
|
|
||
|
speedfix
|
|
||
|
Member No: #1043
Location: south west |
Oh really, Your quote one wire no earth is required. Why have you deleted your post to witch I replied to? |
||
|
|
|
||
|
C6Dave
|
|
||
|
Member No: #1
Location: Northumberland |
speedfix wrote ... Oh really, Your quote one wire no earth is required. Why have you deleted your post to witch I replied to? Nothing has been deleted, the post is still there.....  BTW, the 'UK supplier' are out of stock until circa 20th November |
||
|
|
|
||
|
speedfix
|
|
||
|
Member No: #1043
Location: south west |
Sorry, yes it is indeed there and did miss read it. More haste less speed! |
||
|
|
|
||
Dekidex

|
|
||
  Member No: #1471
Location: Untersiggenthal |
Any pics of what needs to be removed on the bulb?also what is the size of the bulb/wattage? |
||
|
|
|
||
smihaialex

|
|
||
 Member No: #1031
Location: Bucharest |
Quick question: won't the dash show an error if you change the bulbs to SMD LEDs?!? I've seen countless eBay & Amazon offerings for SMD LED replacements for W5W (sidelights, number plate lights & side signal lights), including some from popular automotive bulb manufacturer Philips, and while some state that they have a CAN BUS error prevention mechanism embedded, others (including the Philips) don't. Philips however does offer a separate system that clips onto the wires for CAN BUS error prevention. So another question would be: did you factor this in when deciding to switch to LEDs - are you planning to fit such devices or just ignore the error message in case it pops up in the Diagnosis menu?!? Thanks, Sam |
||
|
|
|
||
|
C6Dave
|
|
||
|
Member No: #1
Location: Northumberland |
No, no errors Sam as the bulbs are CanBus friendly  @Dekidex please follow the link in the opening post in the thread - Click Here - to the correct bulbs. They are however out of stock until 21st November 2013 The thread also explains what to do if you read through it properly. |
||
|
|
|
||
|
speedfix
|
|
||
|
Member No: #1043
Location: south west |
"Any pics of what needs to be removed on the bulb?also what is the size of the bulb/wattage?" Bulb wattage is 7.5 watts.I needed to remove just one plastic nib on each bulb for a tight fitment, do check the bulb contacts have a good connection before fitting. will see if a picture shows the position of nib removal. |
||
|
|
|
||
|
magicands
|
|
||
|
Member No: #1021
Location: Coventry, Warwickshire |
I have today managed to find enough time to replace the Factory fitted DLR's with the new LED's that I purchased some time ago. See posts above to find the lamps I found in England. Dave was unable to get his to illuminate but after following the post from speedfix (above) my lamps worked right away. I will now talk you through some of the stripping issues and re assembly. 1) When removing the finisher (see photo 1) start from the inside of each one near to the grille, Dave suggests starting in the middle of the finisher but I found it impossible to move so went for the grille side and it pulls off the lugs there quite nicely, then just work along toward the other end pulling it off the locking pegs, it is tight but just give it a tug & it will move. 2) Once the finisher is off you can remove the entire lamp housing by pressing down on the 3 tabs that hold it in place using a flat blade screwdriver or similar, press down all the way but don't over press as you may snap the tongues and end up having to replace the lamp housing front, complete with glass at £65 !! (see photo 2) 3) once free disconnect the wiring plug from the rear of the unit by lifting the tongue up with a flat blade and pulling the connector off (see photo 3) 4) This next step is the tricky one as removing the lamp housings rear case to access the lamps can be problematic in so much that the 4 tabs that hold it in place will probably have age hardened and you will more than likely snap one or two of them (see photo 4) as you try to bend them back with a flat blade to get them clear. I pre empted this problem by purchasing 2 new rear lamp house units from Citroen before starting this job & its a good job I did as I managed to snap 2 tabs and I was being very careful. They are not expensive and you can get a pair for £34 with the lamps fitted as well!! 5) There are 2 V shaped metal tensioning clips at each side of the rear of the lamp housing and I suggest you remove them (see photo 5)by pulling them out as this will aid cover removal. 6) You can now remove the existing DLR and replace it with the Cree LED that is mentioned above, ensure that your polarities are correct though ( see threads from speedfix and myself to save me going through it again) Once fitted you should check the lamps work before re assembly (see photo 5) by starting the car. Please note, it has to be light enough for the DLR's to activate and if its dull your headlights will come on and not the DLR's.... so remember this as you may NOT have a fault just a lack of DAYLIGHT!! 7) Assuming all is ok then you can change the opposite DLR next by following the same procedure as outlined above. 8) Once you start to re assemble the parts I would recommend that when you get to the Finisher you start by locating the 2 tongues found at the bottom of it, these locate with 2 slots found in the bumper (Photo 5) at the bottom outside edge. Once these are in position then the finisher is aligned correctly and you can pop all the locking lugs back into place by applying pressure and working toward the grille. Its almost a reversal of the way you remove the finisher. 9) Your C6 should now look like photo 9 Thanks to Speedfix and Dave for other input on this thread and others regarding DLR's as without them I would not have managed to do this job first time around. Good luck folks. 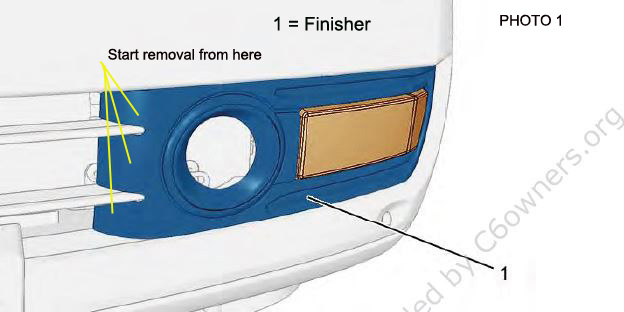 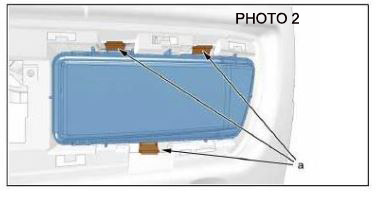 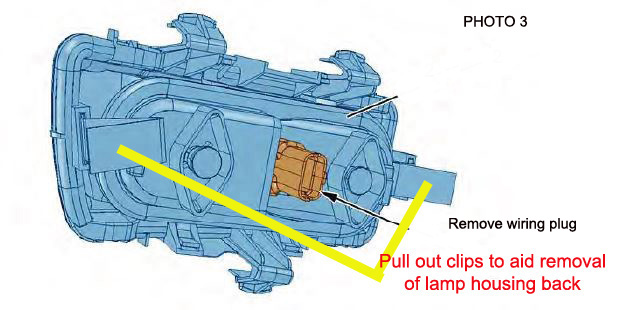 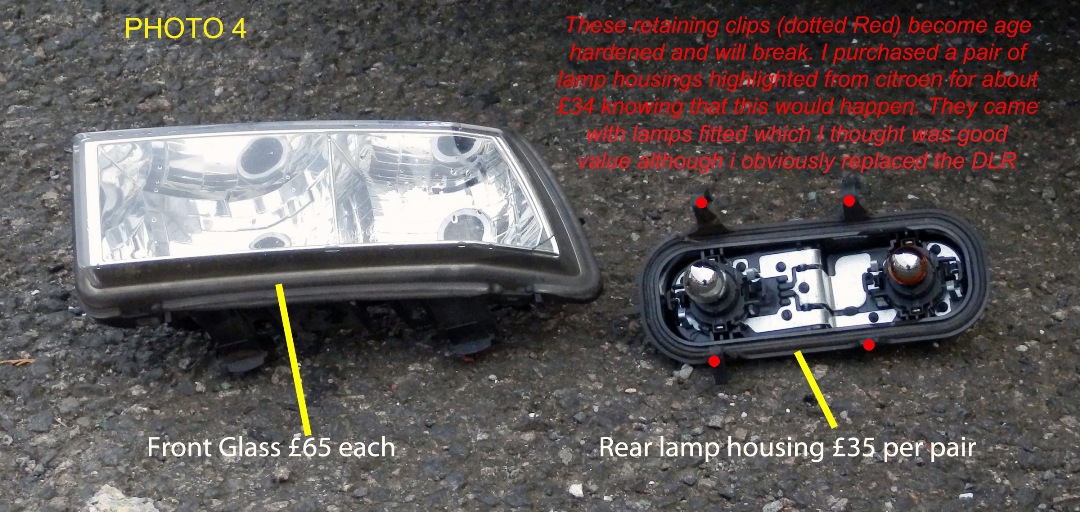 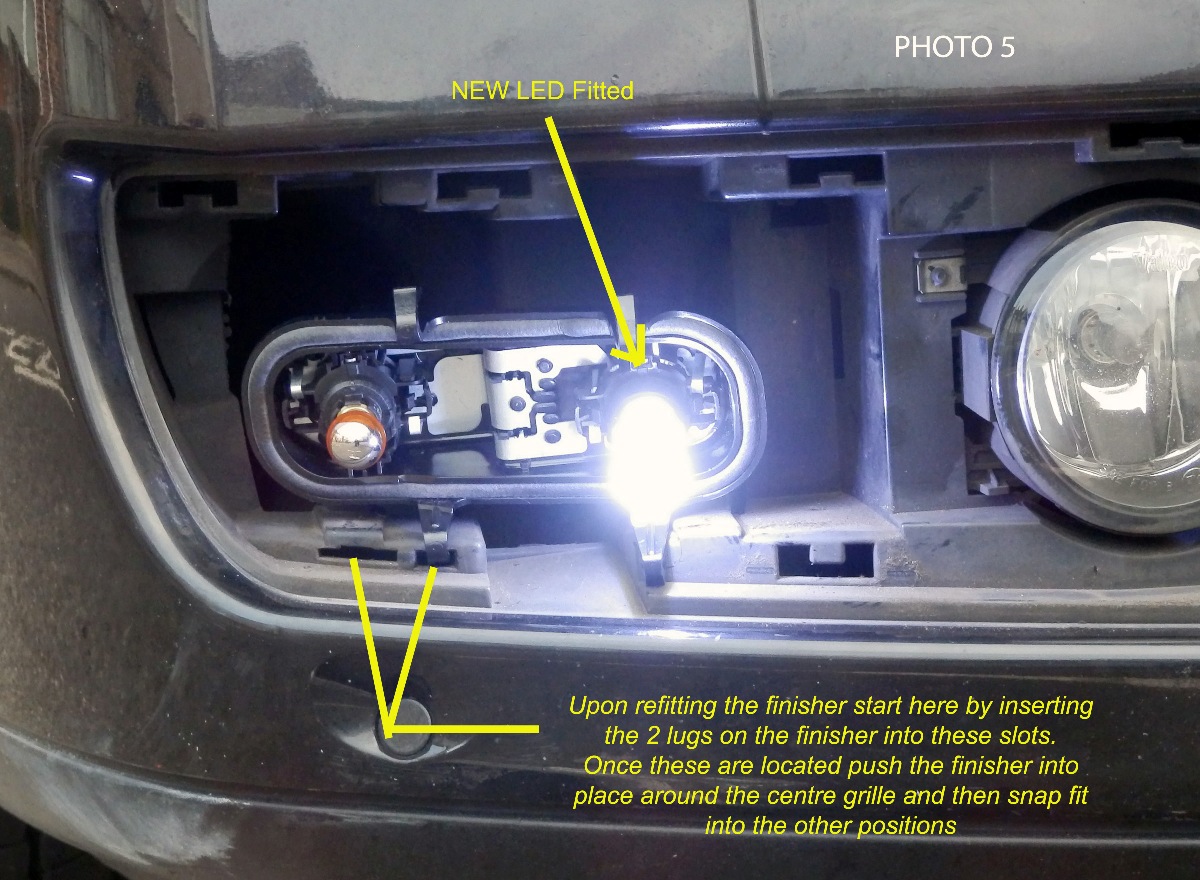 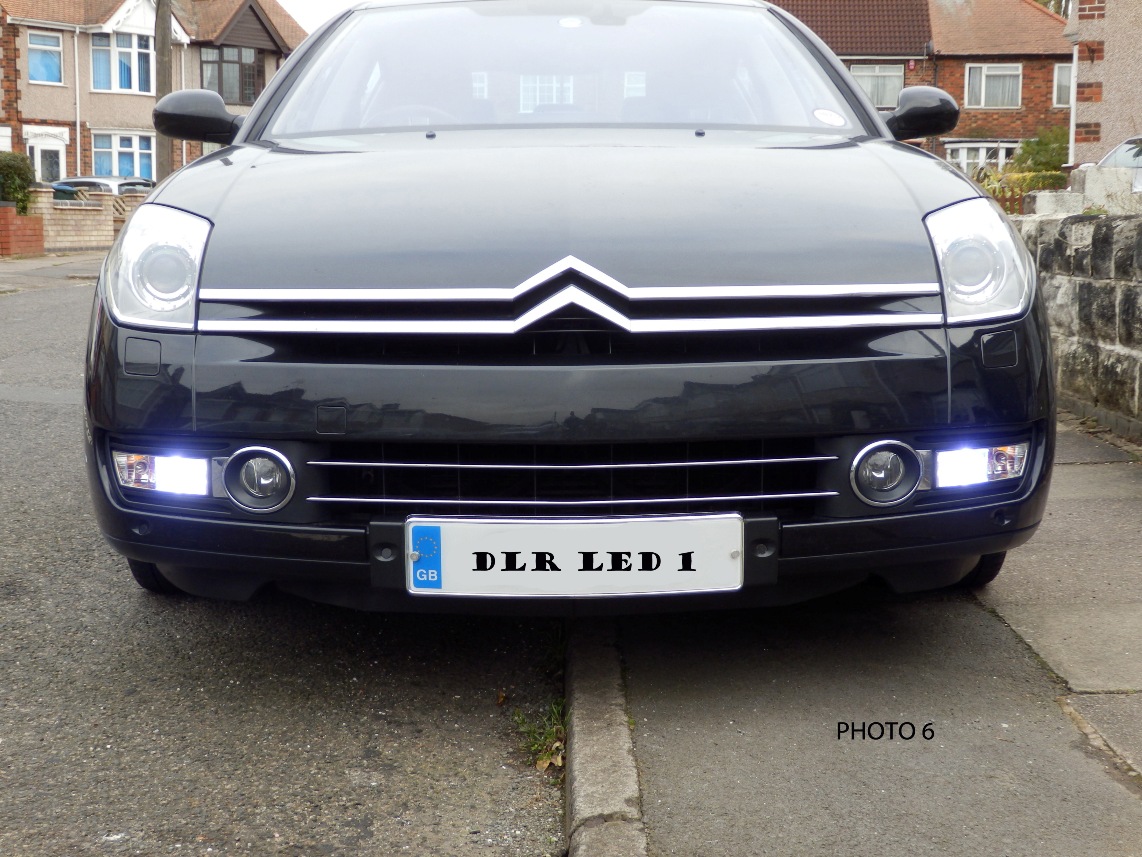 |
||
|
|
|
||
|
smihaialex
|
|
||
|
Member No: #1031
Location: Bucharest |
Awesome! I almost wanna do mine too now  Cheers, Sam |
||
|
|
|
||
 User Colour Key: User Colour Key:Head Administrator, Administrator, C6 owner, Technical Expert, C6 Premier Discount Club |
|
Privacy Policy | Cookie Policy | Site Disclaimer | Contact Details | Warranty | Sitemap | C6 Insurance | Quick Facts | Re Call Info | Downloads | Error Codes
| Site and Graphics created by: C6Dave Forum Icons by Axialis Emotes by Seb |  |


