| C6owners :: Forums :: C6 Support :: The Garage |
<< Previous thread | Next thread >>
|
"Suspension Faulty"! |
    Please Register to enjoy additional Member Benefits |
| Author | Post | ||
travlician
 
|
|
||
   Member No: #350
Location: Paradera |
For sphere replacement no Lexia is required, however need to depressurize manually (and bleed some LDS off in the process). Faulty spheres will not cause any error message (how strange this sounds!). Can you visually check the ride height where the suspension feels "ridiculously hard"? I had a problem with the stiffness actuator (on the rear suspension) that caused the suspension to drop and therefore no suspension (bouncing like a CX with hard spheres) and after a while suddenly came up to level and suspension back to normal. I got this acator out of the control body that contains the extra spheres, cleaned it and since then no problem. I figure that when switching from "stiff" to "smooth" mode the actuator did not reach it's position properly and this causes a massive LDS leak to the return lines. I did get the "Suspension faulty" message at times, as far I can trace this it's because the ride height was not reached in a timely manner. Static checks were all ok (including ride height and suspension sphere checks). |
||
|
|
|
||
C6Dave

|
|
||
  Member No: #1
Location: Northumberland |
dsharples wrote ... I said how about we change the stiffness sphere? They said "we really don't want to do it, as we don't believe it will solve the problem - these new spheres don't fail. We have never changed one." Oh dear. Those spheres do fail, which at least 2 of our members can confirm. |
||
|
|
|
||
gmerry

|
|
||
 Member No: #21
Location: Scotland |
Hi Dave, sorry to here of your woes with the suspension. Actually changing any of the front spheres is a straight forward job. One you have the car up and supported safely, lower to lowest setting, then depressurise the front and rear circuits using the bleed screw located on the front and rear stiffness control units (sorry should have said you need to remove front drivers side wheel and the plastic mudguard liner). Then go and make a cop of tea, leave it 10 minutes for the suspension to fully depressurise. A tip is to make sure you have an overflow arranged for the LDS reservoir because a failed sphere may have injected a lot of nitrogen bubbles into the LDS increase its volume. Then when the fluid is depressuised the increased volumes will cause a nice little overflow back at the LDS tank. Get yourself a decent sphere clamp. The handle needs to be about 350mm to get enough leverage. Once depressurised, unscrew the old spheres, screw on the new (check new seal supplied with spheres are in place). Follow citroen's procedures for bleeding out the air. Note my posts from earlier this year had details of aftermarket manufacturers of the spheres, part numbers, pre-charge pressures tooling etc. I even sectioned a sphere to show the spikes that deliberately will puncture a flat sphere. Admin Edit: links added LDS Bleeding: - Click Here - Sphere options: - Click Here - Suspension Gone Hard: - Click Here - Regards G |
||
|
|
|
||
cruiserphil

|
|
||
 Member No: #38
Location: Celbridge |
Trav, Would you have some more detail on that rear suspension drop problem. My car has started to drop suddenly at the rear and then restore itself when driving. And sometimes it sinks at the rear to minimum level when shut down. I was about to start investigating but your solution sounds good. Was the actuator difficult to remove? Regards, Phil C. |
||
|
|
|
||
|
travlician
|
|
||
|
Member No: #350
Location: Paradera |
Hi Phil, The actuator was kind of hard to remove as it was very tight. I used a "monkey wrench" to get it out. It is located at the bottom of the rear firmness regulator (the thing with 2 spheres under the car at the rear end) and you need to remove the connector on the actuator, no need to remove anything else, just make sure the car is properly supported at the rear and raised as LDS connection will be opened where removing the actuator. Also need to depressurize before starting this operation. I had a temporary fix just to make sure the cause was with the actuator. I disconnected the cable to the actuator and connected a 12V dashboard light to the connector (the ECU reports an error if no load is found) and drove like that for about a month without any problems (remember that in that case the rear suspension can not switch to stiff mode which might influence the road holding, no issue here with speed limit at 80 km/hr (50 mph?). By the way, the official repair method is replacing the entire firmness regulator body (procedure is published in downloads)... |
||
|
|
|
||
|
cruiserphil
|
|
||
|
Member No: #38
Location: Celbridge |
Thanks for response. I'll have a go soon and report back. I'll price the valve as well. If I go for actuator dismantle I'll try to remember to take photos. Regards, Phil C. |
||
|
|
|
||
|
cruiserphil
|
|
||
|
Member No: #38
Location: Celbridge |
Well the rear of the car continued to sink occasionally after shut down, sometimes dropping like a stone. Occasionally while driving, the rear of the car would drop suddenly (mudflaps scraping the road) and then recover. It came to a head a few days ago when after dropping while driving it refused to rise for about 5 minutes. With Travlician pointing me to the firmness regulator I studied the system to try and get a feel for what would be going wrong. It appears that in switching from soft to firm the firmness regulator was sticking allowing a direct connection from the suspension struts to the hydraulic tank return resulting in the drop. Indeed I remember now that when driving the drops did occur on rough road. When parked the car presumably switches to firm mode when the ignition is switched off (incidentally, I think the diagrams for the firmness regulator in system description are incorrectly shown). Anyway here's the detail of the repair process I undertook (with photos) and so far at 2 days there has been no problem. First lower the car to low position and then depressurise. I used Lexia to de-pressurise. I notice it's good to release the LDS tank cap as there is quite a pressure build up in the tank otherwise as the fluid returns to it. Then disconnect the battery to make sure there's no chance the hydraulic pump would start. It's essential that the hydraulic system is de-pressurised as the job entails exposing areas that experience full pump pressure. Photo 1: This is the rear firmness regulator viewed from the leading end with the solenoid indicated. 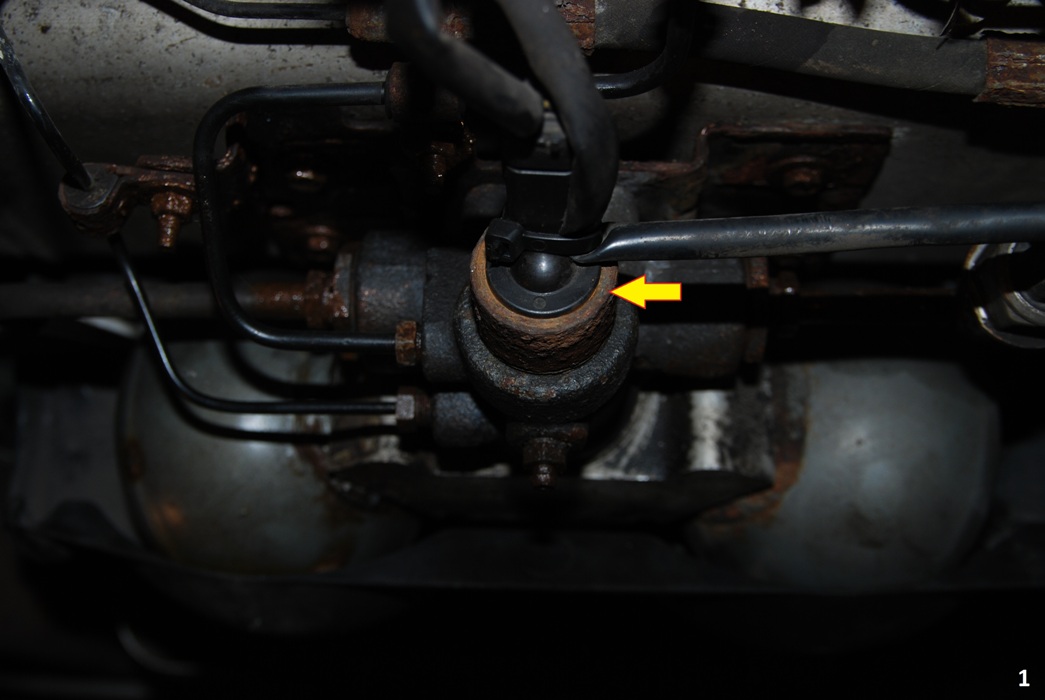 Photo 2: The plug is unplugged and the wiring moved clear. The solenoid has no flats on it's body so I used a chain vice grips to unscrew it (anticlockwise). Have a container at hand for a small spillage of LDS and then a continuous drip from the return circuit in the valve. 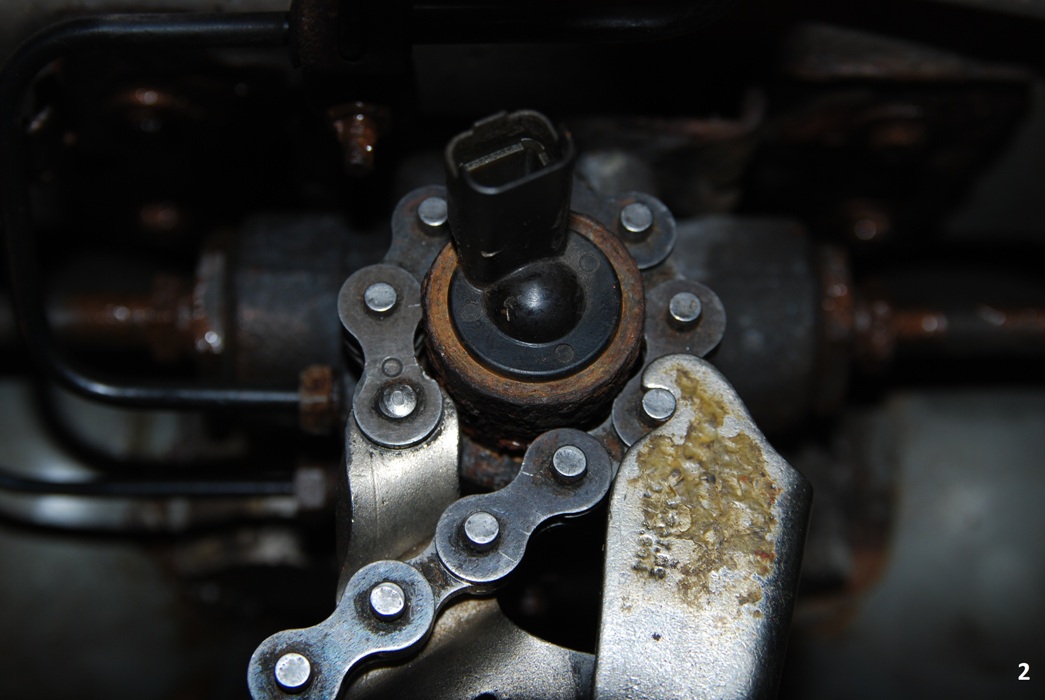 Photo 3: This is the solenoid removed with it's slide indicated. 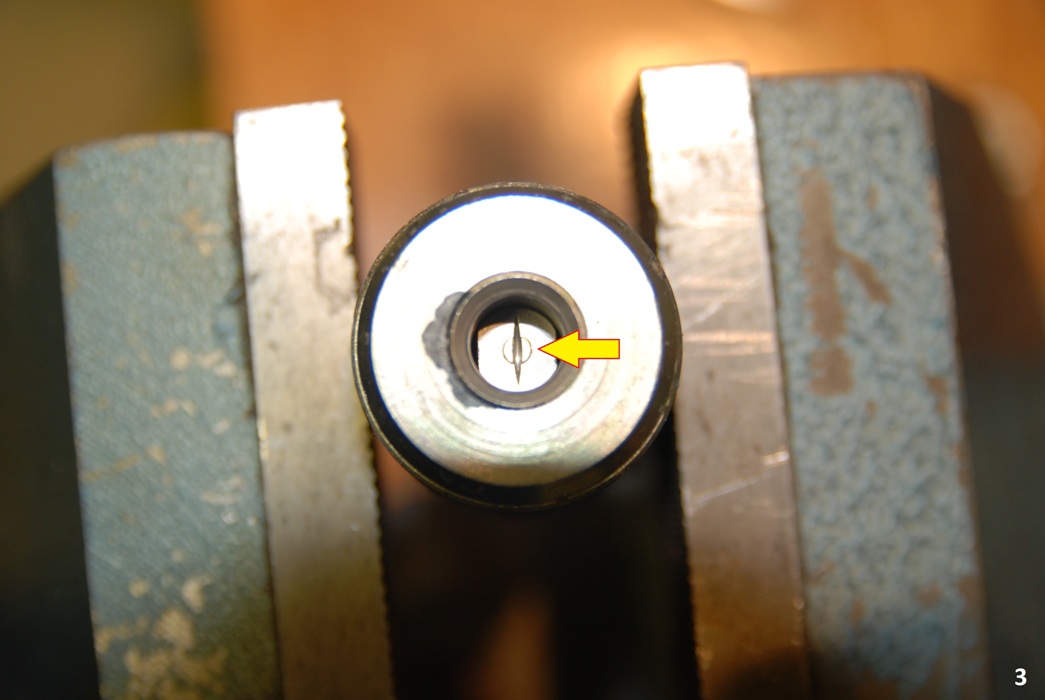 Photo 4: A few taps on the solenoid with the slide facing downward will be enough to work out the slide sufficient to grip it and remove it by hand. Be careful not to lose the small slide spring which may remain behind in the bore. There was no visible signs of wear on the slide or the solenoid bore but I gave them a very light rub with 800 grade sand paper (would have used 1200 grade if I'd had it).  Photo 5: I was interested to see what the indicated spool was. The end shown inserts into the solenoid bore but the spool appears to be a non moving item. I used a long nose pliers with electrical shrink wrap attached to the noses and gently twisted and pulled to remove, trying not to mark the surface or damage the O ring.(You can see the constant drip from the tank return). 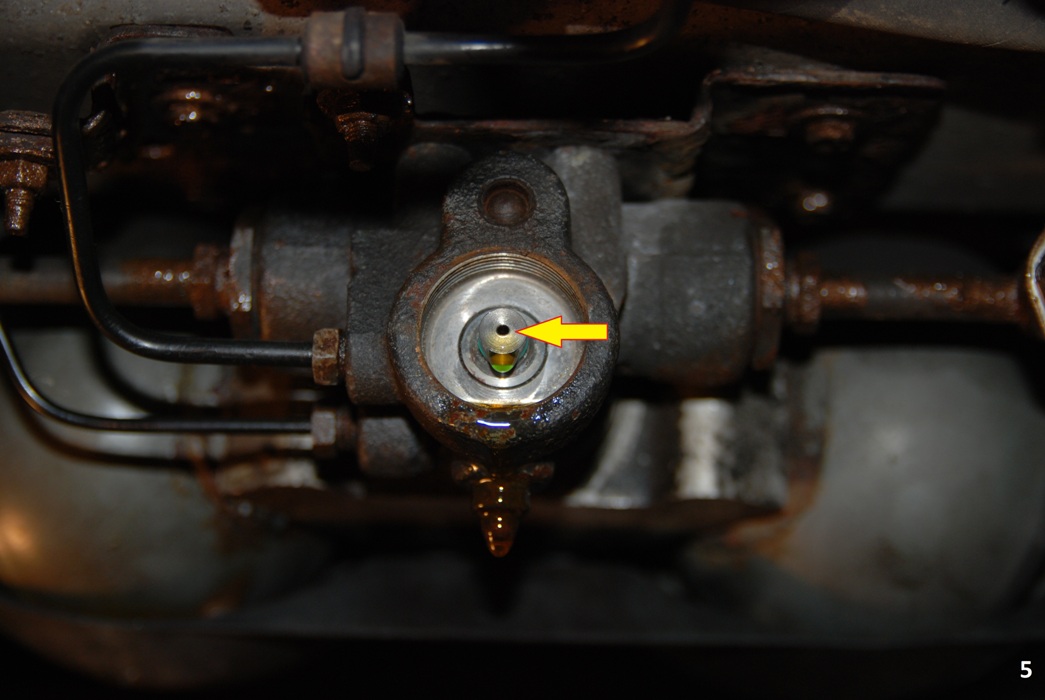 Photo 6: This is the bore. 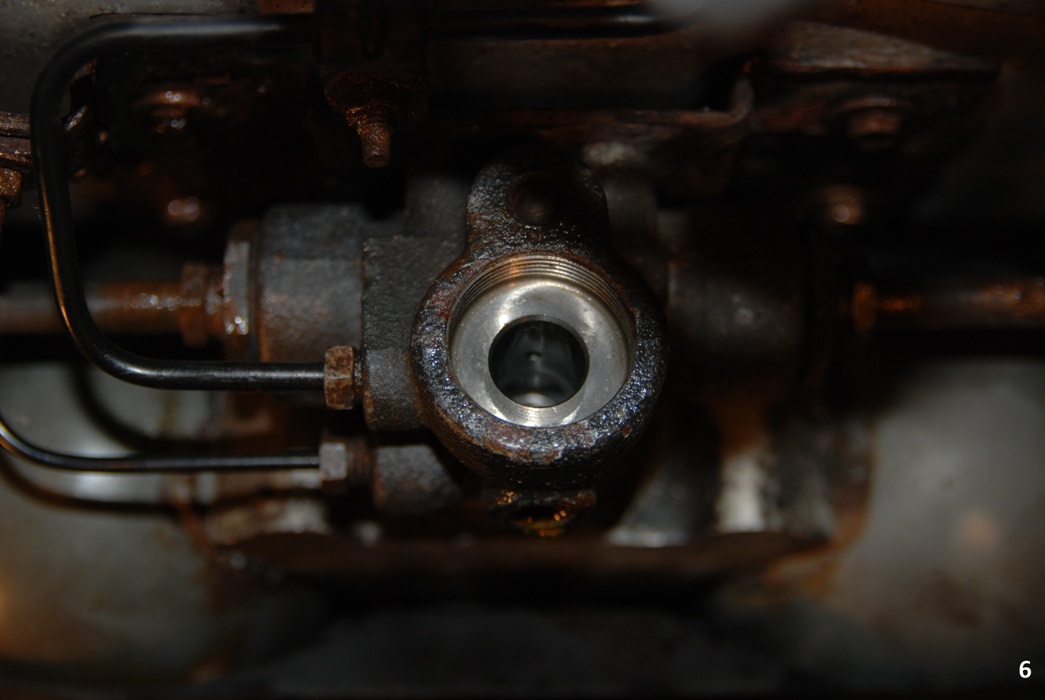 Photo 7: And this is the spool. The small O ring is removed from the leading end (I had some small marks to polish out - my fault). As this part does not move I refitted it without any other intervention. I also reassembled the solenoid and slide. A tip here is to hold the solenoid bore facing down and push the slide with spring fitted up into the bore. This ensures that the spring stays on the slide and holds it's position. Push the slide fully home. Refitting is as they say the reverse of removal. 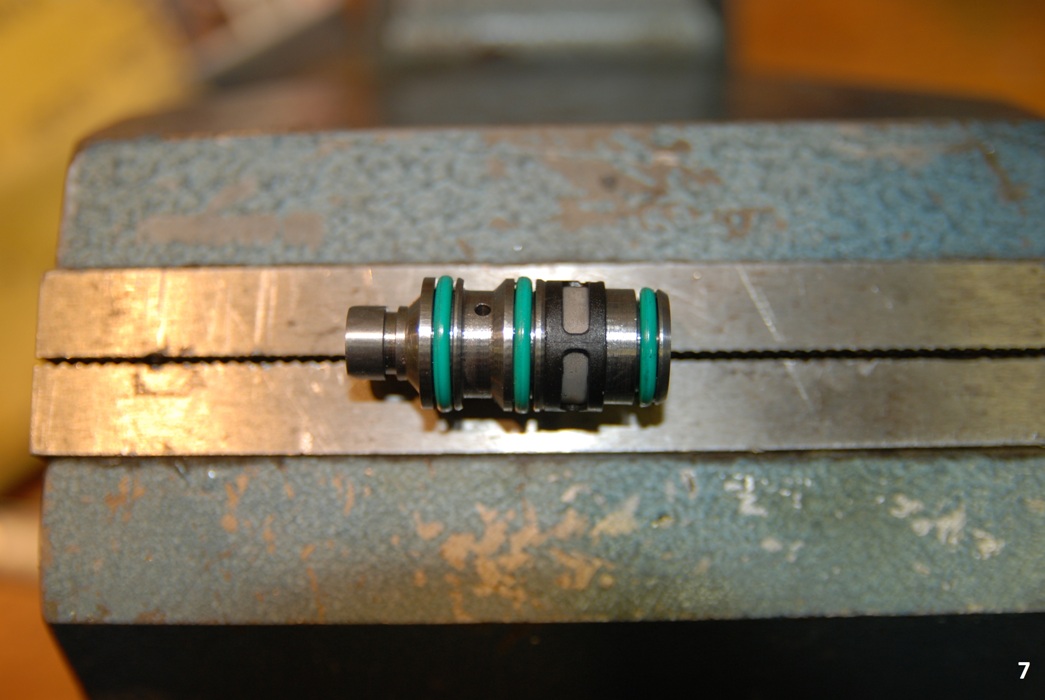 From the components here it was clear that the electrovalve set up is not as simple as that represented in the system description. The system description also indicated a hydraulic isolation slide valve that's piloted by the solenoid valve assembly. This is the slide valve that actually isolates the suspension from the comfort spheres. I decided to look at this. Photo 8: First the block carrying the comfort spheres needs to be removed. This gives access to the mounting bolts for the support bracket for the regulator valve housing and saves having to release the spheres. There is a plastic cover to remove first (3 x 10mm A/F nuts). The bracket indicated needs to be bent up clear after removing the 10mm A/F nut. 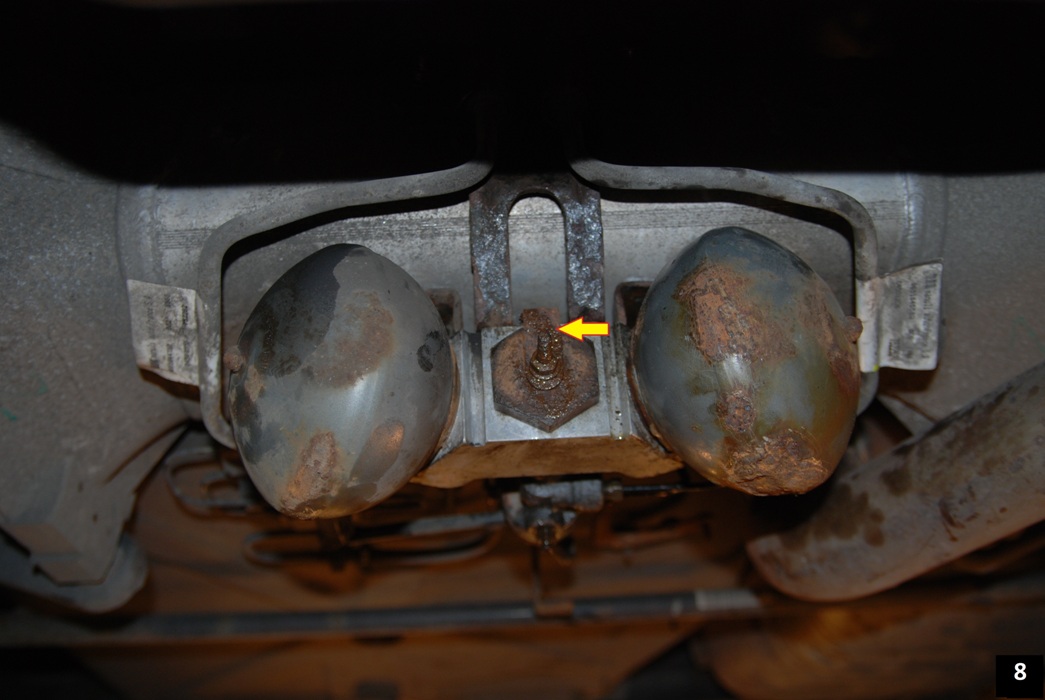 Photo 9: Bracket bent back as shown. The large nut is actually a banjo bolt. The head is 46mm A/F. 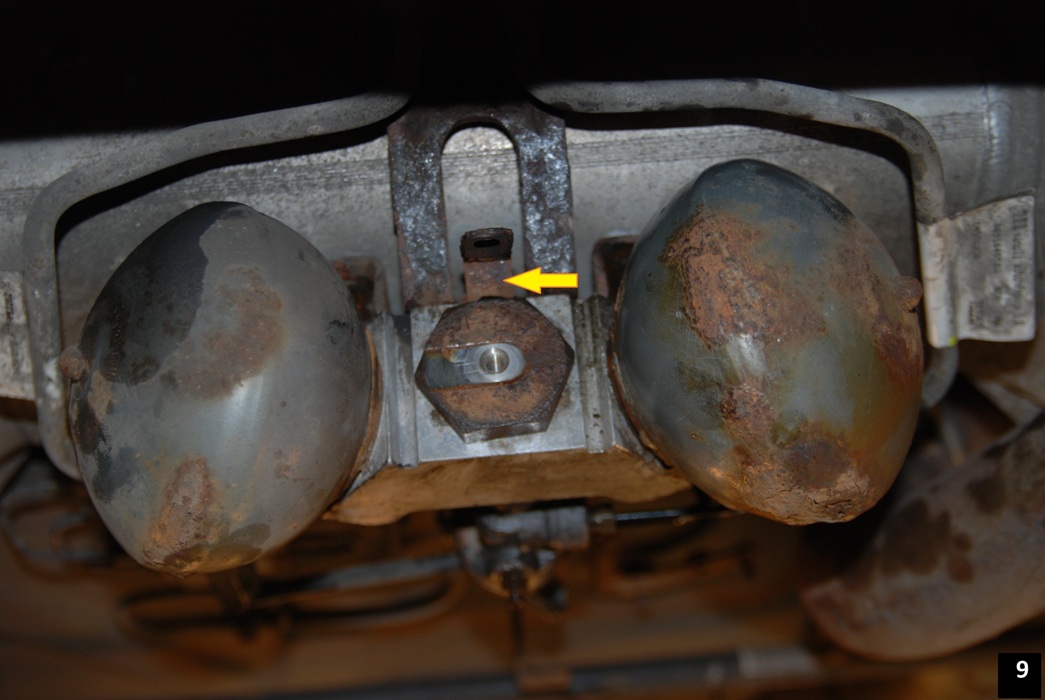 Photo 10: With the bolt and spheres removed, the slide valve is visible (indicated) as are the mounting bolts. (Notice the ravages of salted roads). There is minimal LDS spillage. The slide valve is held in by a C clip which would be very difficult to remove where you see it in this picture. So I decided to remove the regulator valve from the car. There is minimal spillage from the piping but the return pipe needs to be blocked to stem the flow from the tank while the valve is out. (I tied a balloon to the pipe!!). 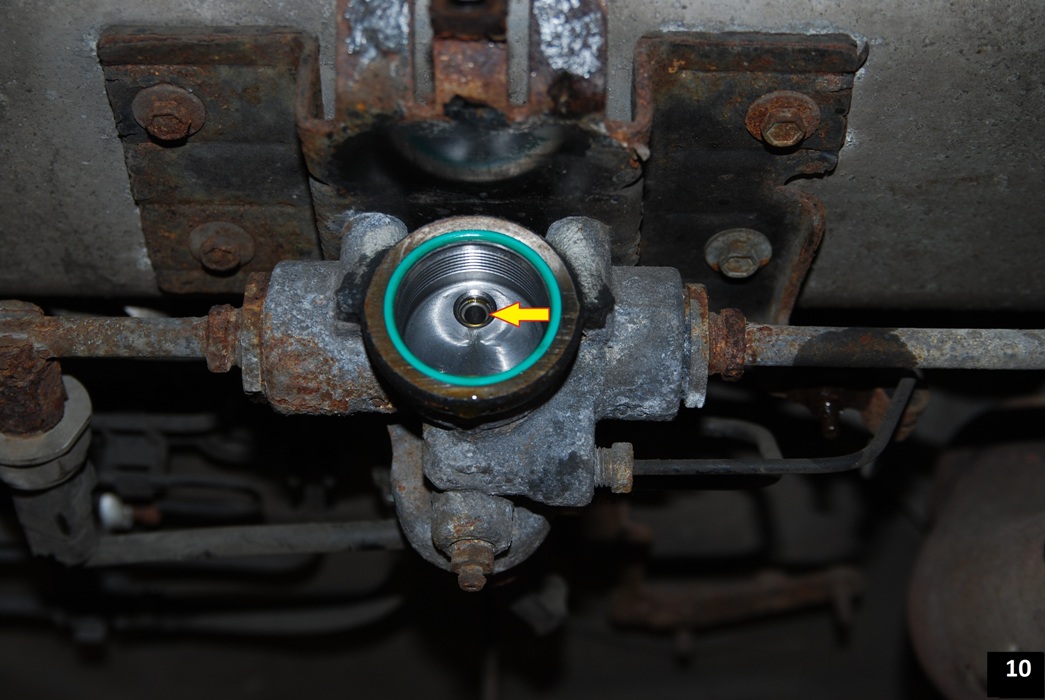 Photo 11: This is the regulator valve with hydraulic isolation slide valve and showing C clip removed. 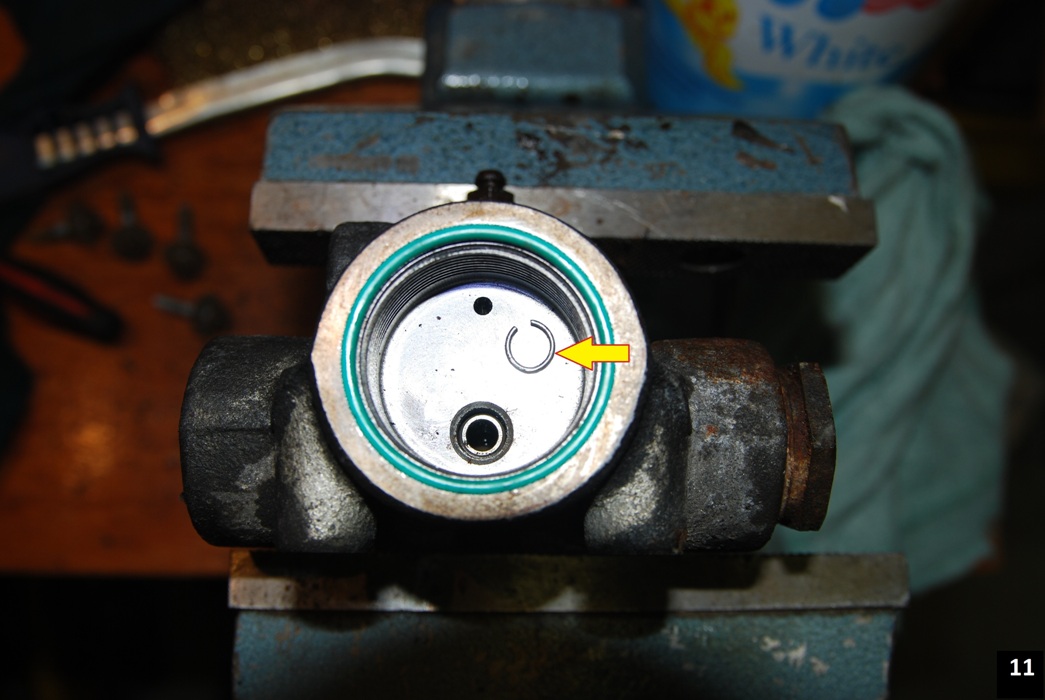 Photo 12: The slide valve would not tap out. The top is bored so I fitted a 5.5mm rawl plug and screwed in a self tapping screw. This gave me a grip to remove the slide and the rawl plug protected against damage.  Photo 13: This is the slide valve and spring as it came out of the bore. I could see no visible wear so I just gave the slide valve a light rub with 800 grade paper. 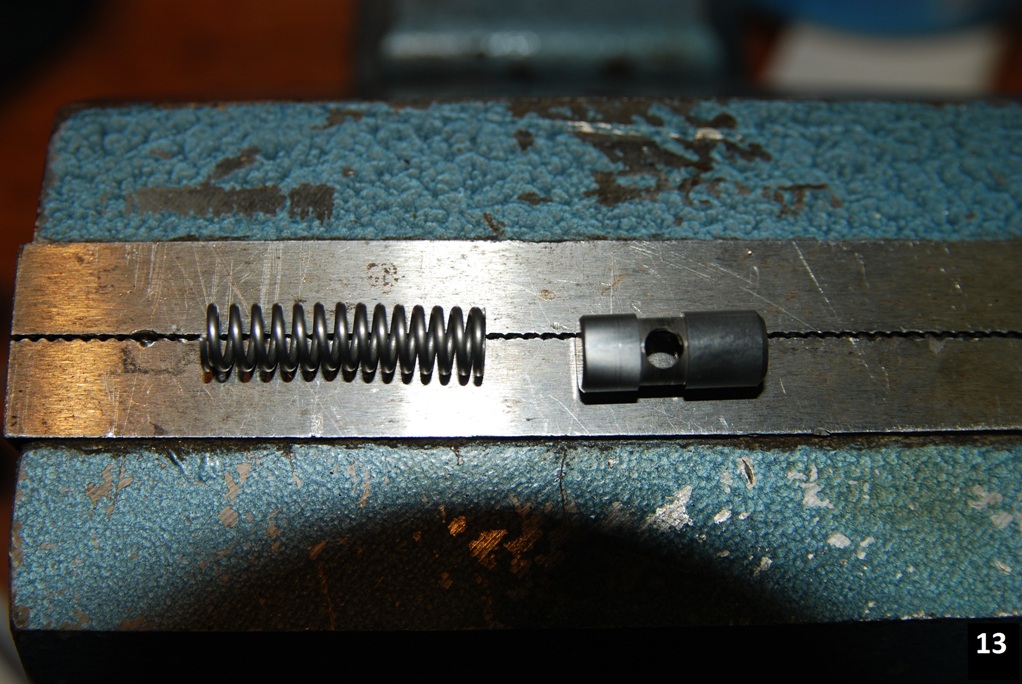 I reassembled and refitted the regulator valve. Then connected the battery and used Lexia to bleed the hydraulic system. I set up an air regulator similar to the set up shown by Gmerry previously to create the 0.5 bar pressure required for the reservoir to assist the bleeding process. Then started the car and checked for leaks. Comment: As I tackled both slide valves at the same time I'm not sure which has delivered the present correct functioning of the rear suspension (keeping the fingers crossed that it lasts). However Travlician had success only tackling the solenoid slide valve. Therefore, if your car develops this problem, I would recommend dealing with the solenoid slide first. It's very straightforward as detailed above. Then see if it is successful. If not, then go for the hydraulic isolation slide valve. Regards, Phil C. |
||
|
|
|
||
|
C6Dave
|
|
||
|
Member No: #1
Location: Northumberland |
Great tutorial. I'll print it to a downloadable .pdf next week | ||
|
|
|
||
|
Gobxoy
|
|
||
  Member No: #786
Location: Essex |
 and nice work cruiserphil. Loved the "protection sleeve" (rawplug). and nice work cruiserphil. Loved the "protection sleeve" (rawplug). Armed with the tutorial anyone who doesn't want to tackle the job, could get an indepenedant Citroën specialist to do it? |
||
|
|
|
||
|
gmerry
|
|
||
|
Member No: #21
Location: Scotland |
Hi Phil, great post. Did you conclude what was causing the problem (sticking spool due to dirt? Weak solenoid?) External corrosion is pretty fearsome in this location. I've sprayed this area with various concoctions to try and reduce corrosion. I might try and get some protective tape on all the connections before this winter's salting starts. Regards G |
||
|
|
|
||
|
cruiserphil
|
|
||
|
Member No: #38
Location: Celbridge |
G, It was not clear from the condition of the valve slides whether they were sticking. But so far so good - rear of car is behaving. Based on Travlician's result my money would be on the solenoid valve sticking. That's why I suggest if you get the problem to just remove the solenoid and give its slide a clean up. Interesting thought by the way on moisture retention of LDS. I don't know the history of the LDS - the car is 6 years old and doubt it's been changed but there was no corrosion on the slides, bores or spool that I could see! I still plan to change the LDS as a preventative measure though. Regards, Phil C. |
||
|
|
|
||
|
Clive980
|
|
||
  Member No: #901
Location: Leeds |
A couple of important lessons learned for anyone changing suspension spheres. 1. When screwing on the new sphere FIRST place the seal in the slot on the mount and not on the sphere. The seal has to be seated correctly otherwise it won't seal. I didn't realise this and just put the seal on the sphere then screwed the sphere on. The result was next morning my drive was covered in LDS fluid. 2. Second lesson, when removing an old sphere, once you have broken the seal (I found a good blow with an old chisel released mine) and it is turning, it should turn easily without much effort. If it doesn't turn easily then the fluid is probably still under pressure. Release the pressure before proceeding!! If you don't then it's going to pop off, with some force and spray you and car in LDS fluid. You have been warned. |
||
|
|
|
||
|
dsharples
|
|
||
  Member No: #119
Location: Woodbridge |
Just to let you all know that I had my front 3 spheres replaced (at my local dealer, using my own supplied Suplex spheres), and the ride is restored. No longer does the nose of the car buck-and-bronco over road undulations, its back to its level-nosed self.... Thank Goodness... thanks for all the advice guys... I can now feel the back though..... If someone has a Sphere-Testing device in Suffolk, I would love to know which ones have failed/are failing... |
||
|
|
|
||
|
gmerry
|
|
||
|
Member No: #21
Location: Scotland |
Tried the rattle test on the old spheres? Regards G |
||
|
|
|
||
|
Hattershaun
|
|
||
 Member No: #320
Location: Bedfordshire, UK |
dsharples wrote ... Just to let you all know that I had my front 3 spheres replaced (at my local dealer, using my own supplied Suplex spheres), and the ride is restored. No longer does the nose of the car buck-and-bronco over road undulations, its back to its level-nosed self.... Thank Goodness... thanks for all the advice guys... I can now feel the back though..... If someone has a Sphere-Testing device in Suffolk, I would love to know which ones have failed/are failing... I have a sphere pressure tester, although I'm not in Suffolk! Hertfordshire is close though. I leave it with B.L.Autos in Welwyn Garden City. Let me/them know when you are passing so arrangements can be made for a testing session. |
||
|
|
|
||
 User Colour Key: User Colour Key:Head Administrator, Administrator, C6 owner, Technical Expert, C6 Premier Discount Club |
|
Privacy Policy | Cookie Policy | Site Disclaimer | Contact Details | Warranty | Sitemap | C6 Insurance | Quick Facts | Re Call Info | Downloads | Error Codes
| Site and Graphics created by: C6Dave Forum Icons by Axialis Emotes by Seb |  |


